3
REV. 8/3/2020 INSTAXDSPX-HN3
INSTALLATION
1.
Locate the factory amp in the passenger side kick panel. Unplug and remove the amp.
2.
Install the
AX-DSPX-HN3 harness
to the vehicle and make all necessary connections, but
leave the amp turn-on wire disconnected.
3.
Connect the
AX-DSPX-HN3 harness
to the
AX-DSPX-HN3 interface
.
4.
Connect the
AX-DSPX-HN3 interface harness
to the
AX-DSPX-HN3 interface
.
5.
Download and install the
AXDSP-X app
from the
Google Play Store
or
Apple App Store
.
6.
Cycle the key on.
7.
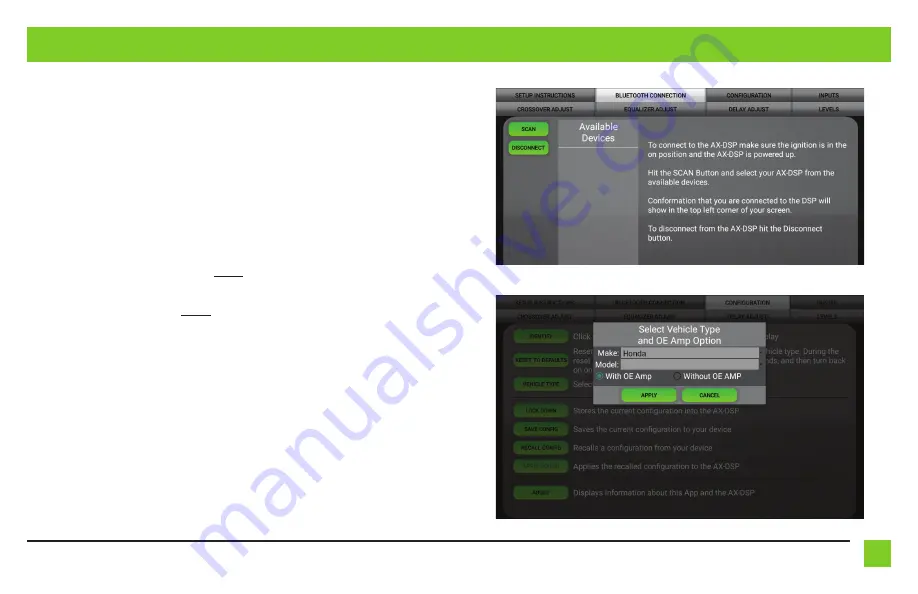
Open the app then select the
Bluetooth Connection
tab. Follow the instructions to pair the
mobile device to the interface. Refer to page 5 for more information. (Figure A)
8.
Scroll to the
Configuration
tab then select the vehicle type. Press the
Lock Down
‡ button to
save the configuration. Refer to page 6 for more information. (Figure B)
9.
Connect the amp turn-on wire.
10.
Click the
Identify
button to confirm the interface is connected properly. A chime will be heard
from the front left speaker. Test all functions of the installation for proper operation.
Note:
The outputs may need to be configured within the
Outputs
tab.
11.
Adjust the settings in the app as desired. Press the
Lock Down
‡ button to save any new
configurations.
‡ Anytime the interface is locked down the key must be cycled off then back on
Note:
The interface provides a 12-volt 1-amp output to turn on aftermarket amp(s). If installing
multiple amps, an SPDT automotive relay will be required if the amp turn-on current of all
amps combined exceeds 1-amp. Use Metra part number E-123 (sold separately) for best results.
(Figure A)
(Figure B)
Summary of Contents for AXDSPX-HN3
Page 14: ...14 ...


