Axor Allegroh 36135XX1 Installation Instructions Manual Download Page 6

6

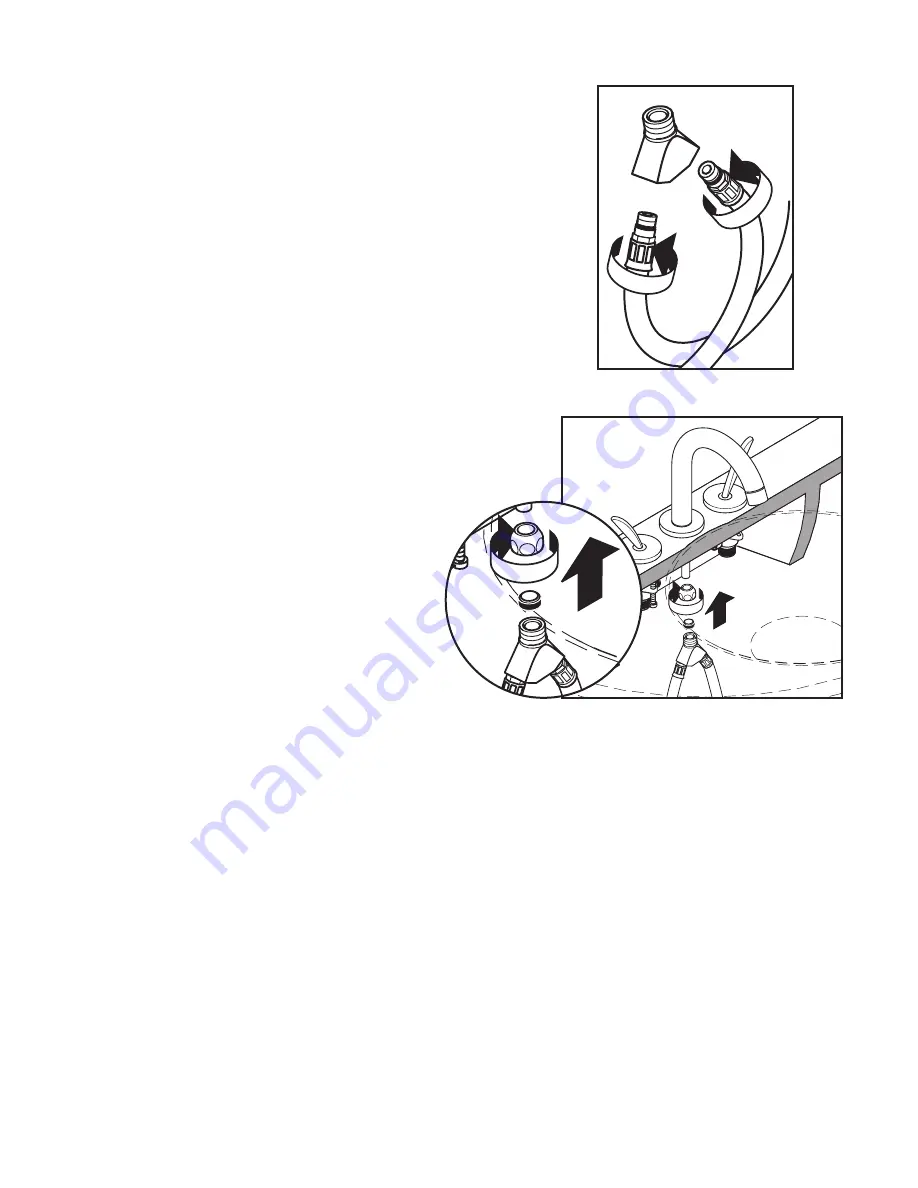
Screw the connection hoses into the mounting angle.  

Connect the mounting angle to the spout tube using 

the 10 mm compression fitting.  
The metal side of the compression ferrule must face 

up toward the spout. 

Turn to page 10 to continue the installation.

Summary of Contents for Allegroh 36135XX1

Page 1: ...Starck 10133XX1 Carlton 17135XX1 Steel 35033801 Terrano 37135XX1 Phoenix 17105XX1 Phoenix 17115XX1 Phoenix 17114XX1 Terrano 37136XX1 Phoenix 17104XX1 Carlton 17235XX1 Installation Instructions Warranty ...

Page 2: ... Starck 10133XX1 Phoenix 17105XX1 Phoenix 17104XX1 Phoenix 17114XX1 ...

Page 3: ... Carlton 17135XX1 Carlton 17235XX1 Phoenix 17115XX1 Steel 35033801 ...

Page 4: ...5 gpm max Flow rate all other models 2 2 gpm max Requires 1 2 hot and cold supply hoses not included Please know and follow all applicable local plumbing codes when setting the temperature on the water heater Installation Considerations For best results Hansgrohe recommends that this unit be installed by a licensed profes sional plumber Please read over these instruc tions thoroughly before begin ...

Page 5: ...lves Tighten the tensioning screws Place the handles over the valve mounting nuts Tighten the handles by rotating the escutcheons clockwise The handles should be parallel to the basin Install the spout Position the sealing ring escutcheon and spout on the mounting surface Install the mounting flange Thread the collar onto the stud and tighten ...

Page 6: ...ses into the mounting angle Connect the mounting angle to the spout tube using the 10 mm compression fitting The metal side of the compression ferrule must face up toward the spout Turn to page 10 to continue the installation ...

Page 7: ... at the proper height Rest the valve on the mounting surface Turn the valve so that the outlet points toward the center Tighten the mounting nut Tighten the tensioning screws Installation Carlton Phoenix Terrano and Steel Carlton Phoenix and Steel only Install the handle escutcheons Carlton Phoenix and Terrano only Position the handle over the valve stem Rotate the lower part of the handle clockwi...

Page 8: ...ews Install the spout Carlton only Place the spout and sealing ring on the mounting surface Install the mounting flange Thread the collars onto the studs and tighten Steel only Install the color rings red on the left and blue on the right Install the handle snap connectors Position the handle over the valve Push it firmly into place on the snap connector ...

Page 9: ...g on the mounting surface Install the mounting flange Thread the collar onto the stud and tighten Terrano 37136XX1 Phoenix only Position the spout and sealing ring on the mounting surface Install the mounting flange Thread the collar onto the stud and tighten ...

Page 10: ...e hose into the valve outlet Tighten the compression nut wrench tight Use two wrenches Do not allow the connecting hose to twist or it will become loosened from the spout All models Install the drain pull rod Finish the installation Install the 1 2 hot and cold supply lines not included Install the pop up drain 7 1 6 1 1 1 6 ...

Page 11: ...nd replace Install the flexible white sealing gasket on the flange Place it in the sink outlet Install the black mack gasket white friction ring and retainer nut on the flange Do not tighten the nut against the bottom of the sink at this time Thread the tee and tailpiece to the flange The pivot must face the faucet Turn the drain assem bly if necessary Tighten the retainer nut Place the plunger as...

Page 12: ...12 1 9 2 10 12 7 13 3 11 2 6 5 7 8 3 2 3 19 18 7 15 16 14 17 4 24 7 5 16 ...

Page 13: ...17104 17105 13185XX0 other models 13085XX0 12 drain pull rod 94028XX0 13 fixing set 94138000 14 Terrano lever cold 37296XX0 15 Terrano lever hot 37295XX0 16 aerator 96336XX0 17 pull rod knob 96335XX0 18 fixing set 13961000 19 spout 96521XXX 20 Phoenix lever cold 96629XX1 21 Phoenix lever hot 96628XX1 22 pull rod 92620XX0 23 Phoenix cross handle 96793XX1 24 fixing set 96016000 XX Color code 00 chro...

Page 14: ...tor cpl 96683800 2 Steel handle 35293800 3 color ring cold hot water 97127000 4 escutcheon 97128800 5 connection hose 94071001 6 cold cartridge 94008000 7 Fixation cpl 96016000 8 Lift rod 96657800 9 hot cartridge 94009000 9 6 5 1 2 3 4 7 8 ...

Page 15: ... to comply with the needs of the market with regard to design and functionality To avoid damage and returns it is necessary to consider certain criteria when cleaning Cleaning Materials for Faucets and Showers Acids are a necessary ingredient of cleaning materials for removing lime however please pay attention to the following points when cleaning faucets and showers Only use cleaning materials wh...

Page 16: ...luegrass Lakes Parkway Alpharetta Georgia 30004 Attention Technical Service if required by Hansgrohe When warranty service is completed any repaired or replacement product or part will be returned to you postage prepaid EXCLUSIONS AND LIMITATIONS REPAIR OR REPLACEMENT OR IN LIMITED CIRCUMSTANCES REFUND OF THE PURCHASE PRICE AS PROVIDED UNDER THIS WARRANTY IS THE EXCLUSIVE REMEDY OF THE PURCHASER H...

Reviews: