background image


Preface  

Before commissioning the machine, please read these operating instructions thoroughly 
and get familiar with the machine. Please also make sure that all persons operating the 
machine have read and understood the operating instructions beforehand.   
Keep these operating instructions in a safety place nearby the machine.   


 Information  
The operating instructions include indications for safety-relevant and proper 
installation, operation and maintenance of the machine. The continuous observance 

of all notes included in this manual guarantee the safety of persons and of the machine.   

 
The manual determines the intended use of the machine and includes all necessary information for 
its economic operation as well as its long service life.   
 
The illustration and information included in the present manual can possibly deviate from the current 
state of construction of your machine. Being the manufacturer we are continuously seeking for 
improvements and renewal of the products. Therefore, changes might be performed without prior 
notice. The illustrations of the machine may be different from the illustrations in these instructions with 
regard to a few details. However, this does not have any influence on the operability of the machine. 
Therefore, no claims may be derived from the indications and descriptions.   
 
Your suggestion with regard to these operating instructions are an important contribution to optimising 
our work which we offer to our customers. For any questions or suggestions for improvement, please 
do not hesitate to contact our service department.   


 WARNING


Failure to read, understand and follow the instructions in this manual may result 
in fire or serious personal injury—including amputation, electrocution. 
The owner of this machine/tool is solely responsible for its safe use. This 

responsibility includes but is not limited to proper installation in a safe environment, personnel 
training and usage authorization, proper inspection and maintenance, manual availability and 
comprehension, application of safety devices, cutting/sanding/grinding toolb integrity, and the 
usage of personal protective equipment. 
The manufacturer will not be held liable for injury or property damage from negligence, 
improper training, machine modifications or misuse. 


Summary of Contents for AC118CE

Page 1: ...AC118CE Cyclone Extractor AT M 16 08 2019 BOOK REF 007840 Code 105845 Original Instructions ...

Page 2: ... Street Laizhou Shandong 261400 China Mainland and complies with the relevant essential health and safety requirements 2006 42 EC 06 42 EC Annex I 05 2006 EN 62233 2008 EN 60335 2 69 2012 EN 60335 1 2012 A11 2014 30EU declares that the machinery described This machine complies with the following directives EU Declaration of Conformity EN 55014 1 2017 EN 55014 2 2015 EN 61000 3 2 2014 EN 55014 1 20...

Page 3: ......

Page 4: ... notice The illustrations of the machine may be different from the illustrations in these instructions with regard to a few details However this does not have any influence on the operability of the machine Therefore no claims may be derived from the indications and descriptions Your suggestion with regard to these operating instructions are an important contribution to optimising our work which w...

Page 5: ...ossible hazardous conditions This manual uses a series of symbols and signal words intended to convey the level of importance of the safety messages The progression of symbols is described below Remember that safety messages by themselves do not eliminate danger and are not a substitute for proper accident prevention measures WARNING Some dust created by power sanding sawing grinding drilling and ...

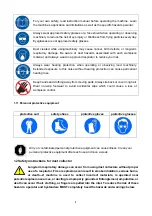
Page 6: ...hands and clothing away from moving parts Always tie back or cover long hair Wear non slip footwear to avoid accidental slips which could cause a loss of workpiece control 1 11 Personal protective equipment Dirty or contaminated personal protective equipment can cause illness Clean your personal protective equipment after each use and once a week 1 2Safety instructions for dust collector Long term...

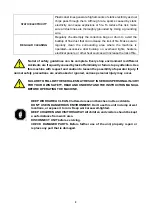
Page 7: ... the machine unattended or doing any service cleaning maintenance or adjustments SUSPENDED DUST PARTICLES AND IGNITION SOURCES Do not operate the dust collector in areas were explosion risks are high Areas of high risk include but are not limited to areas near pilot lights open flames or other ignition sources FIRE SUPPRESSION Only operate the dust collector in locations that contain a fire suppre...

Page 8: ...op environment is different Accidents are frequently caused by lack of familiarity or failure to pay attention Use this machine with respect and caution to lessen the possibility of operator injury If normal safety precautions are overlooked or ignored serious personal injury may occur FAILURE TO FOLLOW THESE RULES MAY RESULT IN SERIOUS PERSONAL INJURY FOR YOUR OWN SAFETY READ AND UNDERSTAND THE I...

Page 9: ......

Page 10: ... appliances Make sure that the appliance is connected to an outlet having the same configuration as the plug No adaptor should be used with this appliance If the appliance must be reconnected for use on a different type of electric circuit qualified service personnel should make the reconnection For a permanently connected appliance This appliance must be connected to a grounded metal permanent wi...

Page 11: ......

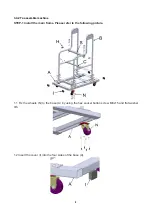
Page 12: ...ine STEP 1 Install the main frame Please refer to the following picture 1 1 Fix the wheels N to the base A by using the hex socket button screw M6x15 and flat washer Φ6 1 2 Insert the cover I into the four sides of the base A ...

Page 13: ...r Φ8 1 4 Fix the transom C to the support B by using the hexagon socket cap head bolt M8x40 washer Φ8 and hex nut M8 1 5 Fix the connecting tube S to support B by using the hexagon socket cap head bolt M8x70 flat washer 8 and hex nut M8 1 6 Insert the big cover H to the two sides of connecting tube S ...

Page 14: ...llowing picture 2 1 Fix the support connecting bar K to the support connecting ring J one by one by using the hexagon socket button screw M8x15 flat washer 6 spring washer and hex nut m6 2 2 Tighten the collector bag D to the drum lip G by using the bag clamp Q ...

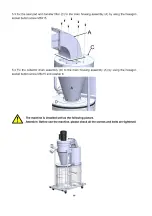
Page 15: ... E to the inlet F 3 2 Fix the inlet F to the main house assembly L by using the Philip head screw M5x8 3 3 Fix the connector M and seal pad I to the main house assembly L by using the hexagon socket button screw M8x16 STEP 4 Fix the collector bag R to the canister filter O by using the bag clamp P ...

Page 16: ...Install the main housing assembly A to the support base B by using the hexagon socket button screw M8x16 and flat washer 8 5 2 Fix the main housing assembly A to the support base B by using the hexagon socket head cap bolt M8x40 and washer 8 ...

Page 17: ......

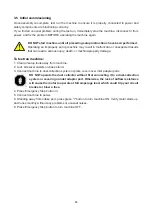
Page 18: ...ine property damage To test run machine 1 Clear all setup tools away from machine 2 Lock all swivel casters on base stand 3 Connect machine to dust collection system or place covers over inlet adapter ports DO NOT operate the dust collector without first connecting it to a dust collection system or covering an inlet adapter port Otherwise the lack of airflow resistance will cause the motor to oper...

Page 19: ......

Page 20: ......

Page 21: ......

Page 22: ......

Page 23: ...bly 3 Fix the seal pad and new canister filter to the main housing assembly by the screw M6X15 5 6 Washing canister filter For a more thorough cleaning every few months under heavy use wash the filter by hand To wash canister filter by hand DISCONNECT MACHINE FROM POWER Remove canister filter see Removing Replacing Canister Filter on this page Rinse filter outside under warm water IMPORTANT DO NOT...

Page 24: ......

Page 25: ...lection ducting problem 3 Canister filter clogged at fault 4 Dust collector too far from machine or undersized for dust collection system 5 Run capacitor at fault 6 Motor bearings at fault 1 Allow motor to cool reset overload if necessary 2 Clear blockages seal leaks use smooth wall duct eliminate bends close other branches 3 Clean canister filter replace canister filter 4 Move closer to machine r...

Page 26: ...Remove ducting from dust collector inlet and unblock restriction A plumbing snake may be necessary 4 Relocate dust collector closer to point of suction re secure ducts remove sharp bends 5 Only process lumber with less than 20 moisture content 6 Seal eliminate all ducting leaks close dust ports for lines not being used Refer to Designing the System in manual 7 Open 1 or 2 more blast gates to diffe...

Page 27: ...24 8 Diagram and part list 8 1 Diagram ...

Page 28: ......

Page 29: ......

Page 30: ......

Page 31: ......

Page 32: ...together with household waste material By law they must be collected and recycled separately EU Countries Only The Axminster guarantee is available on Craft Trade Engineer AirTools CNCTechnology Series machines Buy with confidence from Axminster So sure are we of the quality we cover all parts and labour free of charge for three years For more information visit axminster co uk 3years ...

Reviews: