background image

AXIS Q3505–VE Fixed Dome Network Camera

16. Weather shield
17. Status Led
18. Function button
19. Spring
20. Heater Caution!

Caution!

Caution! The heater may be hot
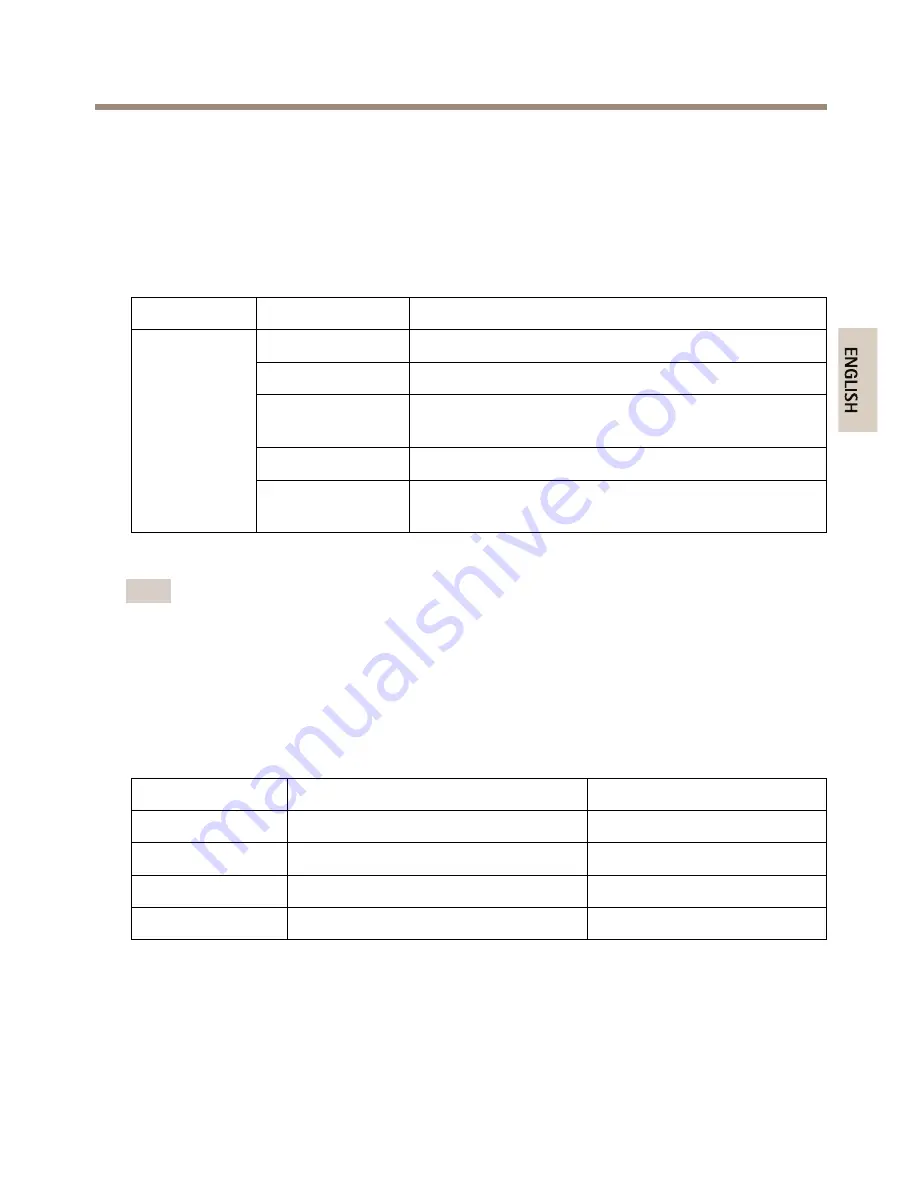
LED Indicators

LED

Color

Indication

Unlit

Connection and normal operation

Amber

Steady during startup. Flashes during firmware upgrade.

Amber/red

Flashes amber/red if network connection is unavailable
or lost.

Red

Flashes red for firmware upgrade failure.

Status

Green

Shows steady green for 10 seconds for normal operation
after restart.

Note

• The Status LED can be configured to flash while an event is active.

• The Status LED can be configured to flash for identifying the unit. Go to

Setup > System

Options > Maintenance

.

Status LED Behavior and Buzzer Signal for Levelling Assistant

For information on the Function button used for levelling the camera, see

Connectors and Buttons

.

Color

Buzzer

Camera position

Fixed green

Continuous beep

Level

Flashing green

Fast interval

Almost level

Flashing orange

Medium interval

Not level

Flashing red

Slow interval

Far from level

Connectors and Buttons

For specifications and operating conditions, see

page 13

.

11

E

N

G

L

IS

H

Summary of Contents for Q3505-V

Page 1: ...AXIS Q3505 VE Fixed Dome Network Camera ENGLISH Installation Guide ...

Page 2: ... SDHC and SDXC are trademarks or registered trademarks of SD 3C LLC in the United States other countries or both Also miniSD microSD miniSDHC microSDHC microSDXC are all trademarks or registered trademarks of SD 3C LLC in the United States other countries or both Regulatory Information Europe This product complies with the applicable CE marking directives and harmonized standards Electromagnetic C...

Page 3: ...sed of together with household or commercial waste Directive 2012 19 EU on waste electrical and electronic equipment WEEE is applicable in the European Union member states To prevent potential harm to human health and the environment the product must be disposed of in an approved and environmentally safe recycling process For information about your nearest designated collection point contact your ...

Page 4: ......

Page 5: ...dicates a hazardous situation which if not avoided could result in death or serious injury CAUTION Indicates a hazardous situation which if not avoided could result in minor or moderate injury NO NO NOTICE TICE TICE Indicates a situation which if not avoided could result in damage to property Other Message Levels Important Indicates significant information which is essential for the product to fun...

Page 6: ... for service matters Transportation NO NO NOTICE TICE TICE When transporting the Axis product use the original packaging or equivalent to prevent damage to the product Battery The Axis product uses a 3 0 V BR CR2032 lithium battery as the power supply for its internal real time clock RTC Under normal conditions this battery will last for a minimum of five years Low battery power affects the operat...

Page 7: ...er that looks clean to the eye and never polish the surface Excessive cleaning could damage the surface For general cleaning of the dome cover it is recommended to use a non abrasive solvent free neutral soap or detergent mixed with pure water and a soft clean cloth Rinse well with pure lukewarm water Dry with a soft clean cloth to prevent water spotting Never use harsh detergents gasoline benzene...

Page 8: ...8 ...

Page 9: ...9 2 Study the hardware overview See page 10 3 Study the specifications See page 13 4 Install the hardware See page 16 5 Access the product See page 19 Package Contents For optional accessories see axis com AXIS Q3505 VE Fixed Dome Network Camera Secure Torx L key I O connector Extra cable gaskets Cable Gasket M20 Cable Gasket M20 3mm Weather shield AXIS Conduit Adapter U Shape 30mm A Installation ...

Page 10: ...icking Calibrate from the Server Maintenance web page System Options Maintenance 8 9 11 13 19 14 15 16 1 2 3 4 5 6 17 18 7 12 10 20 1 Network connector 2 Control button 3 I O connector 4 Audio out 5 Audio in 6 SD card slot 7 AC DC connector for power accessory 8 Mounting bracket 9 Side lid covering side hole in mounting bracket 10 Conduit adaptor 11 Locking clip 12 Network cable 13 Unit casing 14 ...

Page 11: ...nds for normal operation after restart Note The Status LED can be configured to flash while an event is active The Status LED can be configured to flash for identifying the unit Go to Setup System Options Maintenance Status LED Behavior and Buzzer Signal for Levelling Assistant For information on the Function button used for levelling the camera see Connectors and Buttons Color Buzzer Camera posit...

Page 12: ... buttons on the Live View page or by an Action Rule The output will show as active shown under System Options Ports Devices if the alarm device is activated Digital input An alarm input for connecting devices that can toggle between an open and closed circuit for example PIRs door window contacts glass break detectors etc When a signal is received the state changes and the input becomes active sho...

Page 13: ...is level when the buzzer beeps continuously To view the Status LED Press the button once to light up the Status LEDs Press again to turn them off The LEDs will turn off automatically after 10 seconds Multicable sold separately The multicable can be purchased from an Axis reseller for connecting external equipment to the Axis product The cable provides the following connectors Audio connector See C...

Page 14: ...ote This pin can only be used as power out 12 V D C Max load 50 mA Digital input Connect to pin 1 to activate or leave floating unconnected to deactivate 0 to max 30 V DC Configurable Input or Output 3 4 Digital output Connected to pin 1 when activated floating unconnected when deactivated If used with an inductive load e g a relay a diode must be connected in parallel with the load for protection...

Page 15: ...as input 4 I O configured as output Audio Connector 3 5 mm audio connectors stereo 1 2 3 1 Tip 2 Ring 3 Sleeve Audio Input Microphone Line in Balanced Microphone Hot In Unbalance Microphone In Line In Balanced Microphone Cold In Ground Audio Output Line out mono Ground 15 ENGLISH ...

Page 16: ... required for routing the cable or cables in the wall 2 Route the network cable and the multicable if required through the wall and through the hole or holes in the mounting bracket The cables can be routed along the wall and through the side hole on the mounting bracket To do this detach the locking clip and side lid in the mounting bracket after attaching mounting bracket to wall see Attach Moun...

Page 17: ... required later Connect the Cables and Attach Unit Casing to Mounting Bracket 1 Insert the SD memory card in the camera unit optional 2 Push the network cable through the black cable gasket in one of the holes in the unit casing using the connector guard provided Pull the network cable back slightly so that the cable gasket adjusts itself on the cable It is recommended to route the cable through t...

Page 18: ...2 Small lines on optic mount that indicate a pan increment of 3 3 Lines on optic mount that indicate a pan increment of 15 4 Lines on lens cover to help ensure camera is level 1 Pan tilt and rotate the camera to cover the area under surveillance It is possible to pan 360 and tilt to an angle of 90 2 Pan and rotate the lens to adjust image Use the 2 lines on the lens cover to ensure the camera is l...

Page 19: ...er attach the dome cover to the unit casing by tightening the 4 screws The installation is now complete Access the Product Use the tools provided on the Installation and Management Software CD to assign an IP address set the password and access the video stream This information is also available from the support pages on www axis com techsup Focus Zoom If you have selected Optical zoom for install...

Page 20: ...nitoring Go to PTZ Preset Positions and follow the online instructions to set the focus In order to be able to retain this focus position after restarting the camera enter a name for this preset in the Current position field and select the Use current position as Home option If you calibrate the optics while in this Optical zoom for monitoring mode select this preset from the Available positions d...

Page 21: ...ry default settings If no DHCP server is available on the network the default IP address is 192 168 0 90 5 Using the installation and management software tools assign an IP address set the password and access the video stream It is also possible to reset parameters to factory default via the web interface Go to Setup System Options Maintenance Further Information The User Manual is available at ww...

Page 22: ...Installation Guide Ver M1 14 AXIS Q3505 VE Fixed Dome Network Camera Date April 2014 Axis Communications AB 2014 Part No 54768 ...

Reviews: