Wi
n
d
ow
s
AXIS 540/640
User’s Manual
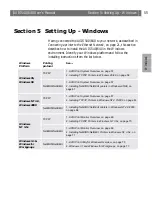
Section 5: Setting Up - Windows
59
4. AXIS IP Installer opens. Click the serial number of the AXIS
540/640 that appears in the server list. Restart the AXIS 540/640
if it does not appear in the list.
Notes:
❏
The serial number is located on the underside label of the AXIS
540/640.
❏
If you have an active DHCP server in your network, you should
not use AXIS IP Installer to set the IP address. You should instead
follow the installation instructions available in Installing TCP/IP
Printer Ports, on page 60.
5. Enter the desired IP address in the appropriate fields and click the
Set IP address
button.
6. The AXIS IP Installer closes and the Installation Wizard starts.
Select the port you want to install from the list and click
Next>
.
7. AXIS Print System searches your computer and the network for a
location for a suitable printer driver for the printer. Click
Next>
if
a printer driver is found. If not, you have to manually find a
printer driver using the
Select
button before clicking the
Next>
button.
8. Enter a name for the printer, select if you want to make it your
default printer and select if you want to produce a test page. Click
Finish
.
The printer is now installed on your computer. The printer will
feature in the My Printers window of AXIS Print System as well as in
the Printers folder of the Windows operating system.
If you want to change the default name or the password of the AXIS
540/640, use the Configuration Wizard that is available from the User
mode of the Web interface. Refer to Using a Web browser, on page
109.
Note:
❏
If you want to install LPR printer ports instead of Raw TCP/IP
printer ports, start the Microsoft Add Printer Wizard and refer to
the AXIS Print Monitor on-line help for instructions. The help
file is available in the folder where AXIS Print System is installed.

