Axion AXN-6979 User Manual Download Page 5


3. Right


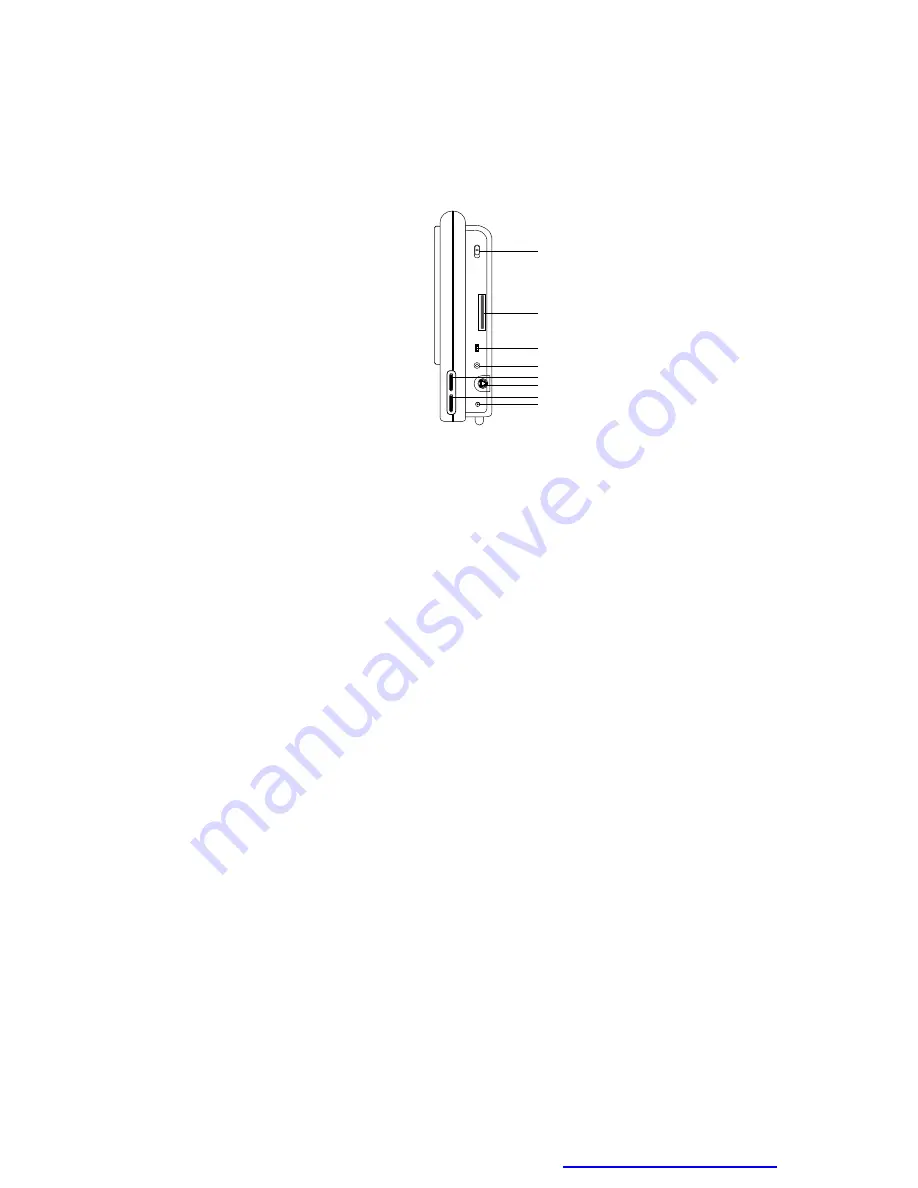
1). Power On/Off Switch 

Turns the player on or off. 

2). Column for Binding 
3). AV In/Out Switch 


Switches the A/V jack between input and output. 

4). A/V Jack 

Connects to an external audio/video source (A/V in) or player 
(A/V out) like a monitor or amplifier. 

5). Brightness Control 

Adjust the brightness. 

6). DVD Port 

Connects to the monitor with the DIN cable. 

7). Volume Control 

Adjust the Volume. 

8). DC Input Jack 

Connects to the AC to DC adapter or car cigarette lighter adapter. 


PDF created with pdfFactory Pro trial version 

www.pdffactory.com

1

1

2

2

3

3

4

4

5

5
6

6
7

7

8

8

Summary of Contents for AXN-6979

Page 1: ...7 Dual Screen Portable DVD Player AXN 6979 PDF created with pdfFactory Pro trial version www pdffactory com...

Page 2: ...cifications 18 I Trouble Shooting 18 What s included 1 x AC to DC Adapter 1 x Remote Control with Battery CR2025 1 x Instruction Manual 1 x AV Cable 1 x Car Cigarette Lighter Adapter 2 x Straps 1 x Di...

Page 3: ...nything heavy on the unit To ensure proper ventilation and proper operation never cover or block openings with a cloth or other material Keep the unit away from an open flame such as fire candle etc D...

Page 4: ...disc is playing press to pause playback Press again to resume playback 4 Remote Sensor Receives signals from remote control 5 Next Button Skip to the next titles chapters or tracks NOTE Press this bu...

Page 5: ...io video source A V in or player A V out like a monitor or amplifier 5 Brightness Control Adjust the brightness 6 DVD Port Connects to the monitor with the DIN cable 7 Volume Control Adjust the Volume...

Page 6: ...a set of headphones here Disable the internal speakers 3 Headphone Jack 2 Connect a set of headphones here Disable the internal speakers 5 Top 1 Open Switch Opens the disc tray 6 PDF created with pdf...

Page 7: ...udio video source 6 Monitor Port Connects to the DVD port with the Din cable 1 Strap Connector Attach one end of a carrying strap here 2 Headphone Jack 1 Connect a set of headphones here Disable the i...

Page 8: ...cigarette lighter adapter into the DC jack on the unit then plug the other end into the cigarette lighter socket Note Unplug the apparatus from the power source when not in use for an extended period...

Page 9: ...4 Positing the DVD Player Monitor on Headrest Step 1 Step 2 Note Install the DVD player Monitor according to the above steps 9 PDF created with pdfFactory Pro trial version www pdffactory com...

Page 10: ...LO W ANG LE 1 5 1 6 1 7 1 8 1 9 2 0 Display information about the DVD such as title chapter number track number and time 2 Setup Enter or exit the setup menu 3 Fast Forward Scan forward at 2 4 8 16 or...

Page 11: ...ack 8 Play Pause Start playback or pause playback 9 Up Down Enter Right Left Navigate in the menus and confirm your selection 10 Numbers Use to select an item in a menu or enter a password 11 Audio Se...

Page 12: ...Enlarge the image 2 3 or 4 times the original size 18 Return Press once to return to the previous menu 19 Slow Play forward or backward at 1 2 1 4 1 8 and 1 16 times speed 20 Angle Change the viewing...

Page 13: ...isplay Normal PS When the player outputs signal to a normal TV Wide screen images are shown on the screen but with some parts cropped automatically Normal LB When the player outputs signal to a normal...

Page 14: ...en 2 Video Quality Setup 1 In Setup menu Press the or button to select Video Quality Setup and is highlighted Press ENTER to enter the video quality setup page 2 Press the ENTER button Brightness is h...

Page 15: ...enter the Preference Page 2 Press the ENTER button Audio is highlighted 3 Press the or button to select the other menus in preference page 4 Press to enter the sub menu 5 Press the or button to select...

Page 16: ...pressing the or button in preference page And Press to enter the sub menu Press ENTER to make the setting return to the factory set mode NOTE The parental setting is not affected by the default reset...

Page 17: ...the DVD or Monitor Simply plug in the headset to either Headphone 1Jack or 2 jack on the Right DVD or Left Monitor DVD Monitor Plugging into Headphone jack 1 2 disable the internal speakers 17 PDF cr...

Page 18: ...ight NTSC 7 Inches DC 9 12V 41 95 F 5 35 C 10 75 14 140 F 10 60 C 8 19 X 6 69 X1 26 inches 208 X 170 X 32 mm 0 41Kg Design and Specifications are subject to change for product improvement without noti...

Page 19: ...beginning of a movie you won t be able to This part of the movies often programmed to prohibit skipping through it IR sensor inoperative 1 Verify that the batteries in the remote are fresh 2 Verify th...

Page 20: ...rized product modification or failure to follow instructions supplied with the product B Repair or attempted repair by anyone not authorized by AXN C Any damage of the product due to shipment D Remova...

Page 21: ...clearly and marked on the outside of the packing All RMA products should be returned in secured packaging preferably in the original package with the complete set of accessories We recommend that you...

Page 22: ...or limitation of incidental or consequential damages or allow limitations on how long an implied warranty lasts so the above limitations or exclusion may not apply to you This warranty gives you speci...

Reviews: