background image

eBOX710-521-FL Series u

ser’s Manual 


Configuring SATA for RAID 

67 


3.5. 

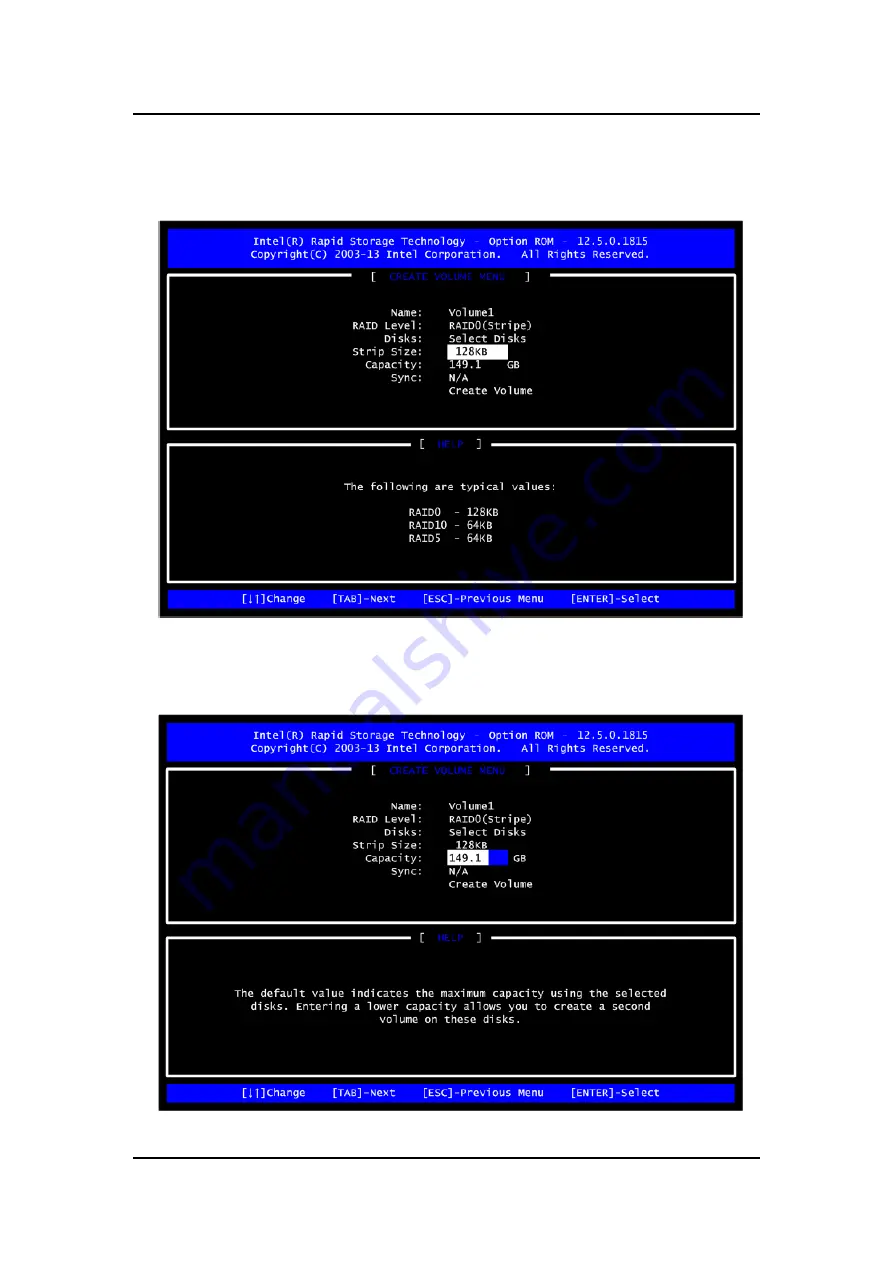
Set the stripe block size. The KB


is the standard unit of stripe block size. The stripe block 

size can be 4KB to 128KB. After the setting, press <Enter> for the array capacity. 


3.6. 

After setting all the items on the menu, select Create Volume and press  <Enter> to start 
creating the RAID array. 


Summary of Contents for eBOX710-521-FL Series

Page 1: ...eBOX710 521 FL Series Embedded System User s Manual...

Page 2: ...r usefulness of any information in this document Axiomtek does not make any commitment to update any information in this manual Axiomtek reserves the right to change or revise this document and or pro...

Page 3: ...tly onto the screen 6 Do not leave equipment in an uncontrolled environment where the storage temperature is below 40 or above 80 as it may damage the equipment 7 Do not open the system s back cover I...

Page 4: ...n against electric shock not classified 2 Degree of protection against ingress of water IP40 3 Equipment not suitable for use in the presence of a flammable anesthetic mixture with air oxygen or nitro...

Page 5: ...tention to components requiring designated products for cleaning as mentioned below Cloth A piece of cloth is the best tool to use when rubbing up a component Although paper towels or tissues can be u...

Page 6: ...tek is a trademark of Axiomtek Co Ltd IBM PC AT PS 2 VGA are trademarks of International Business Machines Corporation Intel and Pentium are registered trademarks of Intel Corporation MS DOS Microsoft...

Page 7: ...Installation of 2 5 SATA Device 16 2 3 Installation of SO DIMM 17 2 4 Installation of Mini PCIe Module Full size 18 2 5 Installation of Flexible I O Modules 19 2 6 Installation of PCIe card 21 SECTION...

Page 8: ...HDA1 Optional 36 3 3 17 Digital I O CN11 optional 36 SECTION 4 BIOS SETUP UTILITY 37 4 1 Starting 37 4 2 Navigation Keys 37 4 3 Main Menu 38 4 4 Advanced Menu 39 4 5 Chipset Menu 51 4 6 Boot Menu 56 4...

Page 9: ...e i7 i5 i3 Celeron processors 35W It comes with an IP40 rated heavy duty aluminum extrusion design offers 24V DC power input with power protection and supports 40 C to 70 C extended temperature range...

Page 10: ...ports 9th 8th generation Intel Xeon Core i7 i5 i3 and Celeron 35 watt processors along with high flexibility and multi functional design that make it the best solution for smart factory applications F...

Page 11: ...I3 8100T 35W processor Intel Pentium G5400T 35W processor Intel Celeron G4900T 35W processor Chipset Intel C246 BIOS American Megatrends Inc UEFI Unified Extensible Firmware Interface BIOS System Memo...

Page 12: ...1 x AT ATX Quick switch 1 x Reset switch Antenna SIM 4 x SMA type connector openings for antenna 2 x Internal SIM slot TPM 2 0 1 x ST33HTPH2E32AHB4 1 2 3 System Specifications Watchdog Timer 1 255 sec...

Page 13: ...n 5 1 2 4 Driver Contents Please download the following eBOX710 521 FL drivers from Axiomtek official website Ethernet Chipset Graphic Serial Port USB 3 1 Intel ME User Manual Note All specifications...

Page 14: ...eBOX710 521 FL Series user s Manual Introduction 6 1 3 Dimensions The following diagrams show dimensions and outlines of the eBOX710 521 FL 1 3 1 System Dimensions...

Page 15: ...oduction 7 1 3 2 Wall mount Bracket Dimensions Users can get 6pcs truss head M3 6L screws for fixing the wall mount kit from the accessories box Note When users install wall mount kit please turn the...

Page 16: ...eBOX710 521 FL Series user s Manual Introduction 8 1 3 3 Din Rail Bracket Dimensions Users can get 6pcs truss head M3 6L screws for fixing the wall mount kit from the accessory box...

Page 17: ...g figures show I O outlets on the eBOX710 521 FL Front View 1 1 x Reset button 7 System LEDs 2 1 x Power button 8 1 x Remote power switch 3 2 x Swappable HDD tray 9 1 x HDMI 1 4 4 4 x Antenna opening...

Page 18: ...eBOX710 521 FL Series user s Manual Introduction 10 Rear View 12 1 x PCIe x4 slot 15 1 x DVI I 13 Flexible I O window 16 2 x RS232 422 485 COM 1 14 4 x USB 3 2 Gen2 17 24VDC power input...

Page 19: ...Grease x 1 Terminal Block x 1 Remote Switch Cable x 1 Foot Pad x 4 Screw Pack x 1 1 6 Model List eBOX710 521 FL DC 6GbE Fanless Expandable System with LGA1151 9th 8th gen Intel Intel Xeon Core i7 i5 i...

Page 20: ...eBOX710 521 FL Series user s Manual Introduction 12 This page is intentionally left blank...

Page 21: ...on 2 1 Installation of CPU Step 1 Turn off the system and unplug the power cord Step 2 Loosen four screws to remove top cover Step 3 Remove the warning label and disengage load lever Disengage load le...

Page 22: ...which aligns with connection 1 indicator chamfer on the socket and notice processor keying features that line up with posts along socket walls Grasp the processor with thumb and index finger along th...

Page 23: ...Step 5 Align pins of the CPU with pin holes of the socket While installing the CPU pay attention to the CPU s orientation by aligning the arrow mark on the CPU with the arrow key on the socket Step 6...

Page 24: ...power cord Step 2 Loosen two of the SATA drive tray s screws and extract the SATA HDD drive tray Step 3 Turn the SATA drive tray upside down to install SSD HDD and then fasten the four HDD screws to...

Page 25: ...ews on the top heatsink which are used to fasten the heatsink to the chassis Step 3 Located the dual DDR4 SO DIMM sockets on main board Step 4 Locate the memory module insert a gold colored contact in...

Page 26: ...the system and unplug the power cord Step 2 Turn the system upside down to locate screws at the bottom and loosen all screws Step 3 Identify the two full size mini PCIe slots insert a mini PCIe modul...

Page 27: ...r to their respective quick manuals 1 x GbE Kit RJ45 1 32CH DIO Kit DB32 1 1 x CAN Bus CAN Open Kit DB9 1 1 x Audio kit 2 x RS232 COM3 4 via cable on flexible IO window Steps 1 Prepare the optional fl...

Page 28: ...FL Series user s Manual Hardware Installation 20 Step 4 Assemble I O cable to fix the I O bracket then fasten dual screws of the Flexible I O Window Step 5 Fasten the bottom cover with all screws onto...

Page 29: ...2 6 Installation of PCIe card Step 1 Turn off the system Step 2 Turn the system upside down to locate screws at the bottom and then loosen all screws Step 3 Identify the location of the PCIe slot as b...

Page 30: ...L Series user s Manual Hardware Installation 22 Step 5 Insert the PCIe card and fasten the screw of PCIe card adjustable bracket Step 6 Fasten the small bracket screw and put the bottom cover back ont...

Page 31: ...CTION 3 JUMPER CONNECTOR SETTINGS Proper jumper settings configure the eBOX710 521 FL to meet various application needs Hereby all jumpers settings along with their default settings are listed for dev...

Page 32: ...r Connector Settings 24 SBC87521 Bottom View Note It is strongly recommended that any unmentioned jumper settings should not be modified without instructions by Axiomtek FAEs Any modifications without...

Page 33: ...s Descriptions Settings JP1 Restore BIOS Optimal Defaults Default Normal Operation Short 1 2 Note How to setup Jumpers That a cap on a jumper is to close the jumper whereas that offs a jumper is to op...

Page 34: ...yPort Connector 3 3 3 Serial Port Connector 3 3 4 USB 3 2 Connector 3 3 5 Ethernet Connector 3 3 6 DVI I Connector 3 3 7 ATX Power On Off Button 3 3 8 Rest Button 3 3 9 Remote Power Switch Connector 3...

Page 35: ...High Definition Multimedia Interface is a compact digital interface which is capable of transmitting high definition video and high resolution audio over a single cable Pins Signals Pins Signals HDMI1...

Page 36: ...B_LANE2 19 GND 10 DPB_LANE3 20 3 3V 3 3 4 Serial Port Connector CN27 CN27 The system has two serial ports COM1 COM2 are RS 232 422 485 ports Please refer to Chapter 4 for the detail of BIOS setting CO...

Page 37: ...3 1 gen1 5GB s and ideally for installing USB peripherals such as scanner camera and USB devices etc Pins Signal USB Port 0 Pins Signal USB Port 1 1 USB_VCC 5V level standby power 10 USB_VCC 5V level...

Page 38: ...ned by Intel i219LM and LAN2 to LAN6 are Intel i210 IT L1 L2 L3 L4 L5 L6 L7 L8 A B Pins LAN Signal Pins LAN Signal L1 MDI0 L5 MDI2 L2 MDI0 L6 MDI2 L3 MDI1 L7 MDI3 L4 MDI1 L8 MDI3 A Activity link LED Y...

Page 39: ...nd high quality digital video between source device graphic card and display device 3 3 8 ATX Power on off SW3 The ATX power button is on the I O side It can allow users to control eBOX710 521 FL powe...

Page 40: ...the system will automatically power on without pressing soft power button during power input We can use this switch to achieve auto power on demand 3 3 12 SATA Connector SATA 1 2 These Serial Advanced...

Page 41: ...r for SATA 2 5 HDD SSD 3 3 14 SIM Card Slots CN13 CN14 The eBOX710 521 FL includes two SIM slots SCN1 on the bottom side of the system for inserting the SIM card It is mainly used in 3G LTE wireless n...

Page 42: ...ll mSATA or WLAN WWAN card into this slot Please refer to the SATA of BIOS setting to enable or disable mSATA support CN12 Pins Signals Pins Signals 1 WAKE 2 3 3VSB 3 No use 4 GND 5 No use 6 1 5V 7 CL...

Page 43: ...use 15 GND 16 No use 17 No use 18 GND 19 No use 20 W_DISABLE 21 GND 22 PERST 23 PE_RXN3 mSATA SATA_RXP 24 3 3VSB 25 PE_RXP3 mSATA SATA_RXN 26 GND 27 GND 28 1 5V 29 GND 30 SMB_CLK 31 PE_TXN3 mSATA SAT...

Page 44: ...ollowing table to get default pin define Default is 4in 4out The digital I O can be configured to control cash drawers and sense warning signals from an Uninterrupted Power System UPS or perform store...

Page 45: ...etup navigation process These keys include F1 F2 Enter ESC Arrow keys and so on Note Some of the navigation keys differ from one screen to another Hot Keys Descriptions Left Right The Left and Right A...

Page 46: ...screen is also shown below BIOS Information Display the auto detected BIOS information System Language Choose the system default language System Date Time Use this option to change the system time an...

Page 47: ...ystem devices Users can select any items in the left frame of the screen to go to sub menus Mini Card switch NCT6106D Super IO Configuration NCT6106D Hardware Monitor ACPI Settings Trusted Computing C...

Page 48: ...eBOX710 521 FL Series user s Manual BIOS Setup Utility 40 Mini Card switch Use this to select Mini Card setting default is PCIE...

Page 49: ...ations and change the value of the selected option A description of the selected item appears on the right side of the screen For items marked with please press Enter for more options Serial Port 1 2...

Page 50: ...eBOX710 521 FL Series user s Manual BIOS Setup Utility 42 Serial Port 1 Select Mode Use this option to set RS 232 RS 422 RS 485 mode Serial Port 2...

Page 51: ...ies user s Manual BIOS Setup Utility 43 NCT6106D Hardware Monitor This screen monitors hardware health status This screen displays the temperature of system and CPU as well as system voltages VCORE 3...

Page 52: ...o select options for the ACPI configuration and change the value of the selected option A description of the selected item appears on the right side of the screen ACPI Sleep State When the sleep butto...

Page 53: ...eBOX710 521 FL Series user s Manual BIOS Setup Utility 45 Trust Computing If users install a security device such as TPM users will see the following information for the TPM device and status...

Page 54: ...onfiguration This screen shows the CPU version and its detailed information Intel Virtualization Technology It allows a hardware platform to run multiple operating systems separately and simultaneousl...

Page 55: ...s Manual BIOS Setup Utility 47 SATA RST Configuration In this Configuration menu you can see the currently installed hardware in the SATA ports During system boot up the BIOS automatically detects th...

Page 56: ...L Series user s Manual BIOS Setup Utility 48 SATA Mode Selection AHCI Advanced Host Controller Interface mode is how SATA controller s operate Serial ATA Port 1 2 It shows the device installed in conn...

Page 57: ...eBOX710 521 FL Series user s Manual BIOS Setup Utility 49 PCH FW Configuration This screen shows ME Firmware information...

Page 58: ...eries user s Manual BIOS Setup Utility 50 AMT Configurations Users can use this screen to configure AMT parameters Intel AMT Enable or disable Intel Active Management Technology BIOS Extension The def...

Page 59: ...nu The Chipset menu allows users to change the advanced chipset settings Users can select any of the items in the left frame of the screen to go to the sub menus System Agent SA Configurations PCH IO...

Page 60: ...Manual BIOS Setup Utility 52 System Agent SA Configurations Graphics Configuration Use this item to configure internal graphics controller Memory Configuration Use this item to refer to the informati...

Page 61: ...eBOX710 521 FL Series user s Manual BIOS Setup Utility 53 Graphic Configurations...

Page 62: ...eBOX710 521 FL Series user s Manual BIOS Setup Utility 54 Memory Configurations This screen shows the system memory information PCH IO Configurations This screen allows users to set PCH parameters...

Page 63: ...Setup Utility 55 Security Menu Administrator Password This item indicates whether an administrator password has been set installed or uninstalled User Password This item indicates whether a user passw...

Page 64: ...econds to wait for setup activation key where 65535 0xFFFF means indefinite waiting Bootup NumLock State Use this item to select the power on state for the keyboard NumLock Quiet Boot Select to displa...

Page 65: ...anges to the system configurations and return to Main Menu Select Discard Changes and Exit from the Save Exit menu and press Enter Select Yes to discard changes and exit Save Changes and Reset Having...

Page 66: ...ore Defaults It automatically sets all Setup options to a complete set of default settings when users select this option Select Restore Defaults from the Save Exit menu and press Enter Save as User De...

Page 67: ...omeone to reboot when computer hangs The systems need to be able to reset automatically when things go wrong The watchdog timer gives us solutions in this regard The watchdog timer is a counter that t...

Page 68: ...ion O 2E 87 Un lock super I O O 2E 87 Select logic device O 2E 07 O 2F 08 WDT device enable O 2E 30 O 2F 01 Set timer unit O 2E F0 O 2F 00 00 Sec 08 Minute Set base timer O 2E F1 O 2F 0A Set reset tim...

Page 69: ...ED 61 APPENDIX B PROGRAMMABLE LED About Programmable LED eBOX710 521 FL supports four programmable LED which allows users to program the LED status It can set LED as a special indicator or alarm Pleas...

Page 70: ...eBOX710 521 FL Series user s Manual Programmable LED 62 This page is intentionally left blank...

Page 71: ...the steps below to configure SATA hard drive s 1 Install SATA hard drive s in your system 2 Enter the BIOS Setup to configure SATA controller mode and boot sequence 3 Configure RAID by the RAID BIOS 1...

Page 72: ...the Del button to enter BIOS Setup during running POST Power On Self Test If you want to create RAID just go to the Advanced Settings menu SATA Configuration select the SATA Mode Selection and press E...

Page 73: ...not want to create a RAID 3 1 After the POST memory testing and before the operating system booting a message Press Ctrl I to enter Configuration Utility shows up accordingly press Ctrl I to enter the...

Page 74: ...the Create Volume Menu screen you can type the disk array name with 1 16 letters letters cannot be special characters in the item Name 3 4 When finished press Enter to select a RAID level There are th...

Page 75: ...stripe block size The KB is the standard unit of stripe block size The stripe block size can be 4KB to 128KB After the setting press Enter for the array capacity 3 6 After setting all the items on th...

Page 76: ...ompting the confirmation press Y to create this volume or N to cancel the creation After the creation is completed you can see detailed information about the RAID Array in the Disk Volume Information...

Page 77: ...RAID volume If you want to delete a RAID volume select the Delete RAID Volume option in Main Menu Press Enter and follow on screen instructions Please press Esc to exit the RAID BIOS utility Now you c...

Reviews: