background image

eBOX625-842-FL Series U

ser’s Manual 


Hardware Installation 

CHAPTER 2 

HARDWARE INSTALLATION 

The  eBOX625-842-FL  is  convenient  for  your  various  hardware  configurations,  such  as 

Memory Module, HDD (Hard Disk Drive), SSD (Solid State Drive) and mSATA. The chapter 2 

will show you how to install the hardware.  


2.1 

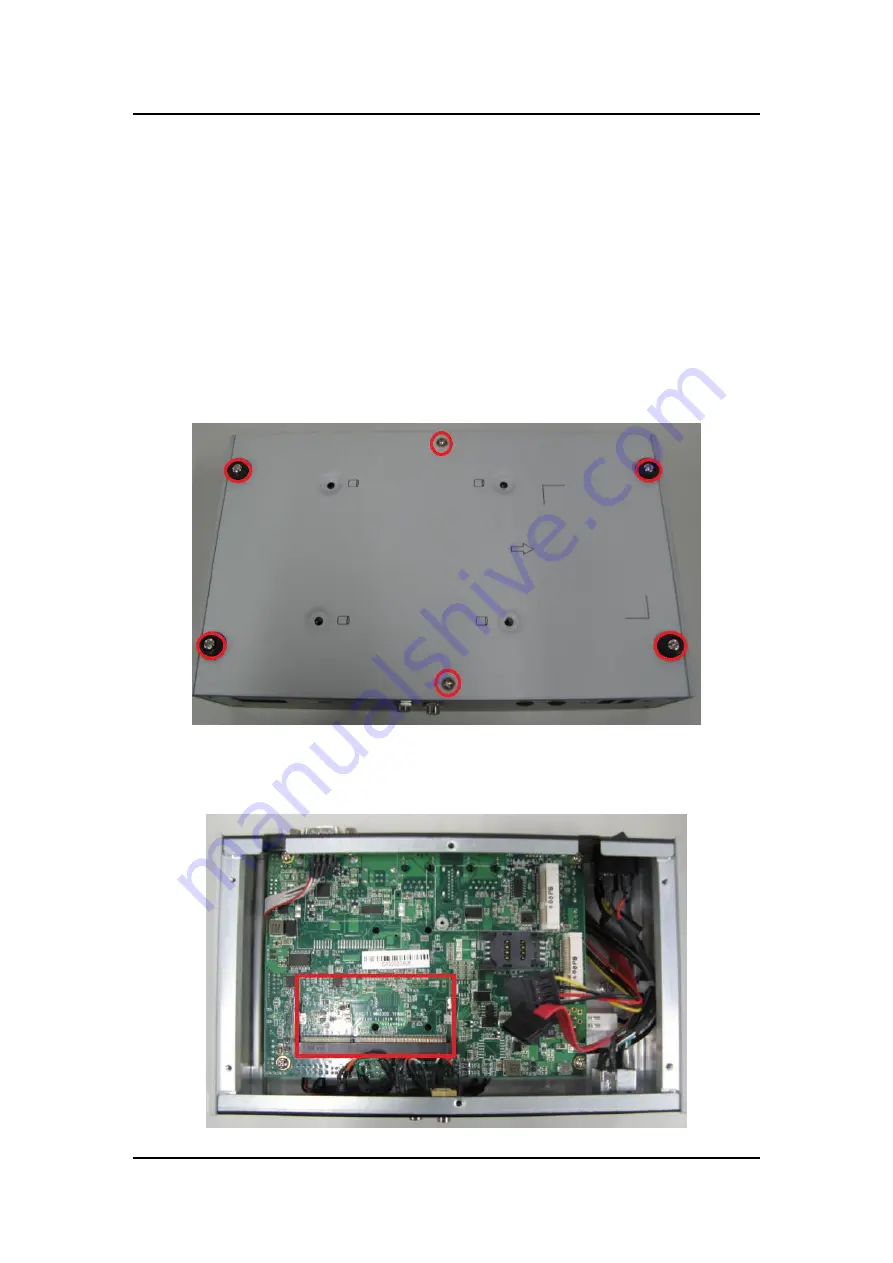
Installing the Memory module 


Step 1 

Turn off the system, and unplug the power cord.  


Step 2 

Turn the system upside down to locate screws at the bottom, loosen screws.


Step 3  Remove the bottom cover. 


Step 4  Find the DDR3L SO-DIMM position. 


Summary of Contents for eBOX625-842-FL Series

Page 1: ...eBOX625 842 FL Series Embedded System User s Manual ...

Page 2: ...r usefulness of any information in this document Axiomtek does not make any commitment to update the information in this manual Axiomtek reserves the right to change or revise this document and or product at any time without notice No part of this document may be reproduced stored in a retrieval system or transmitted in any form or by any means electronic mechanical photocopying recording or other...

Page 3: ...Make sure the voltage of the power source is correct before connecting the equipment to the power outlet 5 Turn OFF the system power before cleaning Clean the system using a cloth only Do not spray any liquid cleaner directly onto the screen 6 Do not leave this equipment in an uncontrolled environment where the storage temperature is below 40 or above 80 It may damage the equipment 7 Do not open t...

Page 4: ...inst electric shock not classified 2 Degree of protection against the ingress of water IP40 3 Equipment not suitable for use in the presence of a flammable anesthetic mixture with air or with oxygen or nitrous oxide 4 Mode of operation Continuous ...

Page 5: ...me components in your computer may only be able to be cleaned using a product designed for cleaning that component if this is the case it will be mentioned in the cleaning Cloth A piece of cloth is the best tool to use when rubbing up a component Although paper towels or tissues can be used on most hardware as well we still recommend you to rub it with a piece of cloth Water or rubbing alcohol You...

Page 6: ...ecycling and we will make the proper arrangement Trademarks Acknowledgments Axiomtek is a trademark of Axiomtek Co Ltd IBM PC AT PS 2 VGA are trademarks of International Business Machines Corporation Intel and Pentium are registered trademarks of Intel Corporation MS DOS Microsoft C and QuickBasic are trademarks of Microsoft Corporation Windows 8 1 Windows 7 Windows XPE Windows XP Windows WinCE em...

Page 7: ...ATA HDD SSD 11 2 3 Installing the Express Mini Card 14 CHAPTER 3 JUMPER SETTING CONNECTOR 17 3 1 SBC Layout 17 3 2 Jumper Setting Summary 19 3 2 1 Restore BIOS Optimal Defaults JP4 19 3 2 2 Auto power on JP10 20 3 2 3 COM2 Data Power Selection JP11 20 3 2 4 COM1 Data Power Selection JP12 20 3 3 Connectors 21 3 3 1 AC DC Jack Power In Connector 22 3 3 2 COM1 COM2 Serial Port Connector 22 3 3 3 VGA ...

Page 8: ...g 29 4 2 Navigation Keys 29 4 3 Main Menu 30 4 4 Advanced Menu 31 4 5 Chipset Menu 42 4 6 Boot Menu 45 4 7 Security Menu 46 4 8 Save Exit Menu 47 APPENDIX A WATCHDOG TIMER 49 About Watchdog Timer 49 How to Use Watchdog Timer 49 Appendix B Digital I O 51 About Digital I O 51 Digital I O Programming 52 ...

Page 9: ...6 1333 memory for J1900 3 Ultra slim and compact design 4 VGA HDMI for display output 5 Supports 4 USB 2 0 ports 6 Supports 2 RS 232 422 485 7 Supports 8 CH Programmable Digital I O 8 Supports dual 10 100 1000Mbps Ethernet ports 9 One 2 5 SATA HDD drive bay 10 One Full Size Mini PCI Express Mini Card w mSATA supported 11 One Half Size Mini PCI Express Mini Card 12 One SIM slot 13 Watchdog timer 14...

Page 10: ...00 x 1200 60Hz One HDMI port up to 1080P Two Audio connector Mic IN Line OUT HD audio compliant with Realtek ALC662 Two RJ 45 connector for 10 100 1000Base T Ethernet w Wake on LAN and PXE Boot ROM Four USB 2 0 ports One 12V DC Jack for power input connector Two Indicators System Power HDD Active Three Antenna Opening 1 2 3 System Specification Watchdog Timer 1 255 seconds or minutes up to 255 lev...

Page 11: ...42 FL Series User s Manual Introduction 3 1 2 4 Driver CD Content Driver Audio Chipset Ethernet Graphic TPM Manual User Manual Quick Manual NOTE All specifications and images are subject to change without notice ...

Page 12: ...eBOX625 842 FL Series User s Manual Introduction 4 1 3 Dimensions The following diagrams show you dimensions and outlines of the eBOX625 842 FL 1 3 1 System Dimension ...

Page 13: ...eBOX625 842 FL Series User s Manual Introduction 5 1 3 2 Wall mount Bracket Dimension ...

Page 14: ...eBOX625 842 FL Series User s Manual Introduction 6 1 4 I O Outlets The following figures show you I O outlets on front view of the eBOX625 842 FL Front View Front View drawing ...

Page 15: ...eBOX625 842 FL Series User s Manual Introduction 7 Rear View Rear View drawing ...

Page 16: ...ws pack x1 Foot pad x4 Optional 12V 36W AC DC Adapter Optional Power cord Optional Wall mount Brackets Optional VESA mount Bracket Optional Din rail Bracket Optional WIFI 3G GPS Modules If you cannot find this package or any items are missing please contact Axiomtek distributors immediately 1 6 Model List eBOX625 842 FL DC J1900 Fanless embedded system with Intel Celeron J1900 2 0GHz quad core sin...

Page 17: ... such as Memory Module HDD Hard Disk Drive SSD Solid State Drive and mSATA The chapter 2 will show you how to install the hardware 2 1 Installing the Memory module Step 1 Turn off the system and unplug the power cord Step 2 Turn the system upside down to locate screws at the bottom loosen screws Step 3 Remove the bottom cover Step 4 Find the DDR3L SO DIMM position ...

Page 18: ...tion 10 Step 5 Locate the memory module insert the gold colored of memory to contact into the socket Step 6 Push the module down until it is firmly seated by locking two latches on the sides Step 7 Fasten all screws of bottom cover to finish installation ...

Page 19: ...rd Step 2 Turn the system upside down to locate screws at the bottom loosen screws Step 3 Remove the bottom cover and then prepare your 2 5 HDD SSD to assemble with your bottom cover Step 4 Please refer to the below photo and you can see some marks on the surface of bottom cover assemble your HDD on bottom cover and notice HDD s connector position ...

Page 20: ...eBOX625 842 FL Series User s Manual Hardware Installation 12 Step 5 Assembly the HDD together with the SATA HDD Step 6 Fasten total four screws Step 7 Connect SATA PWR and SATA Signal cables ...

Page 21: ...eBOX625 842 FL Series User s Manual Hardware Installation 13 Step 8 Put the bottom cover back then fasten screws to finish the installation ...

Page 22: ...nd unplug the power cord Step 2 Turn the system upside down to locate screws at the Bottom loosen screws Step 3 Find the location of Mini card slot Please notice that eBOX625 841 842 supports one full size Express Mini card slot and one half size Express Mini card slot and also supports one SIM slot to let you connect SIM card ...

Page 23: ...ies User s Manual Hardware Installation 15 Step 4 Slide Mini Card into Mini Card slot with caution and fasten screw of Express Mini Card Step 5 Assembly the bottom cover back and fasten all screws to finish installation ...

Page 24: ...eBOX625 842 FL Series User s Manual Hardware Installation 16 This page is intentionally left blank ...

Page 25: ...nnector 17 CHAPTER 3 JUMPER SETTING CONNECTOR Proper jumper settings configure the eBOX625 842 FL to meet your application purpose We are herewith listing a summary table of all jumpers and default settings for onboard devices respectively 3 1 SBC Layout ...

Page 26: ... Manual Jumper Setting Connector 18 NOTE We strongly recommended that you should not modify any unmentioned jumper setting without Axiomtek FAE s instruction Any modification without instruction might cause system to become damage ...

Page 27: ... COM2 Data Power Selection Default RS 232 Data COM2 Pin 1 DCD 3 5 Close COM2 Pin 8 RI 4 6 Close JP12 COM1 Data Power Selection Default RS 232 Data COM1 Pin 1 DCD 3 5 Close COM1 Pin 9 RI 4 6 Close NOTE How to setup Jumpers The illustration shows how to set up jumpers When the jumper cap is placed on pins the jumper is close if not that means the jumper is open Open Closed Pin1 2 Closed 3 2 1 Restor...

Page 28: ...tting this jumper When this port is set to 5V or 12V level please make sure its communication mode is RS 232 You can change the communication mode RS 232 422 485 via BIOS setting Function Setting Power Set COM2 pin 1 to 5V level 1 3 close Data Set COM2 pin 1 to DCD Default 3 5 close Power Set COM2 pin 8 to 12V level 2 4 close Data Set COM2 pin 8 to RI Default 4 6 close 3 2 4 COM1 Data Power Select...

Page 29: ...n on the eBOX625 842 FL Series External Connectors Section AC DC Jack Power In Connector 3 3 1 COM1 COM2 Serial Port Connector 3 3 2 VGA Connector 3 3 3 HDMI Connector 3 3 4 Ethernet Connector LAN1 LAN2 3 3 5 USB Connector 3 3 6 ATX Power On Off Button 3 3 7 Audio Connector 3 3 8 8 CH Digital I O Connector 3 3 9 Internal Connectors Section Serial ATA SATA Connector 3 3 10 SATA Power Connector 3 3 ...

Page 30: ...S 422 COM1 1 DCD Data Carrier Detect TX RX TX 2 RXD Receive Data TX RX TX 3 TXD Transmit Data No use RX 4 DTR Data Terminal Ready No use RX 5 GND Ground GND GND 6 DSR Data Set Ready No use No use 7 RTS Request To Send No use No use 8 CTS Clear To Send No use No use 9 RI Ring Indicator No use No use Pin RS 232 RS 485 RS 422 COM2 1 DCD Data Carrier Detect TX RX TX 2 RXD Receive Data TX RX TX 3 TXD T...

Page 31: ...2 DDC DATA 13 Horizontal Sync 14 Vertical Sync 15 DDC CLK 3 3 4 HDMI Connector The HDMI High Definition Multimedia Interface is a compact digital interface which is capable of transmitting high definition video and high resolution audio over a single cable Its interface is available through connector CN10 Pin Signal Pin Signal 1 HDMI OUT_DATA2 2 GND 3 HDMI OUT_DATA2 4 HDMI OUT_DATA1 5 GND 6 HDMI O...

Page 32: ... L3 MDI1 L7 MDI3 L4 MDI2 L8 MDI3 A Active LED Yellow B 100 LAN LED Green 1000 LAN LED Orange 3 3 6 USB Connector The Universal Serial Bus connectors are compliant with USB 2 0 480Mbps and ideally for installing USB peripherals such as keyboard mouse scanner etc Pin Signal USB Port 0 Pin Signal USB Port 1 1 2 3 4 5 6 7 8 1 USB VCC 5V level 5 USB VCC 5V level 2 USB 0_D 6 USB 1_D 3 USB 0_D 7 USB 1_D ...

Page 33: ... can be set to function as input or output by software programming The BIOS default settings are 3 inputs and 5 outputs 3 3 10 SATA Connector This Serial Advanced Technology Attachment Serial ATA or SATA connector is for high speed SATA interface It is a computer bus interface for connecting to devices such as hard disk drive Pin Signal 1 GND SATA_TX 3 SATA_TX 4 GND 5 SATA_RX 6 SATA_RX 7 GND Pin D...

Page 34: ... SIM Card Slot SCN3 This board has SCN3 socket on the bottom side for inserting SIM Card In order to work properly the SIM Card must be used together with 3G module which is inserted to SCN1 or SCN2 It is mainly used in 3G wireless network application Pin Signal 1 12V level 2 GND 3 GND 4 5V level Pin Signal 1 PWR 2 RST 3 CLK 4 NC 5 GND 6 VPP 7 I O 8 NC ...

Page 35: ...pec V1 2 Pin Signal Pin Signal 1 WAKE 2 3 3VSB 3 No use 4 GND 5 No use 6 1 5V 7 CLKREQ 8 No use 9 GND 10 No use 11 REFCLK 12 No use 13 REFCLK 14 No use 15 GND 16 No use 17 No use 18 GND 19 No use 20 W_DISABLE 21 GND 22 PERST 23 PE_RXN3 24 3 3VSB 25 PE_RXP3 26 GND 27 GND 28 1 5V 29 GND 30 SMB_CLK 31 PE_TXN3 32 SMB_DATA 33 PE_TXP3 34 GND 35 GND 36 USB_D8 37 GND 38 USB_D8 39 3 3VSB 40 GND 41 3 3VSB 4...

Page 36: ...or disable mSATA support Pin Signal Pin Signal 1 WAKE 2 3 3VSB 3 No use 4 GND 5 No use 6 1 5V 7 CLKREQ 8 No use 9 GND 10 No use 11 REFCLK 12 No use 13 REFCLK 14 No use 15 GND 16 No use 17 No use 18 GND 19 No use 20 W_DISABLE 21 GND 22 PERST 23 PE_RXN3 SATA_RXP 24 3 3VSB 25 PE_RXP3 SATA_RXN 26 GND 27 GND 28 1 5V 29 GND 30 SMB_CLK 31 PE_TXN3 SATA_TXN 32 SMB_DATA 33 PE_TXP3 SATA_TXP 34 GND 35 GND 36 ...

Page 37: ... the setup navigation process These keys include F1 F2 Enter ESC Arrow keys and so on NOTE Some of the navigation keys differ from one screen to another Hot Keys Description Left Right The Left and Right Arrow keys allow you to select a setup screen Up Down The Up and Down Arrow keys allow you to select a setup screen or sub screen Plus Minus The Plus and Minus Arrow keys allow you to change the f...

Page 38: ...is shown below BIOS Memory Information Display the auto detected BIOS memory information System Language Choose the system default language System Date Time Use this option to change the system time and date Highlight System Time or System Date using the Arrow keys Enter new values through the keyboard Press the Tab key or the Arrow keys to move between fields The date must be entered in MM DD YY ...

Page 39: ...PU and other system devices You can select any of the items in the left frame of the screen to go to the sub menus ACPI Settings WatchDog Timer Configuration NCT6106D Super IO Configuration NCT6106D HW Monitor S5 RTC Wake Settings CPU Configuration IDE Configuration USB Configuration For items marked with please press Enter for more options ...

Page 40: ...eBOX625 842 FL Series User s Manual BIOS Setup Utility 32 ACPI Settings ACPI Sleep State When the sleep button is pressed the system will be in the ACPI sleep state The default is S3 Suspend to RAM ...

Page 41: ...the default setting is disabled NCT6106D Super IO Configuration You can use this screen to select options for the Super IO Configuration and change the value of the selected option A description of the selected item appears on the right side of the screen For items marked with please press Enter for more options ...

Page 42: ...related to serial port 1 2 DIO Configuration Use this item to setup 8 CH digital I O configurations Serial Port 1 COM1 Configuration Serial Port Enable or disable serial port 1 The optimal setting for base I O address is 3F8h and for interrupt request address is IRQ4 COM Port Type Use this option to set RS 232 RS 422 RS 485 mode ...

Page 43: ...tup Utility 35 Serial Port 2 COM2 Configuration Serial Port Enable or disable serial port 2 The optimal setting for base I O address is 2F8h and for interrupt request address is IRQ3 COM Port Type Use this option to set RS 232 RS 422 RS 485 mode ...

Page 44: ...g Enable or disable system wake on alarm event When enabled System will wake on the hr min sec specified the default setting is disabled While enable RTC Wake up setting there are two options for setting Fixed Time Dynamic Time While choosing Fixed Time at the BIOS and reboot the system it will be turned on base on the fixed setting time hr min sec for DynamicTime option system will be turned on a...

Page 45: ...en shows the CPU Configuration Socket 0 CPU Information This item is for socket specific CPU information Intel Virtualization Technology Allow a hardware platform to run multiple operating systems separately and simultaneously enabling one system to virtually function as several systems ...

Page 46: ...ection Determine how SATA controller s operate Operation mode options are IDE Mode and AHCI Advanced Host Controller Interface Mode The default is AHCI Mode Serial ATA Port 0 Enable or disable the onboard SATA port 0 Serial ATA Port 1 Enable or disable the onboard SATA port 1 for mSATA device SATA Switch This option supports you to select mSATA SATA signal or standard Mini card modules USB PCIe si...

Page 47: ...eBOX625 842 FL Series User s Manual BIOS Setup Utility 39 LAN Controller Enable or disable integrated LAN to wake the system default setting is enabled ...

Page 48: ...tion for specifying the TPM settings Security Device Support Enable or disable BIOS support for security device The default setting is Disabled TPM State Once the Security Device Support is Enabled TPM can be used by the operating system Current Status Information Display current TPM status information ...

Page 49: ...ll detected USB devices Legacy USB Support Use this item to enable or disable support for USB device on legacy operating system The default setting is Enabled Auto option disables legacy support if no USB devices are connected Disable option will keep USB devices available only for EFI applications ...

Page 50: ... 4 5 Chipset Menu The Chipset menu allows users to change the advanced chipset settings You can select any of the items in the left frame of the screen to go to the sub menus North Bridge South Bridge For items marked with please press Enter for more options ...

Page 51: ...eBOX625 842 FL Series User s Manual BIOS Setup Utility 43 North Bridge ...

Page 52: ...Utility 44 South Bridge This screen allows users to configure parameters of South Bridge chipset Audio Controller Control detection of the Azalia device Disabled Azalia will be unconditionally disabled Enabled Azalia will be unconditionally enabled ...

Page 53: ...waiting Bootup NumLock State Use this item to select the power on state for the keyboard NumLock Quiet Boot Select to display either POST output messages or a splash screen during boot up Launch PXE OpROM Use this item to enable or disable the boot ROM function of the onboard LAN chip when the system boots up Boot Option Priorities These are settings for boot priority Specify the boot device prior...

Page 54: ...curity menu allows users to change the security settings for the system Administrator Password This item indicates whether an administrator password has been set installed or uninstalled User Password This item indicates whether an user password has been set installed or uninstalled ...

Page 55: ... the system configuration and return to Main Menu Select Discard Changes and Exit from the Save Exit menu and press Enter Select Yes to discard changes and exit Save Changes and Reset When you have completed the system configuration changes select this option to leave Setup and reboot the computer so the new system configuration parameters can take effect Select Save Changes and Reset from the Sav...

Page 56: ...ete set of default settings when you select this option Select Restore Defaults from the Save Exit menu and press Enter Save as User Defaults Select this option to save system configuration changes done so far as User Defaults Select Save as User Defaults from the Save Exit menu and press Enter Restore User Defaults It automatically sets all Setup options to a complete set of User Defaults when yo...

Page 57: ...atchdog timer can be set up in the system reset mode by program How to Use Watchdog Timer The following example enables configuration using debug tool Enable WDT Enable configuration O 2E 87 Un lock super I O O 2E 87 Select logic device O 2E 07 O 2F 08 WDT device enable O 2E 30 O 2F 01 Set timer unit O 2E F0 O 2F 00 00 Sec 08 Minute Set base timer O 2E F1 O 2F 0A Set reset time where 0A hex 10sec ...

Page 58: ...eBOX625 842 FL Series User s Manual Appendix 50 Disable WDT Enable configuration O 2E 87 Un lock super I O O 2E 87 Select logic device O 2E 07 O 2F 08 WDT device disable O 2E 30 O 2F 00 ...

Page 59: ...through cable Each bit can be set to function as input or output by software programming In default all pins are pulled high with 5V level according to main power The BIOS default settings are 3 inputs and 5 outputs where all of these pins are set to 1 Digital I O Pin Signal Pin Signal 1 DI0 Bit0 2 DO0 Bit 3 3 DI1 Bit1 4 DO1 Bit 4 5 DI2 Bit2 6 DO2 Bit 5 7 GND 8 DO3 Bit 6 9 GND 10 DO4 Bit 7 ...

Page 60: ... 2E 07 O 2F 07 Set multi function selection O 2E 1C O 2F 1C Open GPIO2 and close UART Set GPIO2 I O register O 2E E8 O 2F 00 00 Programmed to function as output port FF Programmed to function as input port Set GPIO2 data register Set digital output pins value O 2E E9 O 2F 00 00 Set digital output to low level FF Set digital output to high level Digital Input Read digital input data O 2E E9 i 2F FF...

Reviews: