AXIOMTEK Dk3g4PANEL 6153-O User Manual Download Page 24

P6153 Series Panel PC User’s Manual 


Supported Input Timing Modes 

16

A p p e n d i x    A 

Supported Input Timing Modes 

Supported Input Timing Modes 

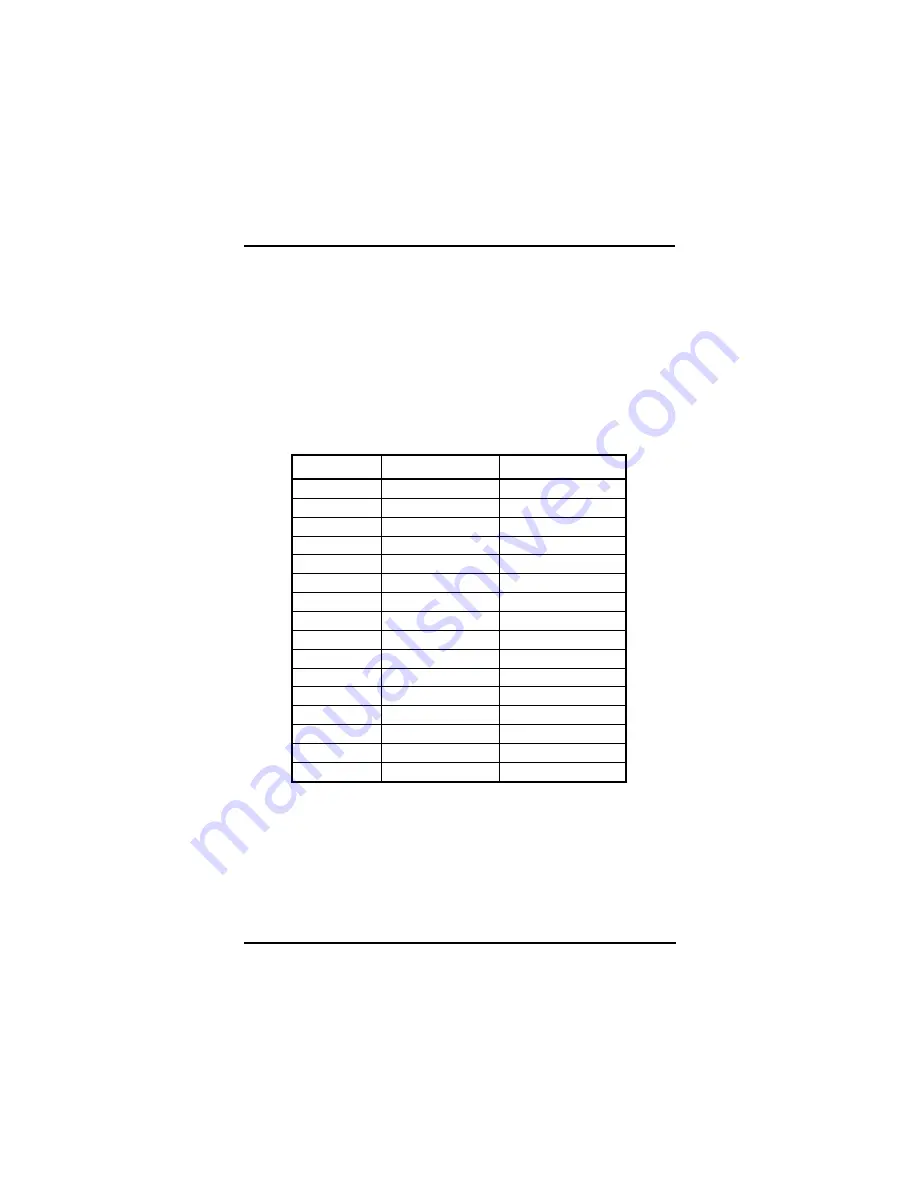
The following timings below are already programmed in this module. 
The input synchronous signals are automatically recognized. 


Preset No. 

Display Size 

Vsync (Hz) 

640x350 70 

640x400 70 

640x480 60 

640x480 72 

640x480 75 

720x400 70 

800x600 60 

800x600 72 

800x600 75 

10 

1024x768 60 

11 

1024x768 70 

12 

1024x768 75 


Summary of Contents for Dk3g4PANEL 6153-O

Page 1: ...Dk3g4PANEL 6153 O P 15 INDUSTRIAL TFT LCD MONITOR User s Manual...

Page 2: ...t AXIOMTEK makes no commitment to update or to keep current the information contained in this manual AXIOMTEK reserves the right to make improvements to this document and or product at any time and wi...

Page 3: ...ver there is no guarantee that interference will not occur in a particular installation If this equipment does cause harmful interference to radio or television reception which can be determined by tu...

Page 4: ...P6153 is properly grounded 4 The brightness of the flat panel display decreases with usage However hours of use vary depending on the application environment 5 Turn OFF the system power before cleani...

Page 5: ...electricity To avoid damaging chips from electrostatic discharge observe the following precautions Before handling a board or integrated circuit touch an unpainted portion of the system unit chassis...

Page 6: ...vi This page does not contain any information...

Page 7: ...Features 2 1 3 Specifications 2 1 4 Dimensions 3 1 5 I O Inputs 5 Chapter 2 System Setup 7 2 1 System Configuration 7 2 2 Panel Mounting 9 2 3 Wall Mounting Option 11 2 4 Rack Mounting Option 13 2 5...

Page 8: ...viii This page does not contain any information...

Page 9: ...source from PC system or multimedia system that let you upgrade the display don t change anything from your system Besides for varied HMI field you can choose one of resistive capacitive touch screen...

Page 10: ...nagement system conforms to VESA DPMS standard Advanced OSD control for picture quality adjustment Supports VESA ARMS Desktop Stand Rear Panel Wall or Rack mounting 1 3 Specifications Construction Hea...

Page 11: ...Introduction 3 1 4 Dimensions...

Page 12: ...4...

Page 13: ...the system via the external DVI connector located on the bottom side of the system unit 4 VGA Port D sub This D Sub15 connector can be connected to the system via the external D Sub15 connector locat...

Page 14: ...6 This page does not contain any information...

Page 15: ...e r 2 System Setup This chapter details the system parts and components with figures Sections include System Configuration Panel Mounting Wall Mounting Rack Mounting Desktop Stand 2 1 System Configur...

Page 16: ...n the power is on flash when the power is active off 3 SEL To scroll up the menu To increase the value of selected item 4 SEL To scroll down the menu To decrease the value of selected item 5 Menu Pres...

Page 17: ...ion Mounting bracket x 6 pcs Pan head screws M4x0 7PxL45 0mm x 6 pcs Installation instruction 1 Find a plate and cut off a window refer the 1 4 P6153 P Dimensions for the dimension 2 Screw the mountin...

Page 18: ...6 to 16 0mm thick Strengthening may be required for the panel Be sure to consider the weight of the P6153 when designing the panel 1 6 16mm Note To enhance the P6153 s maintainability operability and...

Page 19: ...ar View 35 0 35 0 35 0 35 0 35 0 35 0 35 0 Unit mm 2 3 Wall Mounting Option Bracket Wall The unit is designed to support wall mounting application It let you to mount the unit on the wall Three access...

Page 20: ...x 4 pcs Installation instruction 1 Refer the hole location on the page 3 Screw the truss head screws to the hole location on the wall Note Do not tight the screw for mounting the unit The minimum spac...

Page 21: ...ual System Setup 13 2 4 Rack Mounting Installation instruction 1 Remove 8 seal pads in front panel 2 P6153 series products could to mount directly to standard 19 industrial rack There are four screw h...

Page 22: ...esktop stand application Two accessory items are needed for this application Wall mounting bracket x 1 pcs Binding head washer screws M4x0 7PxL6 0mm x 2 pcs Installation instruction Mounting the wall...

Page 23: ...P6153 Series Panel PC User s Manual System Setup 15 This page does not contain any information...

Page 24: ...Timing Modes The following timings below are already programmed in this module The input synchronous signals are automatically recognized Preset No Display Size Vsync Hz 1 640x350 70 2 640x400 70 3 64...

Page 25: ...P6153 Series Panel PC User s Manual OSD Operation 17 A p p e n d i x B OSD Operation Function Description of OSD Menu Main Screen...

Page 26: ...nual OSD Operation 18 Signal Select VGA Input Setting Monitor s Input to VGA DVI Input Setting Monitor s Input to DVI AV Input Setting Monitor s Input to AV S Video Input Setting Monitor s Input to S...

Page 27: ...Operation 19 Video Adjust Brightness Adjust Adjust Monitor s Brightness Use or button to increase or decrease the setting Contrast Adjust Adjust Monitor s Contrast Use or button to increase or decreas...

Page 28: ...P6153 Series Panel PC User s Manual OSD Operation 20 Audio Adjust P6153 doesn t support Audio...

Page 29: ...nual OSD Operation 21 Color Adjust Automatically Color Tuning Monitor will automatically tune the color setting Manually Color Tuning Adjust color setting Use or button to increase or decrease the set...

Page 30: ...uning Monitor will automatically tune the image setting Horizontal Width Adjust Adjust Monitor s horizontal width setting Use or button to increase or decrease the setting Horizontal Phase Adjust Adju...

Page 31: ...23 Horizontal Position Adjust Adjust horizontal position setting Use or button to increase or decrease the setting Vertical Position Adjust Adjust vertical position setting Use or button to increase...

Page 32: ...ual OSD Operation 24 Image Adjust OSD Setting Adjust OSD setting Recall Previous Setting Monitor will recall the previous setting Sharpness Adjust Adjust Monitor s sharpness setting Use or button to i...

Page 33: ...P6153 Series Panel PC User s Manual 25 This page does not contain any information...

Reviews: