background image

4

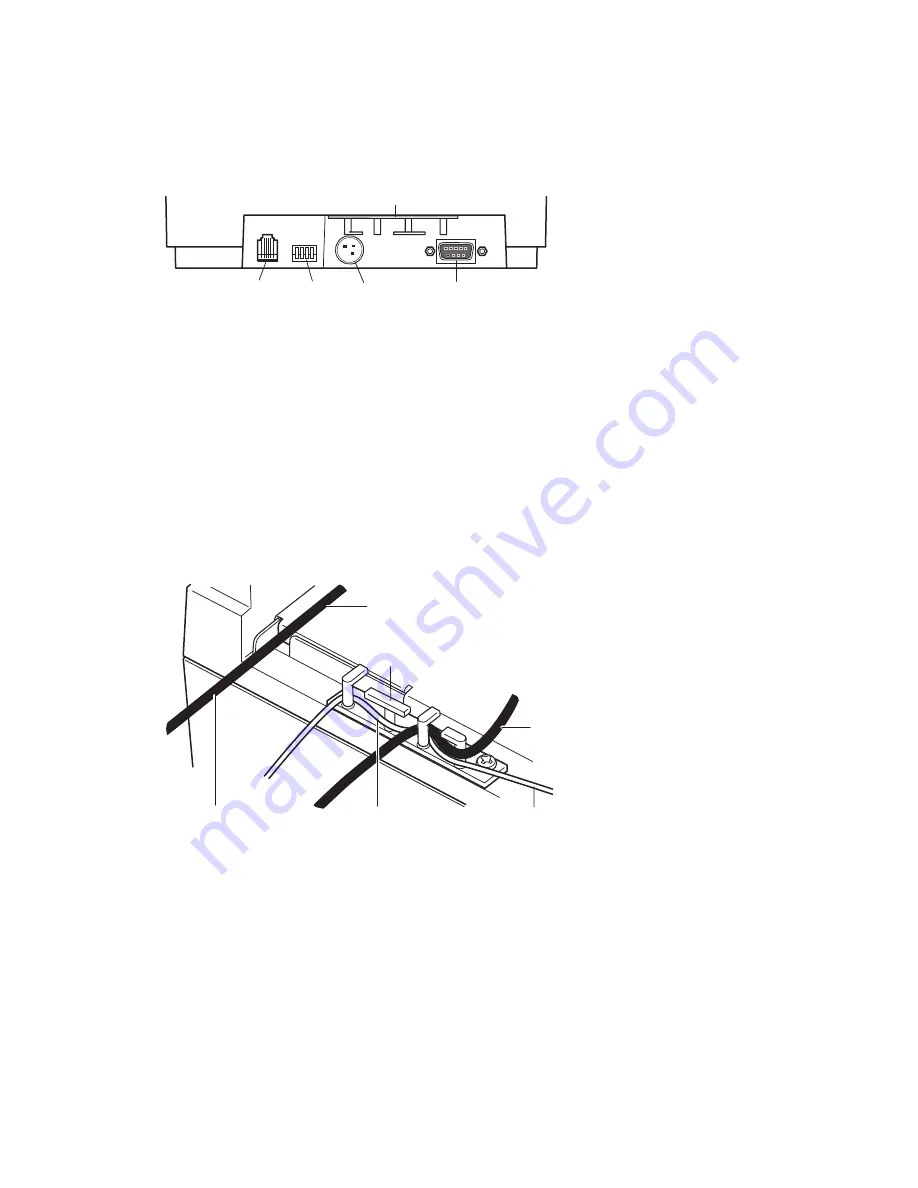
Connecting the Cables

Caution: Connect the cables to the printer before plugging in

the power supply. If power is received from the host
computer, turn it off before connecting any cables.

Note: Depending on your printer configuration, the connector panel

may vary from the above illustration.

1. Turn off the host computer.

2. Secure the communication cable to the communication connector.

3. Connect the cable to the host computer.

4. Connect the cash drawer cable to the cash drawer connector at the

left rear of the unit.

If your system has two cash drawers, attach a Y-cable to the printer’s
cash drawer connector first.

5. Connect the power supply cable to the power supply connector last.

6. Route the cash drawer and the power supply cables through the strain

relief as shown.

7. Plug the power cord into the power supply, then plug the power supply

into an outlet. The green LED on the top cover will light up.

Back of

Printer

Strain Relief

DIP

Switches

Communication

Connector

(9-pin connector

shown)

Power

Supply

Connector

Cash

Drawer

Connector

Communications

Cable

To the

Communications

Connector

Strain

Relief

Cash Drawer

Cable

Power

Supply

or Adapter

Cable

Cash Drawer

Cable

September 1999

3

A758 Setup Guide

Summary of Contents for A758

Page 1: ...A758 Thermal Receipt and Impact Slip Printer Setup Guide TM A758 D110...

Page 2: ...oard support for cantilever on slip table Foam restraint for carriage behind front cover Power supply with cable connecting to printer and power supply cord connecting to power outlet only if ordered...

Page 3: ...oard support from the slip path 3 Open the receipt cover and remove the test printout 4 Lift the thermal paper roll out of the paper bucket and remove the paper supports Front Cover Cardboard Support...

Page 4: ...r of the unit If your system has two cash drawers attach a Y cable to the printer s cash drawer connector first 5 Connect the power supply cable to the power supply connector last 6 Route the cash dra...

Page 5: ...l and with a few inches of paper extending over the cabinet front The paper must unroll from the bottom of the roll to insure the image will print 3 Close the cover while holding the paper over the fr...

Page 6: ...en the ribbon by turning the knob on the cassette in the direction of the arrow 2 Open the printer s front cover position the ribbon cassette onto the carriage making sure the ribbon is underneath the...

Page 7: ...structed on the bottom of the test printout The printout may be useful to a service representative if there is a problem If something appears to be wrong with the test printout such as missing or fade...

Page 8: ...dy to communicate with the host system 1 To run the test either a Open and close the receipt cover while holding down the Paper Feed Button OR b Press the Paper Feed Button and the Reset Button at the...

Page 9: ...power supply other than the Axiohm power supply will require you to test the power supply and Axiohm printer for FCC and CE mark certification Communication Interface Cable A shielded 360 degree inter...

Reviews: