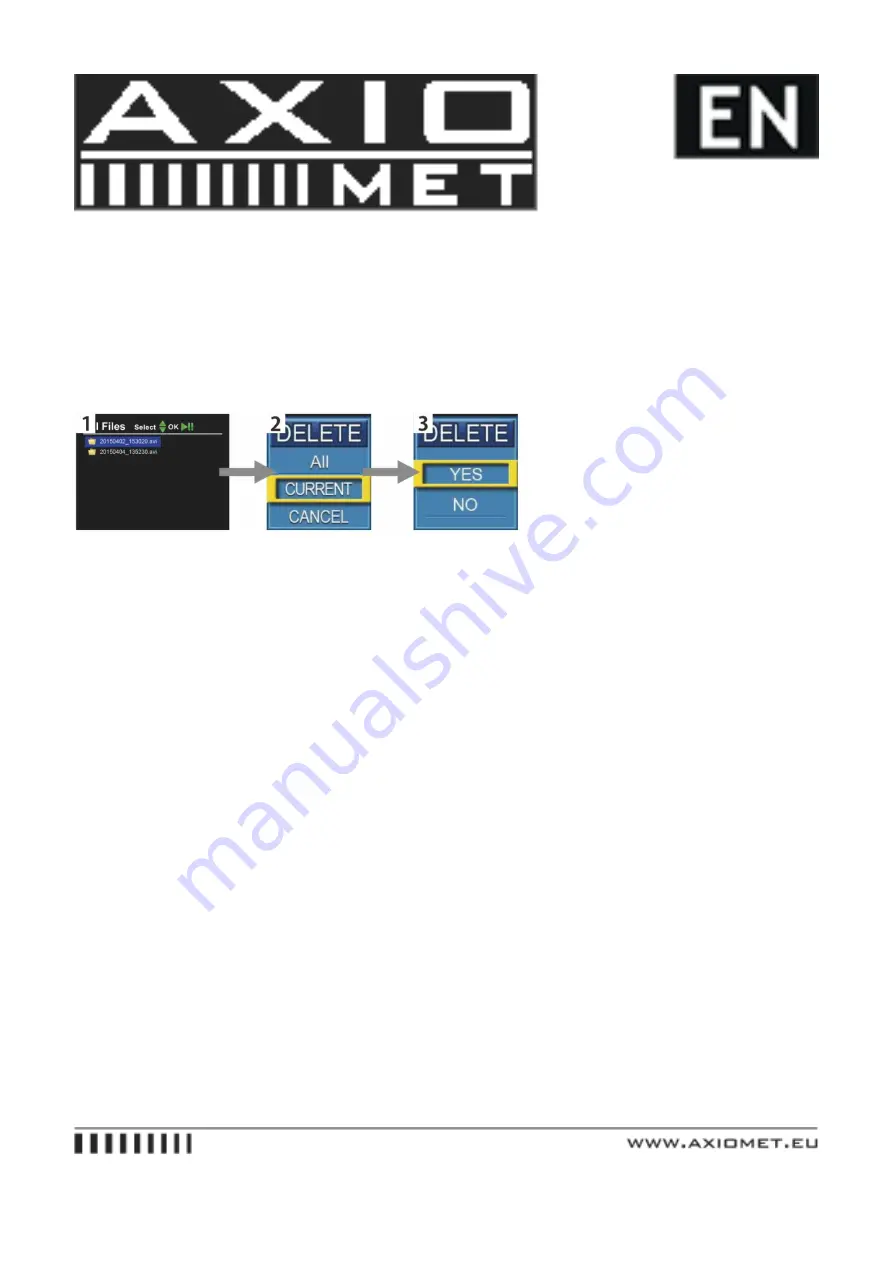
5.10. Delete Files
Please make sure the files you really want to delete, the files won’t be foundafter deleting.
- Press “Playback” key to find the files- Press “menu” to choose the file you want to delete, one and all.- Press “OK” to delete it
Page 1: ...the SD card Remember to always back up the data on your SD card 2 Safety and Notice 2 1 For your safety 1 Do not attempt to insert use or charge a battery not designed for this inspection system 2 Use...
Page 2: ...on system 3 Dispose of unwanted batteries and inspection systems as permitted by the laws in your country 4 Water may cause a fire or electric shock Therefore store your battery in a dry place 5 If yo...
Page 3: ...considerably reduced 4 It is normal for the camera system to become warm during operation because the inspection system casing can conduct heat 3 Parts list 3 1 Accessories 1 Item 2 Image 3 Descripti...
Page 4: ...Fiberglass rod Wheel Material Stainless steel Cable Diameter 5 0mm Cable Counter Meter foot counter optional 11 LI ION BATTERY Total power 14W Charge time 5hours Protective voltage 9 5v 12V 4400MAH Li...
Page 5: ...use jack 7 Video1 Video2 8 Image up down left right 9 Menu include bright contrast color language 16 9 4 3 ratio sleep 10 Sub menu down 11 Sub menu up 1 DVR LED 2 Menu up 3 Menu down 4 Menu left 5 Men...
Page 6: ...Image up down left right 21 Menu include bright contrast color language 16 9 4 3 ratio sleep 22 Sub menu down 23 Sub menu up 24 SD card slot 4 Quick Start Guide 4 1 Charging the Battery 1 Connect the...
Page 7: ...the indicator of charger will turn into green 4 2 Starting up 1 Connect the camera to the cable wheel 2 Assemble fuse 3 Turn the switch knob to ON BATT position the battery level indicators show the c...
Page 8: ...D with a screwdriver by tightening its screws 3 The SKID assemble completed 4 3 3 80mm SKID and 23mm camera head 1 Set the SKID in the camera head 2 Fasten the SKID with a screw rod by tightening its...
Page 9: ...ding and Menu optional 5 1 Inserting SD Card 5 2 AV1 AV2 Switch Press the AV1 AV2 key on screen to switch the AV1 and AV2 mode In AV1 mode can both take picture and record video in AV2 mode can only m...
Page 10: ...on again to finish the recording 5 4 Recording photo 1 Press MENU choose Recording Mode enter Work Mode select Photo then press REC back to the homepage 2 Press the REC button to snap picture 5 5 Play...
Page 11: ...4 Select the you need 5 The monitor plays the video 6 Press the OK button to pause the video 5 6 Playback Photo Follow the same steps that the Playback Video has mentioned...
Page 12: ...5 7 Menu Press menu key enter into main menu...
Page 13: ...h Highest sensitivity Medium Standard sensitivity Low Lowest sensitivity Resolution 720X576 720X480 640X480 Video Quality High High resolution Medium Standard resolution Low Low resolution Time Stamp...
Page 14: ...t the date and time press OK to confirm Video Output Choose whether PAL or NTSC to suit your monitor and TV Video Output Format No The system will not format the SD card Yes The system will format the...
Page 15: ...es Please make sure the files you really want to delete the files won t be found after deleting Press Playback key to find the files Press menu to choose the file you want to delete one and all Press...