Axia KAS3UTUE-12A Owner'S Manual Download Page 19


18


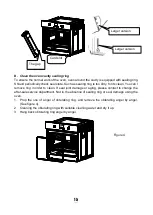
5.  Start the grill program, make sure rotary grilling broach normal rotation, then close the 

oven door. 

6.  When the barbecue is complete, open the oven door, turns rotary grilling broach handle 

to remove food (figure 7);Screw down the handle from the broach. 


7.  Close the oven door.     

 
NOTE:   

▪ Rotary grilling broach suit for cooking meat in big size. Such as reeled meat, poultry.   
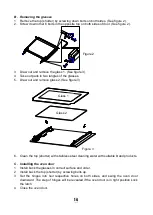
▪  Step  for  fixing  the  food  onto  broach:  Insert  food  in  the  middle  of  the  broach,  and  then 
fasten the food with the forks on both sides. 
▪ Fix poultry wings on the back of the pouitry; fix legs on the body of poultry so that the food 
cannot be burnt easily. 
▪ Prick some holes on the poultry, so that juices can overflow. 
▪When  rotary  grilling  broach  in  rotation,  if  there  is  out  or  not  phenomenon,  please  push 
rotary grilling broach until it can be rotated. 
 

E.  Choose the container 

  The thickness of container, electrical conductivity and the color will affect the effect of 

cooking.  Please  keep  in  mind:  1)  the  use  of  aluminum  plate,  soil  in  burned  tray, 
refractory  clay,  baked  food  at  the  bottom  is  shallow  color,  food  moisture  can  keep 
enough.  It  is  recommended  that  you  use this  kind  of  container  heating  pastry,  dough 
and barbecue.2) use enamel cast iron, glass, tin-coated iron and refractory porcelain,, 
with  anti  blocking  liner  colored  coating  of  the  container,  baked  food  at  the  bottom  is 
darker .It is recommended that you use this kind of container making egg tarts, pies and 
other crispy food. 

  In the process of cooking, the volume of food change, so should according to the actual 

situation to choose suitable containers. 

  When cooking meat and poultry, to prevent oil splash, please choose suitable size  for 

food, with a cover on deeper tray or refractory glass saucepans. 

  Use glass tray cooking the dough and cream. 


Rotary grilling 
broach handle


Figure 7


Summary of Contents for KAS3UTUE-12A

Page 1: ...BUILD IN ELECTRIC OVEN Owner s Manual Model KAS3UTUE 12A Please read these instructions carefully before installing and operating the oven and retain this information for future reference...

Page 2: ...Function Setting 9 Preset function 10 Child proof Lock 10 Steam cleaning function 10 CLEANING AND CARE 12 ACCESSORIES USING INSTRUCTION 16 FAILURE DIAGNOSE 19 SPECIFICATIONS Power Supply 220 240V 50 6...

Page 3: ...r develops a fault switch it off at the mains and do not touch it 12 If the cable is at all damaged it must be replaced promptly When replacing the cable follow these instructions a The cable must to...

Page 4: ...ic rules HINTS FOR COOKING 1 When the oven is first switched on it may give out acrid smelling fumes for the bonding agent for insulating panels round the oven has been heated up for the first time Th...

Page 5: ...to insert screws to fix the oven on the installation location 3 To determine the position of the mounting hole please open the oven door to see inside While fixing the oven the measurement of distance...

Page 6: ...easily accessible when the oven has been installed 3 IMPORTANT During installation the power cable position must be taken account in Avoid the temperature to be above 50 at any point of the power cabl...

Page 7: ...e Part Names Code Part Names 1 Control Panel 6 Oven Door Handle 2 Heater Tubes 7 Rotary Grilling Bracket 3 Cavity Obturating Ring 8 Rotary Grilling Broach 4 Convection Fan 9 Grill Rack 5 Oven Cavity 1...

Page 8: ...knob to hide it Button Image Button GENERAL FUNCTION Temperature Use this button to set temperature Clock Use for clock setting cooking time setting Timer Use this button to start preset function Saf...

Page 9: ...cess this is normal When the oven door open during cooking or at the end of cooking please be careful the hot air may overflow Save electricity mode One minute without operation under standby display...

Page 10: ...es 10 seconds turn the to enter hour digit for cooking time and then press pad once turn the to enter minutes digit for cooking CODE FUNCTION MODES WORKING METHODS TEMPERATUR E RANGE Suitable for the...

Page 11: ...2 00 and press pad once to confirm 5 Press pad once at this time the display shows the current clock and 6 When hour figures flash turn Knob input hour figures 15 and press pad once to confirm 7 When...

Page 12: ...is heavily soiled with grease for example after roasting or grilling it is recommended to remove stubborn soil manually using a cleaning agent before activating Steam cleaning Leave the oven door aja...

Page 13: ...ly Corrosion can form under such flecks Use stainless steel care products Follow the manufacturer s instructions Try out the product on a small area first before using on the whole surface 10 For clea...

Page 14: ...l damage the surface of the oven You can use completely removed the oven door to clean Do not use grinding is strong sharp or sharp items cleaning glass panel it will scratch the glass surface and gla...

Page 15: ...d remove glass 2 See figure 3 6 Clean the top shutter with stainless steel cleaning water with suitable brand products C Installing the oven door 1 Install back the glasses in correct surface and orde...

Page 16: ...er to clean If seal joint damage or aging please contact to change the after sale service department Not in the absence of sealing ring or seal damage using the oven 1 Prop the one of angel of obturat...

Page 17: ...ayer frame respectively in cavity fixed screw position B Grill Rack insert location and layer see figure 2 C Installing the grill See figure 3 1 Insert the oil collector on the first layer 2 Insert th...

Page 18: ...erted into the layer 4 rotary grilling broach can normally use See figure 4 3 Make chicken or duck for own favorite ingredients reoccupy rotary grilling broach to chicken or duck fork figure 5 such as...

Page 19: ...be rotated E Choose the container The thickness of container electrical conductivity and the color will affect the effect of cooking Please keep in mind 1 the use of aluminum plate soil in burned tra...

Page 20: ...er cooking After end cooking the cooling fans to continue to open a time Oven light is not bright The lamp achieve life deadline or damaged Replace the oven lamp Cake or cookies baked non uniform Mayb...

Reviews: