background image


4. INSTALLATION INSTRUCTIONS                                                                    


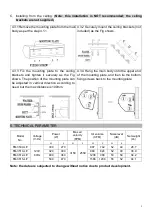
A.  Installing on the concrete wall: 
 

4.1.1  Unscrew  the fixing screws to remove 
the mounting plate from the back of the main 
body. 


4.1.2  Determine the mounting location  with 
the mounting plate. Drill holes and insert the 

Zinc-Plated Steel Hex-Nut-Head Sleeve 
Anchor

 (not included). 


4.1.3  Tighten  the  nuts to secure the 
mounting plate to the wall (use the washers 
and nuts as the Fig shows). 


4.1.4  Hang  the main body onto the upper 
end of the mounting plate, and then tighten 
the bottom fixing screws  back to the 
mounting plate. 


B.  Installing on the  wooden wall: 

(Note: make sure the screws are secured in the wood, 

attach an extra wood frame to the wall if needed.)


4.2.1  Refer to step 4.1.1 and determine the 
mounting location,  then  securely mount  the 
mounting plate to the wooden wall with tapping 
screws. 


4.2.2 Hang the main body onto the upper end 
of the mounting plate, and then tie the bottom 
fixing screws back to the mounting plate. 


Summary of Contents for FM-3509-L/Y

Page 1: ...FM 3509 L Y FM 3510 L Y FM 3512 L Y FM 3515 L Y 2 Speeds with Magnetic Switch Thanks for purchasing this Air Curtain PLEASE READ AND SAVE THESE INSTRUCTIONS Strongly recommend to test the unit before installation for any defective or damage during shipment ...

Page 2: ...r and maintenance operations can only be performed by qualified personnel F Verify and ensure the rated voltage and frequency please refer to the rating label of the air curtain is in compliance with the mains supply CONTENTS 1 PRODUCT INTRODUCTIONS 1 2 INSTALLATION DIMENSIONS 2 3 INSTALLATION CAUTIONS 3 4 INSTALLATION INSTRUCTIONS 4 5 TECHNICAL PARAMETER 5 6 WIRING DIAGRAM 6 7 OPTIONAL MAGNETIC D...

Page 3: ... are subjected to change without notice due to product development MODEL Max Entry Opening A B C D E F G H I FM 3509 L Y 38 35 43 27 36 2 91 3 94 8 46 9 06 4 84 FM 3510 L Y 42 42 00 27 36 FM 3512 L Y 50 47 24 38 98 11 61 FM 3515 L Y 62 59 06 50 59 19 84 ...

Page 4: ... loose or shake and make noise 3 2 Please install the unit inside the room 3 3 Install the unit between 7 feet to 8 feet from the ground ATENCIÓN Instalar la unidad entre los 7 a 9 pies desde del suelo 3 4 When the entrance is wider than the unit it is recommended to install two or more units in parallel In this case provide 20 40mm gaps between the units 3 5 Don t allow gaps between the unit and ...

Page 5: ...he washers and nuts as the Fig shows 4 1 4 Hang the main body onto the upper end of the mounting plate and then tighten the bottom fixing screws back to the mounting plate B Installing on the wooden wall Note make sure the screws are secured in the wood attach an extra wood frame to the wall if needed 4 2 1 Refer to step 4 1 1 and determine the mounting location then securely mount the mounting pl...

Page 6: ...usted in vertical direction according to need but the max distance is 100mm 4 3 4 Hang the main body onto the upper end of the mounting plate and then tie the bottom fixing screws back to the mounting plate 5 TECHNICAL PARAMETER Model No Voltage V Hz Power W Max air velocity FPM Air volume CFM Noise level dB Net weight Lb H L H L H L H L FM 3509 L Y 120V 60Hz 300 270 3150 2559 907 742 52 49 28 7 F...

Page 7: ...LOW 7 OPTIONAL MAGNETIC DOOR MICRO SWITCH INSTALLATION This air curtain comes with a magnetic door switch contact seller or Awoco if you are missing a magnetic switch The dedicated 2 wires Yellow are to connect to the magnetic switch Note Keep the 2 wires connected closed if the magnetic switch is not used Connect the magnetic door switch Cut the dedicated 2 wires nut and connect the wires to the ...

Page 8: ...el who are familiar with local codes and regulations and are experienced with this type of product B Always unplug or disconnect the appliance from the power supply before servicing or cleaning the unit C Never use petrol benzene thinners or any other such chemicals for cleaning the unit D Don t allow water or any liquid to enter the motor 9 1 Use the unit at the rated voltage and frequency indica...

Reviews: