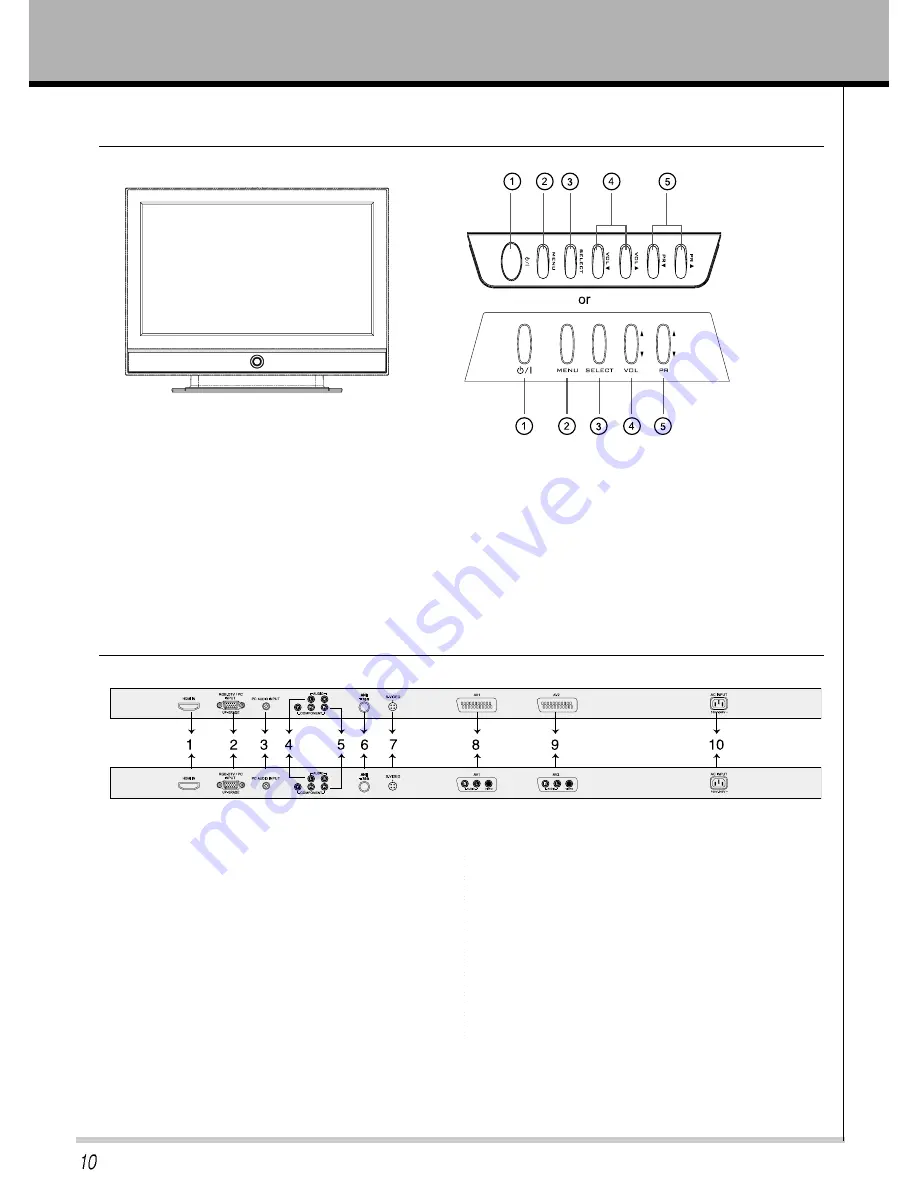
AWA TFTD81M Owner'S Manual Download Page 11

OWNER’S MANUAL

*FRONT AND SIDE VIEW

*Rear View

1. HDMI IN : High Definition Multimedia Interface input.    

2. RGB-DTV/PC INPUT  & UP-GRADE: PC or DTV Video

Source Input. 

Up-grade from PC. 

3. PC AUDIO INPUT : Connect the audio cable from the

PC to the PC AUDIO INPUT of the set.

4. L/R : Audio(L/R) Input in case of S-VIDEO or

COMPONENT mode.

5. Y,Pb,Pr : Component video signal input.

6. TUNER : RF antenna input.

7. S-VIDEO : Connect the output of the A/V Source to the

S-VIDEO input.

8. AV1 : Composite input of A/V Source.

9. AV2 : Composite input of A/V Source.

10. AC POWER : Power cord input.

*SCART

*RCA

1. POWER button : Switches TV set on or off.

2. MENU button : Displays a menu.

3. SELECT button : Selects the A/V source.

4. VOLUME (

) : Adjusts the volume / Adjusts

menu settings.

5. PR (

) : Selects a programme or menu item.

Summary of Contents for TFTD81M

Page 1: ......

Page 2: ...ore operating your set Retain it for future reference Record model number and serial number of the set See the label attached on the back of the set and quote this information to your dealer when you require service OWNER S MANUAL TFTD81M ...

Page 3: ... 296 dots while the 50 8cm 20 has 1 44 million dots Each dot is driven by an individual transistor If a transistor becomes defective the corresponding dot may be permanently lit a bright dot or may totally defect free would lead to a much higher cost of manufacture Defect Specifications The specifications for the number of defects that are deemed to be acceptable for each size of LCD panel are Fur...

Page 4: ...eep Timer Picture Sound Auto picture control Adjusting picture appearance Auto Sound Control Adjusting Sound Balance Setting up TV stations Auto programme tuning Manual programme tuning Programme edit Teletext Teletext Special teletext functions Special Features Selecting CLOCK for the menus Selecting LANGUAGE for the menus Selecting PC CONTROL for the menus Setting picture format Picture In Pictu...

Page 5: ...pparatus during lightning storms or when unused for long periods of time 14 Refer all servicing to qualified service personnel Servicing is required when the apparatus has been damaged in any way such as power supply cord or plug is damaged liquid has been moisture does not operate normally or has been dropped 15 The apparatus shall not be exposed to dripping or splashing and that no objects fille...

Page 6: ...ore moving Only use the TV on a level and stable surface It may fall down or be upset Safety instructions have two kinds of information as illustrated below When installing the monitor on a table be careful not to place it near the edge This may cause the monitor to fall causing serious injury to a child or adult and serious damage to the monitor Surely use a fitting table or rack Do not place the...

Page 7: ... the current leakage If grounding methods are not possible a separate circuit breaker should be employed and installed by a qualified electrician Do not connect ground to telephone wires lightning rods or gas pipe The main plug should be inserted fully into the power outlet to avoid a fire hazard This may cause a fire hazard Outdoor Installation Power In case of using a receiver VCR Digital Set To...

Page 8: ...r Cord option Power Outlet NOTES WARNING WARNING Power Using Do not place anything containing liquid on top of the TV such as flowerpot cup cosmetics or candle This may cause a fire hazard Dispose of used batteries carefully and safely In the case of a battery being swallowed by a child please consult a doctor immediately If water is spilt into the monitor unplug it from the main supply outlet imm...

Page 9: ... your Service Centre This may cause a fire or an electric shock hazard WARNING In the unlikely event of smoke or a strange smell from the TV switch it off unplug it from the wall outlet and contact your dealer or service centre This may cause a fire or an electric shock hazard Do not use water while cleaning the TV This may damage to the TV or an electric shock hazard In the event of a lightning o...

Page 10: ... a child or adult The distance between eyes and the screen should be about 1 5m If not eyes will strain Unplug the TV from the wall outlet when it is left unattended and unused for long periods of time Accumulated dust may cause a fire or an electric shock from deterioration or electric leakage Only use the specified batteries This make cause damaged the TV or could give an electric shock Others ...

Page 11: ...t in case of S VIDEO or COMPONENT mode 5 Y Pb Pr Component video signal input 6 TUNER RF antenna input 7 S VIDEO Connect the output of the A V Source to the S VIDEO input 8 AV1 Composite input of A V Source 9 AV2 Composite input of A V Source 10 AC POWER Power cord input SCART RCA 1 POWER button Switches TV set on or off 2 MENU button Displays a menu 3 SELECT button Selects the A V source 4 VOLUME...

Page 12: ...n 15 FAV INPUT Selects favorite input 16 MULTI MEDI Selects component RGB DTV PC ANALOG HDMI 17 MTS Selects the language during dual language broadcast selects the sound output 18 PIP CH Selects a programme when RF signal is displayed in PIP mode 19 SWAP Switches a main picture for sub picture in PIP mode 20 INPUT Selects the AV source of sub picture in PIP mode 21 SIZE Selects the size of sub pic...

Page 13: ...alkaline batteries Don t mix used batteries with new batteries Using the remote control TV AV select button on the remote control Each press of this button changes the mode as shown below MULTI MEDI select button on the remote control Each press of this button changes the mode as belows Remote Control Key Functions AV1 TV HDMI AV2 PC ANALOG S VIDEO COMPONENT RGB DTV COMPONENT HDMI RGB DTV PC ANALO...

Page 14: ...ote control may cause operation failure Signal from the remote control may be disturbed by sun light or other strong light In this case turn the set to other direction Notes for using the remote control Accesories Remote control D sub 15 pin cable AUDIO cable PC sound cable Wall Mount Bracket HDMI cable S VIDEO cable Component cable Owner s Manual Power cord Alkaline batteries Accesories Option ...

Page 15: ...t Connect the audio cable from the S VIDEO VCR to the AUDIO sockets of the set Select the S VIDEO by pressing the TV AV button repeatedly Press the PLAY button on the VCR The VCR playback picture appears on the screen To avoid picture noise interference leave an adequate distance 20 inches or more between the VCR and TV VCR Setup T i p s 2 Insert a video tape into the VCR and press the PLAY button...

Page 16: ...input or the single RGB DTV PC INPUT for video connections depending on your Set Top Box connectors Then make the corresponding Audio connections DTV input is available to 480 576i 480 576p 720p 1080i mode 2 Tune on the digital SET TOP BOX Refer to the owner s manual for the digital SET TOP BOX 1 Press TV AV button on the remote control to select COMPONENT or RGB DTV To watch SET TOP BOX ...

Page 17: ... Pb Pr of COMPONENT DVD DTV INPUT and audio inputs to Audio jacks of AV INPUT Component Input is available to 480 576i 480 576p 720p 1080i mode How to use Press TV AV button on the remote control of the TV to select COMPONENT Use the DVD player according to its owner s manual Turn on the DVD player and insert a DVD Component Input ports Connect DVD player jacks to TV Component input jacks as indic...

Page 18: ...ntrol to select the PC ANALOG input source Set the resolution output of the PC to WXGA or under 1360 x 768 60Hz You can easily connect the LCD TV to your PC for outstanding image and sound Setup Instructions to Connect a PC to your TV To setup this TV in your PC window environment select Normal Standard or Default TV This TV does not support Plug and Play function The screen does not display when ...

Page 19: ...ncy Hz 70 85 60 67 72 75 85 56 60 72 75 Resolution 1024 768 1360 768 1280 768 832 624 Vertical Frequency Hz 60 70 75 60 60 75 Resolution HDMI Setup You can use the HDMI INPUT depending on your Set Top Box or DVD player Press TV AV button on the remote control to select HDMI Connection of external equipment ...

Page 20: ...rectly At this moment the TV is switched to Standby mode Press the POWER button on the TV or press the POWER button on the remote control and then the TV will be turn on 1 If the TV is turned off with the remote control button or POWER ON OFF button on the TV Press the POWER button on the TV or press the POWER button on the remote control and then the TV will be turn on 2 Checking features Use the...

Page 21: ...e SLEEP button just once If you turn the TV off after setting the sleep timer the setting is erased The sleep timer will then have to be set again Sleep Timer turns the TV off after a preset time To release sleep time setting press the SLEEP button repeatedly to select 10 Setting Sleep Timer T i p s 20 30 60 90 120 180 240 Press the SLEEP button to set sleep time Each time you press SLEEP button t...

Page 22: ...STOM 1 Press the APC button CUSTOM Press the MENU button and then press the VOL button to select PICTURE menu Press the PR button Adjusting picture appearance 1 Press the PR button to select other items Adjust BRIGHTNESS COLOR SHARPNESS and TINT in the same way 2 Press the PR button to select COLOR TEMP and then press the VOL button to select the desired COLOR TEMP Press the ENTER button Press the...

Page 23: ...tton to select a SOUND setup Each press of ASC or PR button changes the screen display as shown below Press the MENU button and then press the VOL button to select SOUND menu Press the PR button Manual Settings Adjusting Sound 1 Press the PR button to select BALANCE and then press the VOL button 2 Use the VOL button th make appropriate adjustments and then press the ENTER button Press the PR butto...

Page 24: ... be received are stored by this method It is recommended That you use auto programme during installation of this set 1 Press the MENU button and then press VOL button to select the TUNING menu 2 3 Press the VOL button to begin auto programming 4 Press the VOL button Select a TV system with the PR button on the SYSTEM pull down menu BG Asia New Zealand M East Africa Australia I Hong Kong South Afri...

Page 25: ...uto programming press the MENU button When auto programming is completed the Programme edit menu appears on the screen See the Programme edit section to edit the stored programme MANUAL programme tuning Manual programme lets you manually tune and arrange the stations in whatever order you desire Also you can assign a station name with five characters to Each programme number 1 Press the MENU butto...

Page 26: ...button on the SYSTEM pull down menu BG Asia New Zealand M East Africa Australia I Hong Kong South Africa option DK East Europe China Africa CIS L France Monaco 9 Press the ENTER button Press the PR button to select CHANNEL On the Channel pull down menu if possible select the channel number directly with the number buttons Any number under 10 is entered with a numeric 0 or 00 in front of it ie 05 f...

Page 27: ...the second character and so on Press the ENTER button Setting up TV stations Programme edit This function enable you to delete or skip the stored programmes Also you can move some stations to other programme numbers or insert a blank station data into the selected programme number Deleting a programme Select a programme to be deleted with the PR or VOL button Press the RED button twice The selecte...

Page 28: ...rogramme number to be skipped with the PR or VOL button Press the BLUE button The skipped programme turns to blue Press the BLUE button again to release the skipped programme When a programme number is skipped it means that you will be unable to select it using the PR button during normal TV viewing If you want to select the skipped programme directly enter the programme number with NUMBER buttons...

Page 29: ...The previous mode reappears Enter the desired page number as a three digit number with the NUMBER buttons If during selection you press a wrong number you must complete the three digit number and then reenter the correct page number The PR button can be used to select the preceding or following page SIMPLE text Page selection The user guide displays four fields red green yellow and blue at the bot...

Page 30: ...ottom half of the page Press this button again to return to the normal display UPDATE Displays the TV picture on the screen while waiting for the new teletext page The display UPDATE will appear at the top left hand corner of the screen When the updated page is available then display UPDATE will change to the page number Press this button to view the updated teletext page HOLD Stops the automatic ...

Page 31: ...CK for the menus 3 4 Press the PR button to select AUTO OFF and then press the VOL button Press the PR button to select ON OFF Press the ENTER button Press the PR button to select ON TIME and then press the VOL button Press the PR button and VOL button to select time and PR VOL ON OFF Press the ENTER button 2 Press the PR button to select OFF TIME and then press the VOL button Press the PR button ...

Page 32: ... available on RGB DTV PC INPUT Selecting LANGUAGE for the menus Press the MENU button and then press the VOL button to select SETUP menu Press the PR button 1 Press the PR button to select Language and then press the VOL button to select the desired language Press the ENTER button 2 Press the PR button to select INPUT and then press the VOL button to select the desired input Press the ENTER button...

Page 33: ...ach time you press the POSITION button sub picture Position is changed as follows Moving the sub picture Press the PIP button It you press the PIP button again the function is off How to use the PIP PIP PICTURE will let you view two seperate inputs on your TV screen at the same time Color of main picture may be different from PIP s in PIP PICTURE When the main picture is component RGB DTV PC ANALO...

Page 34: ...n in PIP mode Change the main picture and the sub picture This function can be operated when input signal of the sub picture is TV signal When pressing PIP CH button the TV channel of the sub picture moves up and down When pressing INDEX button without regard for a present mode each still picture of live signal searched from TV signal is displayed on sub screen Press any button to stop this functi...

Page 35: ...ith the correct polarities If the batteries have no power replace them with two new batteries No or Poor color or Poor picture The image is too light or too dark The image is too large or too small No output from one of the speakers Strange sound from the TV Select color in the picture and press volume button Keep a certain distance between LCD TV and VCR Activate any function to restore the brigh...

Page 36: ... Input Sound Video Sound Low CH E2 S10 High CH E5 S41 CH E21 E 69 1 0Vp p 75Ϊ 1 0Vp p 75Ϊ Y 1 0Vp p 75Ϊ C 0 3Vp p 75Ϊ R 0 7Vp p 75Ϊ G 0 7Vp p 75Ϊ B 0 7Vp p 75Ϊ SCART CVBS 1 0Vp p 75Ϊ HDMI 19 Pin But the Analog input is not supported Mini D SUB 15 Pin Stereo RCA L R x 2 S VIDEO Component PC SCART X 2 AV1 AV2 SCART or RCA X 2 Y Pb Pr Y Cb Cr Y 1 0Vp p 75Ϊ Pb 0 7Vp p 75Ϊ Pr 0 7Vp p 75Ϊ SCART or RCA M...

Page 37: ...OWNER S MANUAL MEMO ...

Page 38: ...OWNER S MANUAL MEMO ...

Page 39: ...OWNER S MANUAL MEMO ...

Page 40: ...OWNER S MANUAL MEMO ...

Page 41: ......

Reviews: