background image

Exit

MENU

Information 

bootloader            0.1.0           2005-12-23

maincode              0.4.0w        2006-08-21

videoback             1.0.0           2005-12-23

radioback              1.0.0           2005-12-23

defaultdb               0.1.0           2005-12-23

userdb                    1.0.0           2005-12-23

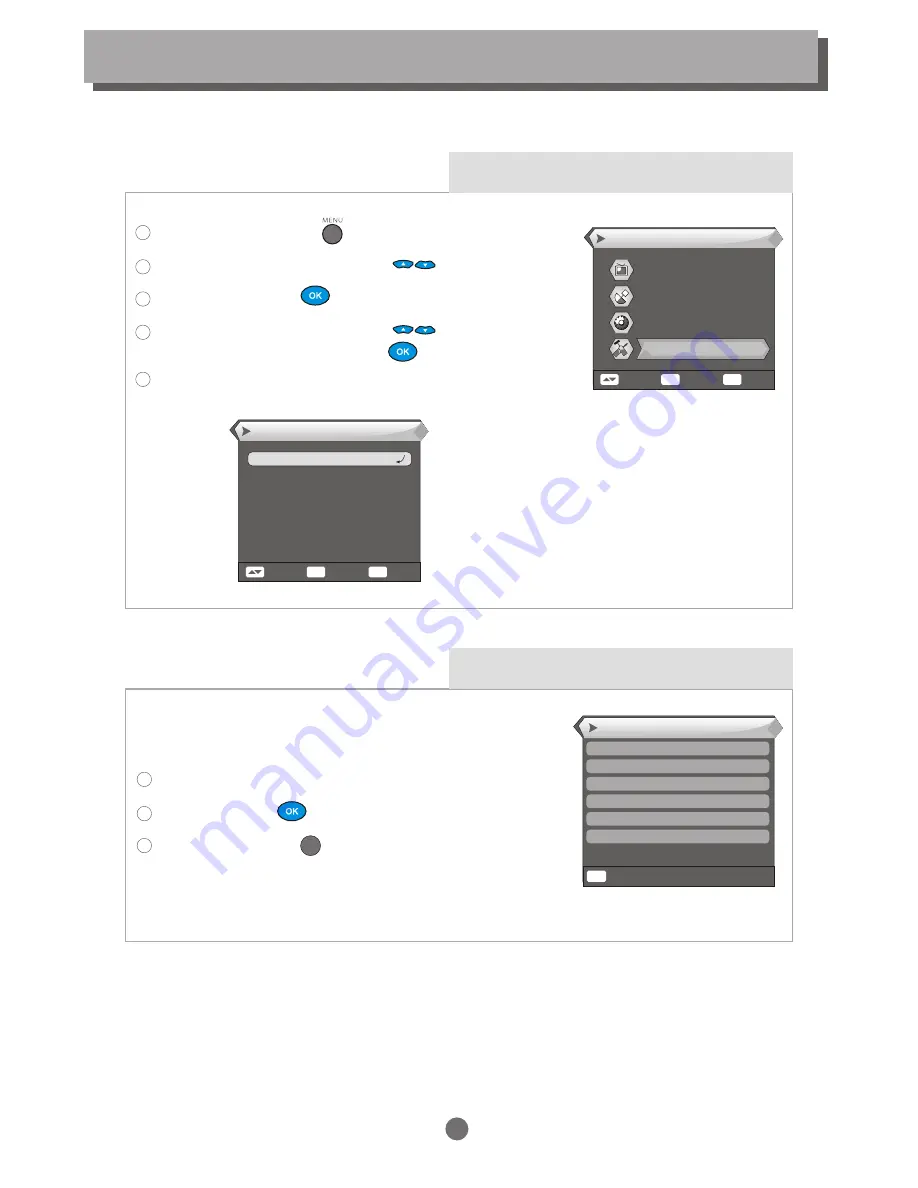
Tools

Use Tools menu ,you can see the information of current event,play game,Load factory default settings,
upgrade software,help using remote control and enter welcome page for quick shortcut menu. 

Tools main menu 

Press the "MENU" button        to enter the main menu of the STB.
 
Press "UP" or "DOWN" cursor button               to select "Tools".
 
Press the "OK" Button          to enter the sub-menu.
 
Press "UP" or "DOWN" cursor button               to highlight the 
desired item and press "OK" button           to confirm .

Press "MENU" button to exit.

1

2

3

4

5

Tools 

Select 

Enter 

Exit

OK

MENU

Information

Game

Load Factory Default

Software Upgrade

Remote Control Help

Welcome Page

Information 

 "Information" can view the software version.

Enter "Tools" menu, highlight "Information".

Press "OK" button            ,the information window appears.

Press "MENU" button           to exit Tools menu.

1

1

2

3

MENU

25

Main Menu 

Channel

Installation 

Setup 

Tools 

Select 

Enter 

Exit

OK

MENU

Summary of Contents for STB 232

Page 1: ...and use Brand Name Model No Description Design Auditing Drawing No Scale English IB 1 1 PART N0 AWA STB 232 00STB 232 I01 0 02 Felly Authorize Engineering Version V1 0 MICO ELECTRIC HONG KONG LIMITED Language English Size 148 x 210 mm Jan 17 07 Total Pages 36 J5840 AWA STB 232English IB V1 0 STB232 ...

Page 2: ...pod bracket or table The videoproduct may fall causing seriousinjury to a child or adult as well as seriousdamage to the video product Use this video product only with a cart stand tripod bracket or table recommendedby the manufacturer s or sold withthe video product Any mounting of the product should follow the manufacturer s instructionsand use of a mountingaccessory recommended by the manufactu...

Page 3: ...f the STB Place the STB at least 30mm from the wall Keep liquids away from the STB Do not use any attachment that is not recommended by the manufacturer it may cause a hazard or damage the equipment Connect all components before plugging any power cords into the wall outlet Always turn off the STB TV and other components before you connect or disconnect any cables Do not attempt to service this pr...

Page 4: ...ge Accessing the favorite channels Teletext Displaying program information Pausing the currentpicture EPG TV Radio CHANNEL Channel list Channel list menu TV Channel list Radio Channel list Delete All Favorites Delete All Channels SYSTEM SET UP System setup mainmenu OSD Language TV System Start up Service Region and Time Timer Setting OSD Setting Parental Lock TOOLS Tools main menu Information Game...

Page 5: ...udio S Video TV aerial for an externalTV aerial Loop through for an externalTV device R F Component Video Y Cb Cr About the STB INTRODUCTION 21 1 USB port with a small upgrading board Down Mix Audio 2 channel L R CompositeVideo Standby button Channel up Channel down Remote sensor Power indicator ...

Page 6: ...al Remove the batteries if the unit will not be used for a prolonged period of time Remote control The remote controltransmits a directional infrared beam Besure to aimthe remote control directly at the infrared sensorof the unit during operation If the sensorhas been coveredor there isa large object betweenthe remote controland the sensor thesensor will notrespond The sensor maynot able to receiv...

Page 7: ...d volume Press to enter Yellow Button For teletext function Mute RECALL switch to previous channel EPG Open up Electronic Program Guide menu TTX Open Teletext function EXIT Exit from menu Green Button For teletext function Page down Blue Button For teletext function FAVORITE Open up Favourite list PAUSE INFO Press for current channel information LANG Select language AUDIO Select audio Left Right S...

Page 8: ...esolved by replacing the roof aerial Some outdoor aerialsare directed towards an analogue transmitter The aerial mustbe directed towards a digital TV transmitter It is not always advisable to position the aerial as high as possible If problemsarise experiment with different aerial heights Indoor and windowmounted aerials It is not advisable to use indoor or window mounted aerials as digital channe...

Page 9: ...our TV and connect this to the TV AERIAL input socket on the STB Switch on your TV plug in and switch on your STB You may need toselect the CVBS orY Cb Cr channelon your TV towatch Digital TV Insome cases your TV will automatically selectthis channel when theSTB is switched on RF Loop Through connectoris used for asecond DVB T receiver The digital signal fromRF In will belooped through via thiscon...

Page 10: ...Never connect digital outputto any analogue input It is always advisableto consult your HiFiinstruction book SYSTEM CONNECTION Coaxial cable You can connectan RCA Cinch singlecable from theDIGITAL AUDIO socketon the STBto a HiFi system equipped withdigital audio input This output isalso used forconnection to anexternal Dolby digital decoder ...

Page 11: ...d be an A V select button This should be selected to record Digital TV You may need toselect the AV channelon your TV betweenS Video CVBS and Y CbCr Video Cassette Recorder VCR TV Antenna R cable F NOTE To record a digitalchannel you will needto select the CVBScable on your video It is always advisableto consult your videoand TV instruction books Please use composite AVoutput to connect yourTV if ...

Page 12: ...PAGE OSD Language Region Tuner Power Auto Scan Main Menu 1 2 3 4 5 Press 1 5 numeric button to enter OSD Language Region tuner Power Auto Scan and Main Menu quickly Press MENU button to return System setup Press the MENU button to enter the setup menu of the STB Press the UP or DOWN cursor button to select Setup Press the OK Button to enter the sub menu Press UP or Down cursor button to select the...

Page 13: ...n Channel Scan MENU UHF 470 0 478 0 MHz Frequency FFT Modulation GI Exit 40 TV Service Radio Service Your STB will start to scan the desired service or Frequency and the picture shown right is displayed Press the MENU button to enter the setup menu of the STB Press UP or DOWN cursor button to select Installation Press the OK Button to enter the sub menu Select the Auto Scan press OK button Auto Sc...

Page 14: ...nel No 1 2 3 4 5 Aerial Adjustment Installation Select Enter Exit OK MENU Auto Scan Channel Scan Aerial Adjustment The signal intensity and quality for the desired channel will display as above When you adjust the location of aerial use this menu to check signal intensity and quality of the selected channel Aerial Adjustment Change MENU 21 On Exit Signal Intensity Signal Quality 65 90 Ch No Tuner ...

Page 15: ...el selected will remain set even when the receiver is turned off and on again until it s altered You can silence the sound from the receiver by pressing the MUTE button The sound remain muted until the MUTE button is pressed again the LEFT or Right cursor button is pressed or until the receiver is turned off and on again Audio control Soundtrack language You can press the AUDIO button to select di...

Page 16: ...rogram information You can read the current program information by pressing INFO button on the remote control Press the button again to hide the program information table Channel Tools Installation System Setup Favorite Group 1 0001 HN Radio2 0002 BBC NEWS 24 0003 BBC Text 0004 BBC Two Pausing the current picture You can pause the current picture by pressing PAUSE button on the remote control Pres...

Page 17: ...BC CHOICE 0002 BBC NEWS 2 Detail 15 02 2006 14 29 Page Extend Timer 2 BBC NEWS 24 13 00 15 00 BBC News Bill Turnbull and Valerie Sanderson present the news with live reports from around the world Widescreen Exit MENU 1 Schedule Detail 1 15 02 2006 14 29 Select Page Enter Exit MENU OK 0002 BBC NEWS 24 15 02 2006 Timer 2 Date 5 5 In schedule and detail menu press numeric button 2 can open the timer ...

Page 18: ...nel directly from on screen channel list This is displayed using the STB s main menu 1 2 3 4 Selection by EPG You can also select the required channel directly from electronic program guide EPG Like the channel list the EPG screen displays a list of the stored channels along with information on what programmes are being broadcast For EPG details see page 13 Channel list menu Channel Select Enter E...

Page 19: ...te group to cancel favorite group the mark will be cancel too Press EXIT button to quit Favorite setup and return to Channel list menu 1 2 3 4 EXIT Move In channel list menu press numeric button 2 there will show a moving mark in the right side of the selected channel Press UP or DOWN cursor button to move the selected channel to the position that you want to place 1 2 5 Favorite 2 OK MENU 1 TV Ch...

Page 20: ...nel list edit menu will be opened The default password is 0000 1 2 Use this menu to delete skip lock and edit channel list Favorite 2 1 TV Channel List Grouo 1 No Signal Move 3 Find Select Page ok Enter 4 Sort 5 Edit Group 0679 SZTV M Input Password Delete In Edit Channel menu press numeric button 1 can make a delete mark in the right side of the highlighted channel After save and exit Edit Channe...

Page 21: ...e of channel successfully After modification highlight Save item and press OK button to save the modified value and exit Edit mode Highlight Exit item and press OK button to exit Edit mode and won t save any modification Video PID Audio PID and PCR PID items are grey and can not be edited NOTE Radio Channel list Enter Channel menu Press UP or DOWN cursor button to highlight Radio channel list Pres...

Page 22: ...tly without save NOTE Use this menu to delete all favorite channels Enter Channel menu Press UP or DOWN cursor button to highlight Delete All channels item Press the OK button you will be asked to input the password Input the password using the numeric buttons a warning window is displayed 1 2 3 4 5 Warning Do you really want to delete all channels Yes No Highlight Yes to confirm all channels will...

Page 23: ...uage First Audio and Second Audio language Enter System Setup menu highlight OSD Language Press OK button the sub menu appears Press UP or DOWN cursor button to select the desired item and press LEFT or RIGHT cursor button to setup the desired language Press OK button to confirm 1 2 3 OSD Language 4 English First Audio Some channels have more than one audio language for choosing use this function ...

Page 24: ... Ratio Aspect Mode is used for switching the screen aspect ratio mode Auto PAL NTSC Autoswitch to TV System PAL TV System NTSC TV System Auto 4 3PS 4 3LB 16 9 Autoswitch to TV System 4 3 Pan Scan 4 3 Letter Box 16 9 Wide Screen Dolby Digital Dolby Digital to set AC3 on or off Video Output Video Output is use for switching the video output mode S VIDEO Y Cb Cr CVBS Set to output S Video video signa...

Page 25: ...ars Press UP or DOWN cursor button to select the desired item and press LEFT or RIGHT cursor button to setup the desired selection Press OK button to confirm Press MENU button to exit 1 2 3 GMT Usage 4 This item is use for open the usage of GMT There are three mode for using Off User Define By Region press LEFT or RIGHT button to switch GMT Offset This item is valid only when the setting of GMT Us...

Page 26: ... 30 minutes Auto power off after 60 minutes Auto power off after 90 minutes Auto power off after 120 minutes Deactivate auto power off Load Default Timer Setting This function can clear all timer setting and return back to default timer setting If you enter this menu you will be asked to input password the default password is 0000 After input password a confirmation window appears All Timers will ...

Page 27: ...ere will show up some information about current channel on the lower of the screen Use OSD Timeout item to set upthe duration of these information show up on the screen Press LEFT RIGHT button to set the time from 1 second 10seconds OSD Transparency to set up the transparency of display of menu and the information show up on the screen Press LEFT RIGHT button to set the valule of transparency 10 2...

Page 28: ...p the Installation Menu Lock Unlock Yes No Lock the Installation menu You must input the password if you want to enter any sub menu of Installation Unlock the Installation menu Channel Lock Set up the channel Lock On Off Yes No Activate channel lock function Deactivate channel lock function New Password Use this item to change password Enter Parental Lock highlight New Password Use the numeric but...

Page 29: ...r the main menu of the STB Press UP or DOWN cursor button to select Tools Press the OK Button to enter the sub menu Press UP or DOWN cursor button to highlight the desired item and press OK button to confirm Press MENU button to exit 1 2 3 4 5 Tools Select Enter Exit OK MENU Information Game Load Factory Default Software Upgrade Remote Control Help Welcome Page Information Information can view the...

Page 30: ...to connecting receiver Master to the other receiver Slave via serial interface to upgrade software code and program list EXIT 4 Software Upgrade Enter Exit OK MENU Upgrade Mode Input Password videoback Start 0 Upgrade mode allcode maincode videoback radioback defaultdb userdb You can re set the STB back to factory settings clear all TV channels in this menu Enter Tools menu highlight Load Factory ...

Page 31: ...exit Help menu 1 2 3 4 EXIT WELCOME PAGE WELCOME PAGE OSD Language Region Tuner Power Auto Scan Main Menu 1 2 3 4 5 This function let you use welcome page for quick shoctcut menu Enter Tools menu highlight WELCOME PAGE Press OK button the WELCOME PAGE menu appears Press 1 5 numeric button to enter OSD Language Region tuner Power Auto Scan and Main Menu quickly Press MENU button to return 1 2 3 4 R...

Page 32: ...eletext channel Channel is scrambled Receiver off Handset not aimed correctly Front panel obstructed Hand set batteries exhausted 1 The batteries in your remote control need replacing 2 There is an obstruction blocking the signal path between the remote control and the box The aerial feed former new point may come through a distribution system which may reduce the digital signal now received by th...

Page 33: ...ROFILE LEVEL VIDEO FORMATS Audio Format VIDEO OUTPUT MPEG 2 ISO IEC 13818 INPUT RATE MAX 15Mbit s MPEG 2 MAIN PROFILE MAIN LEVEL 4 3 16 9 SWITCHABLE CVBS Y Cb Cr default S video MPEG Layer I II 32 44 1 48KHz CONNECTION MAIN POWER CABLE TUNER SPDIF DATA PORT FIXED TYPE ANTENNA INPUTx1 RFOUTPUT x1 COAXIAL x1 OPTICALx1 SERVICE PORT x1 POWER SUPPLY INPUT VOLTAGE POWER CONSUMPTION AC220 240V 50 60Hz MA...

Page 34: ...NOTE ...

Reviews: