background image

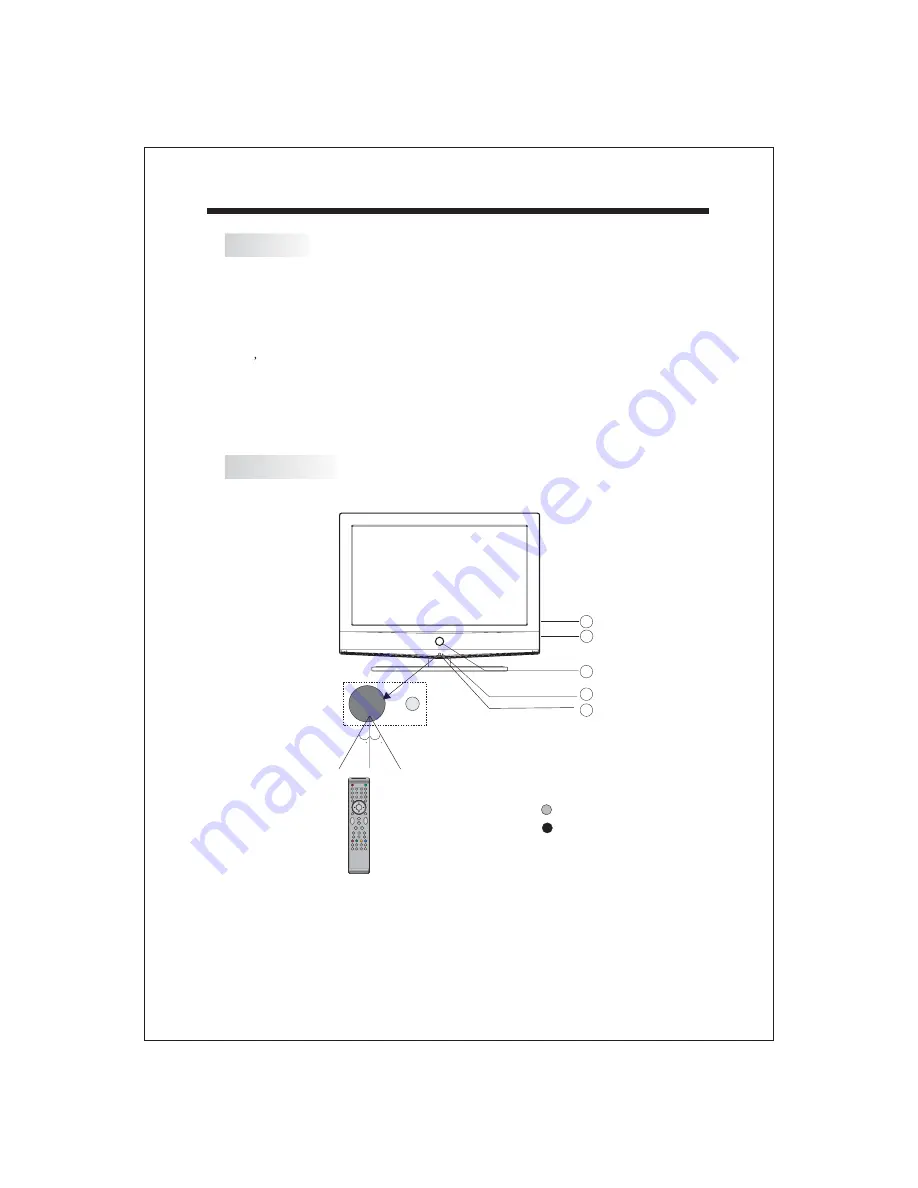
FRONT PANEL

AC Power Cord......................... 1

Infrared Remote Control............ 1

User s Manual ........................ 1

Battery(AAA)........................... 2

ACCESSORIES

INSTALLATION

-4-

1

2

3

4

5

6

7

8

9

0

+

CH

_

+

_

VOL

1:

Remote control sensor.

2:

Indicator LED: GREEN

POWER ON.

RED

STANDBY.

3:

Key board

4:

Power: Press this button to turn the unit

ON from STANDBY mode.

Press it again to turn the set back to

STANDBY.

5:

AC power switch.

30

30

3

4

2
1

5

Summary of Contents for MSDV2203-F3-D0

Page 1: ...USER MANUAL Please read this User Manual carefully to ensure use of this product and keep this manual for future reference MSDV2203 F3 D0 22 56cm HD READY LCD Television N294 ...

Page 2: ...FICATION 29 WALL MOUNTING INSTALLATION GUIDLINES 3 ACCESSORIES 4 FRONT PANEL 4 KEY BOARD RIGHT SIDE 5 REAR PANEL 5 ANTENNA CONNECTION 6 CONNECTING TO PC 7 PC PRESET 8 CONNECTING TO AV EQUIPMENT 9 BATTERY INSTALLATION 10 KEYS FUNCTION 11 BASIC OPERATION 12 TELETEXT 13 EPG 14 MENU OPERATION 15 19 20 27 DVD operation ...

Page 3: ...o rain or moisture WARNING Thank you very much for purchasing this TV To enjoy your product from the very beginning read this manual carefully and keep it handy for easy reference INSTALLATION CAUTION Locate the TV in the room where light does not strike the screen Total darkness or a reflection on the picture screen can cause eyestrain Soft and indirect lighting is recommended for comfortable vie...

Page 4: ...should pay special attention to children Serious injury may result if it falls Do not place your television on an unstable cart stand shelf or table Serious injury to an individual and damage to the television may result if it falls When the television receiver is not used for an extended period of time it is advisable to disconnect the AC power cord from the AC outlet Avoid exposing the televisio...

Page 5: ...2 ACCESSORIES INSTALLATION 4 1 2 3 4 5 6 7 8 9 0 CH _ _ VOL 1 Remote control sensor 2 Indicator LED GREEN POWER ON RED STANDBY 3 Key board 4 Power Press this button to turn the unit ON from STANDBY mode Press it again to turn the set back to STANDBY 5 AC power switch 30 30 3 4 2 1 5 ...

Page 6: ... Rear Audio input YPbPr input ANTENNA SOCKET Note 1 AV S VIDEO and YPbPr share the Rear Audio input channel 2 When HDMI port get DVI signal the PC Audio channel will change to receive the audio from HDMI port Coaxial SPDIF OUTPUT 100 240V 50 60Hz AC INPUT AUDIO VGA INPUT VGA INPUT L R AV S VIDEO HDMI ANT AUDIO INPUT Pr Y Pb YPbPr INPUT SPDIF OUTPUT OPEN CLOSE PLAY PAUSE STOP NEXT USB PREV DVD SIDE...

Page 7: ...ANTENNA CONNECTION INSTALLATION Note Aerial connections IEC female Input impendance 75 unbalanced 6 ...

Page 8: ... cable 2 Connect the power cord 3 Power on the TV switch the input source to VGA mode 4 Power on the PC This sequence is very important INSTALLATION 7 PC Audio Power cord VGA cable 100 240V 50 60Hz AC INPUT AUDIO VGA INPUT VGA INPUT L R AV S VIDEO HDMI ANT AUDIO INPUT Pr Y Pb SPDIF OUTPUT YPbPr INPUT ...

Page 9: ...4 768 60Hz INSTALLATION PC PRESET 8 1 2 3 4 5 6 7 8 9 720 400 640 480 800 600 800 600 800 600 800 600 1024 768 1024 768 1024 768 70 60 56 60 75 72 60 70 75 31 47 31 47 35 156 37 88 46 88 48 08 48 36 56 48 60 02 RESOLUTION V Freq Hz H Freq KHz ...

Page 10: ...ent Please refer to the owner s manual of the equipment to be connected as well You can use the input terminals on TV set rear as follows To audio outputs with terminal VIDEO EQUIPMENT utpu To audio o ts with S video terminal VIDEO EQUIPMENT T outp o S VIDEO ut Yellow video White audio L Red audio R or Pr Y W R R W Y W R output To video Blue Pb Green Y B G VIDEO EQUIPMENT with YPbPr Y W R W R G B ...

Page 11: ...y marks inside the unit 3 Mount the battery cover Replace with new batteries when the TV set begins to show the following symptoms Operation is unsteady or erratic Sometimes the TV set does not function with Remote Control Unit 1 Alkaline Battery Recommended 2 Remove batteries when they are exhausted or if the remote control is not to be used for an extended period of time ...

Page 12: ... what s on next in DTV mode 12 To access your favourite channels list in TV or DTV mode 14 page25 19 page 14 20 To disable or enable the sound output 21 To select the available audio language of TV programs 22 To access the previously viewed channel 23 To select input source 24 To confirm selection 25 To return to the previous menu or exit menu 26 To switch sound mode 27 To access the next or prev...

Page 13: ...n to display the preset channel information Press the button then press the buttons to select the input source and press the OK button to confirm Press the SOURCE button on the remote control to select the TV or DTV input mode and press the OK button to confirm If you are using the unit for the first time an Installation Guide menu will be displayed to guide you through Press the CH or CH button t...

Page 14: ...tain subpages which are automatically displayed successively This key is used to stop or resume sub page acquisition The indication appears top left To freeze the page To display or hide the concealed information games solutions This is used to enter or exit teletext mode The summary appears with a list of items that can be accessed Each item has a corresponding 3 digit page number If the channel ...

Page 15: ...nnel at a later point in time he detailed programme information of the channel currently being viewed will be displayed Press the EPG button to access the EPG menu t To see what is going to be broadcast after the current programme press the button to view future programmes and press the button to return towards the programmes televised at the current time To view a different channel press the or b...

Page 16: ...ess the OK button to start or exit auto tuning NOTE All the channels including ATV DTV and Radio can be tuned at the one time 2 DTV Manual Tuning You can select a DTV channel then find the program in this channel Pls press the buttons to select the channel then press the OK button to search the programs NOTE Bad Normal Good refers to the signal intensity Please select country first then select Sta...

Page 17: ...s to choose the program then press the blue button to skip this program the icon will show on the right side of the program Choose the skipped program and press the blue button again to cancel skip the FAV Press the buttons to choose the program press the FAV button it will show on the right side of the program Choose the FAV program and press the FAV button again to cancel FAV the icon will disap...

Page 18: ... PC Setup is available in VGA mode only EXIT MENU OK SOUND Sound Mode Standard Treble Bass Balance Surround Sound Off 3 SOUND MENU The third item of the menu is the SOUND menu You can adjust the sound effect here including treble bass and balance as well as other sound functions Press the buttons to select and press the buttons to adjust 50 50 0 2 PICTURE MENU EXIT MENU OK PICTURE Colour Temp Norm...

Page 19: ...ock functions Press the buttons to select and press the buttons to adjust NOTE When the Auto Sleep is set to ON the unit will turn to standby mode automatically if there is no signal input for a period of about 15 minutes EXIT MENU OK DEFAULT Menu Language English Audio Language English Subtitle Language English Hearing impaired Off Country Australia 5 DEFAULT MENU The fifth item of the MENU is th...

Page 20: ...channels Press the or OK button and enter the new password Press the or OK button to enter the program list Press the buttons to select the channel you want to lock then press the green button to lock the lock icon will appear behind the locked channel To unlock the channel select the locked channel and press the green button again the lock icon will disappear Press the buttons to set the program ...

Page 21: ...o modes DVD video R RESTRICTED Parental Lock This product incorporates copyright protection technology that is protected by method claims of certain U S patents and other intellectual property rights owned by Macro vision Corporation and other rights owners Use of this copyright protection technology must be authorized by Macro vision Corporation and is intended for home and other limited viewing ...

Page 22: ... appear on the right 4 Press the Arrow buttons to highlight the Exit Setup option then press Enter or Setup again to exit Setup Menu VIDEO SETUP VIDEO SETUP BRIGHTNESS CONTRAST HUE SATURATION SHARPNESS VIDEO SETUP VIDEO SETUP BRIGHTNESS CONTRAST HUE SATURATION SHARPNESS 21 DVD OPERATION SYSTEM SETUP SYSTEM SETUP TV SYSTEM VIDEO TV TYPE PASSWORD RATING DEFAULT 2 Setup Items Introduction 2 1 SYSTEM ...

Page 23: ...2 2 1 OSD LANGUAGE Highlight the OSD LANGUAGE option and press the Arrow buttons to choose the OSD language you prefer Press Enter to confirm and it will display OSD in that language LANGUAGE SETUP LANGUAGE SETUP OSD LANGUAGE AUDIO LANG SUBTITLE LANG MENU LANG 2 2 2 AUDIO LANG Highlight the AUDIO LANG option and press the Arrow buttons to choose the audio language you prefer Press Enter to confirm...

Page 24: ... 4 2 CONTRAST Use the Up and Down arrow buttons to move the scroll and adjust the contrast 2 4 3 HUE Use the Up and Down arrow buttons to move the scroll and adjust the hue VIDEO SETUP VIDEO SETUP BRIGHTNESS CONTRAST HUE SATURATION SHARPNESS 2 4 4 SATURATION Use the Up and Down arrow buttons to move the scroll and adjust the saturation 2 4 5 SHARPNESS Use the Up and Down arrow buttons to move the ...

Page 25: ...REPEAT to select Repeat Single or Repeat All or Repeat off 11 PLAY PAUSE Press PLAY PAUSE during playback to pause playback Press PLAY PAUSE to resume normal playback Press PLAY PAUSE from stop mode to start play 12 STOP Press STOP once during playback to stop and hold playback Press PLAY to resume playback from the point you pressed STOP Press STOP twice to stop playback completely 13 DVD USB Swi...

Page 26: ...l Chapter Enter number to choose the Chapter 31 ANGLE Press ANGLE to view scenes from different camera angles During DVD playback Note This function is disc specific Press ANGLE repeatedly to change from one camera angle to another 32 PBC During VCD2 0 playback press PBC to return to the disc menu 33 NEXT Press NEXT to skip to the next chapter or track 34 PREV Press PREV to skip to previous chapte...

Page 27: ...d manage your pictures on your computer You can also record the JPEG picture into CD R or CD RW with the CD Rewriter yourself The Max Size of JPEG Picture can be supported 3840x3840 pels JPEG stands for Joint Picture Experts Group It is the first International Standard on Still Picture Compressing ISO 10918 1 constituted by the Committee on Still Picture Compressing Standard of ISO The picture on ...

Page 28: ...ched or stained BAD DISC DISPLAYED Ensure the disc is not warped damaged or deformed Ensure the disc is not badly stained or damaged Ensure the disc format is compatible with the player Please check whether you have tried to play a software CD If so please restart the player REMOTE NOT WORKING Make sure the Main unit s POWER button is on Ensure the remote batteries are working Point the remote con...

Page 29: ...activated or if the audio system connections are not correct No picture Mute Power cord is not inserted Power switch is not opened Contrast and brightness volume setup Press standby key on the remote control for inspecting No colour Normal audio Colour control Picture breaking up Normal audio or weak Retune channel No colour Noise TV system Normal audio antenna position direction or connection Pro...

Page 30: ...1 1 1 1 1 LCD Display colours Brightness Contrast ratio Response time Viewing angle 16 7M 400 CD M 800 1 5 ms 170 H 160 V TV DVB T decode DVB T de modulation Audio MPEG2 Audio Layer I II Video MPEG2 Transport MP HL Demodulator COFDM OFDM Mod 2K 8K FFT SFN and MFN Packed Carries 2K 8K Guard Interval 1 4 1 8 1 16 1 32 Terminals ower Voltage utput Power THD 7 100 240V 50 60Hz Others 29 TV system Y Cb...

Page 31: ......

Page 32: ......

Reviews: