background image

-17-

OPERATION

Favourite

Press        to choose the program, press FAV button, it will show      on the right side of the program. Choose 
the FAV program, press FAV button again, you can cancel the FAV,      will disappear .

Once your favorite group is created, you can press the FAV key to quickly access your favourite channel.

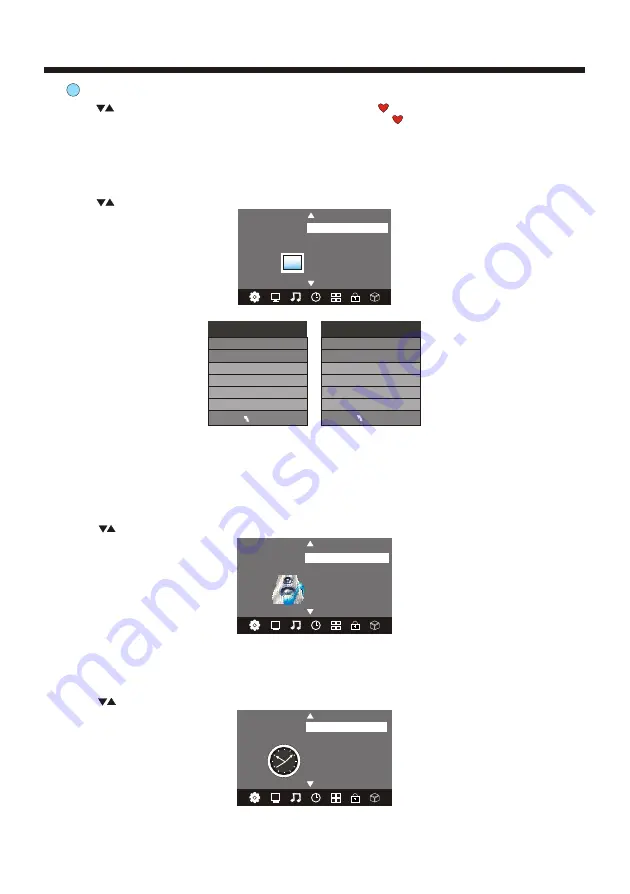
The second item of the MENU is PICTURE MENU.You can adjust picture effect here, such as contrast, 
brightness, etc.
Press        to move, press OK to adjust.
      

2. PICTURE MENU


Color Temperature

Aspect Ratio

Noise Reduction
Screen

Picture Mode Standard

<                                                >

<                                                >

PICTURE

MENU

Picture Mode           Standard

Contrast 82

Brightness 50

Color 50

Sharpness 50

Tint 50

Color Temperature      Medium

Red 40

Green 31

Blue 50

MENU

NOTE:

1).Tint is available in NTSC system only.
2).There are four color temperature modes that can be selected: medium, warm, cool, user.
3).Screen is available in PC mode only, which can adjust Horizontal position, vertical position, size and phase.

3.SOUND MENU

The third item of the MENU is the SOUND MENU.
You can adjust the sound effect here such as treble, bass, balance etc.
Press         to move, press OK to adjust.

<                                                >

<                                                >

Balance

Auto Volume

Sound Mode Standard

SOUND

Note: 

Auto volume: only available when the input signal volume is too large or distortion.

4.TIME MENU

The forth item of the menu is the TIME MENU You can adjust the clock, power on/off time, sleep time etc 
Press        to move, press OK to adjust. 

NOTE:

Within 15 minutes there is no signal, the TV will auto sleep, if Auto Sleep is set ON. The clock time can be 
set from the DTV system.

Off Time
On Time
Sleep Timer
Auto Sleep
Time Zone

Clock --    --    --    --

TIME

<                                                >

<                                                >

Summary of Contents for MHDV3211-O3

Page 1: ...r purchasing this LCD TV Before connection and operation of this product please read the manual carefully and completely Please keep this manual for future reference N294 MHDV3211 O3 32 81cm Full HD LCD Television Version 1 0 ...

Page 2: ......

Page 3: ... 1 INTRODUCTION 1 SAFETY AND WARNINGS 2 4 STAND INSTALLATION GUIDE 5 WALL MOUNTING INSTALLATION GUIDLINES 6 INSTALLATION 7 12 REMOTE CONTROL 13 14 OPERATION 15 19 TROUBLE SHOOTING 20 TECHNICAL SPECIFICATIONS 21 ...

Page 4: ...cessories specified by the manufacturer 11 Unplug this apparatus during lightning storms or when unused for long periods of time 12 Refer all servicing to qualified service personnel Servicing is required when the apparatus has been damaged in any way such as power supply cord or plug is damaged liquid has been spilled or objects have fallen into the apparatus the apparatus has been exposed to rai...

Page 5: ...al attention to children Serious injury may result if it falls Do not place your television on an unstable cart stand shelf or table Serious injury to an individual and damage to the television may result if it falls When the television receiver is not used for an extended period of time it is advisable to disconnect the AC power cord from the AC outlet Avoid exposing the television receiver to di...

Page 6: ...s newspapers table cloths curtains and such like The display panel isa very sensitive andhigh technology product givingyou finely detailed pictures Occasionally a few non active pixelsmay appear on thescreen as a fixedpoint of black blue green orred Please note thatthis does not affect the performance ofyour product About After Image The extended use offixed image programme materialcan cause a per...

Page 7: ...nd the parts Open the box and find the following parts Stand x1 pc Screws x 4 pcs Packing Stand Packing TV Screws Stand Place the Stand on the TV 1 Place the TV with thedisplay side down on a table or desk flat totally clean surface 2 Place the Stand on the TV as shownbelow Stand Secure the Stand to the TV Secure the Stand to the TV by using the 4 supplied screws 1 2 4 3 ...

Page 8: ...le Illustration How to remove the stand from the TV The LCD Display is very fragile and must be protected at all times when removing the base stand Be sure that no hard or sharp object or anything that could scratch or damage the LCD display comes into contact with it DO NOTexert pressure on the front of the unit at any time because the screen could crack 1 Use the screwdriver to remove 4 screws f...

Page 9: ...trol 1 User s Manual 1 Battery AAA 2 ACCESSORIES INSTALLATION 7 Stand mounting screws 4 Wall mounting M4 screws 4 1 Remote control sensor 2 Indicator LED GREEN POWER ON RED STANDBY 3 Key board on side of TV 1 2 3 4 5 6 7 8 9 0 CH _ _ VOL 30 30 3 1 2 ...

Page 10: ...nput 1 SOURCE Display the input source menu 2 MENU Display main MENU 3 CH CH In TV mode press CH or CH to change the channel up and down In MENU mode press CH or CH to select items In standby mode press CH or CH to turn on the TV 4 VOL VOL Adjust sound level In MENU mode press VOL or VOL to adjust the item that you selected 5 STANDBY Press this button to turn the unit ON from STANDBY mode Press it...

Page 11: ...ANTENNA CONNECTION INSTALLATION Note Aerial connections IEC female Input impedance 75 unbalanced 9 ...

Page 12: ...f 1 Connect VGA and audio cable 2 Connect the power cord 3 Power on the TV switch the input source to VGAmode 4 Power on the PC This sequence is very important INSTALLATION 10 VGA INPUT RF INPUT PC AUDIO INPUT 100 240V 50 60Hz AC INPUT HDMI1 INPUT HDMI2 INPUT AV L R AV OUTPUT ...

Page 13: ...ESET MODE INSTALLATION PC PRESET 11 1 2 3 4 5 6 7 720 400 640 480 800 600 800 600 800 600 1024 768 1024 768 70 60 56 60 72 60 70 31 47 31 47 35 156 37 88 48 08 48 36 56 48 RESOLUTION V Freq Hz H Freq KHz ...

Page 14: ...mponent video inputs for convenient connection to VCR DVD or other video equipment Please refer to the owner s manual of the equipment to be connected as well You can use the input terminals on TV set rear as follows W R To audio outputs VIDEO EQUIPMENT with Composite output TO VIDEO output W R W R G B R G B R Yellow video White audio L Red audio R or Pr Y W R Blue Pb Green Y B G HDMI VIDEO EQUIPM...

Page 15: ...IO Press to change the available audio language for the program you are watching 15 RECALL Press to return to the previously viewed channel 16 SOURCE Press to display the Input Source List 17 OK Press to confirm Menu selections 18 EXIT To exit the main menu press the Exit Button or to cancel setting selections 19 SOUND Press to switch between the sound modes 20 CH CH Press to scroll through your C...

Page 16: ...age acquisition Theindication appears top left To freeze the page To display or hide the concealed information games solutions The user can set four favourite pages to be directly linked to the four color keys While list mode is activated it is not possibility to use TOP or FLOF navigation with the colourkeys The favourite pagenumbers should be stored and restored to from nonvolatile memory for ea...

Page 17: ...n CHANNEL Auto Tuning DTV Manual Tuning Software Update USB Software Update OAD Off Dansk Deutsch Hrvatski Italiano Please select an OSD Language OK Magyar Nederlands Norsk Polski English Cesky E k Espanol Fran ais Portugues Pycck Austria Belgium Country OK Australia Croatia Finland Greece Luxembourg Czech France Hungary Netherlands Bulgaria Denmark Germany Italy Tune Type DTV ATV MENU Austria Bel...

Page 18: ... green button to renamethe program Press to choose the character Press to move the cursor Press MENU button to exit edit Press EXIT to exit the menu Note ATV programs name only can beonly 5 characters long DTV programsname can be 25 characters Move the cursor to the program press yellow button then you caninput the number of position pressOK the program will be moved Press to choose the program pr...

Page 19: ... MENU NOTE 1 Tint is available in NTSC system only 2 There are four color temperature modes that can be selected medium warm cool user 3 Screen is available in PC mode only which can adjust Horizontal position vertical position size and phase 3 SOUND MENU The third item of the MENU is the SOUND MENU You can adjust the sound effect heresuch as treble bass balance etc Press to move press OK toadjust...

Page 20: ... OK button to enter the DMP Menu PHOTO MUSIC MOVIE TEXT 6 LOCK MENU To enter the LOCK Menu press MENU button and then press or buttons to select the LOCK Menu The default password is 6666 Please set a new password so it is easy to remember Follow the on screen steps to set Set Password Lock System LOCK Block Program Parental Guidance Off 7 APPLICATIONS MENU To enter the Applications Menu press MEN...

Page 21: ...ormation of the channel you are currently watching as well as the 7 Day Program guide Sample1 ts Resolution 720x576 Subtitle 1 1 Size 30574 KBytes Close AudioTrack 1 2 28 Apr 04 39 800 SZTVM01 No Information 801 SZTVM02 802 SZTVM03 803 SZTVM04 804 Date No Information No Information No Information No Information PROGRAMME GUIDE TIME Schedule INFO Remind OK INDEX 2 Press the teletext yellow key It c...

Page 22: ...tions are not correct No picture Mute Power cord is not inserted Power switch is not opened Contrast and brightness volume setup Press standby key on the remote control for inspecting No colour Normal audio Colour control Picture breaking up Normal audio or weak retune channel No colour Noise TV system Normal audio antenna position direction or connection Trouble phenomenon Symptom Ghost 20 TROUBL...

Page 23: ...eo Output Analog Audio Output 1 2 1 2 1 1 1 1 1 LCD Display colours Brightness Contrast ratio Response time Viewing angle 16 7M 4000 1 6 5 ms 178 H 178 V TV DVB T decode DVB T de modulation Audio MPEG2 Audio Layer I II Video MPEG2 Transport MP HL Demodulator COFDM OFDM Mod 2K 8K FFT SFN and MFN Packed Carriers 2K 8K Guard Interval 1 4 1 8 1 16 1 32 Terminals Input Voltage 100V 240V 50 60Hz 135W 2x...

Page 24: ......

Reviews: