background image


24 

Digital Video Recorder User Manual 

4.3.2  Record stream 

Step1: enter into system configuration

record configuration

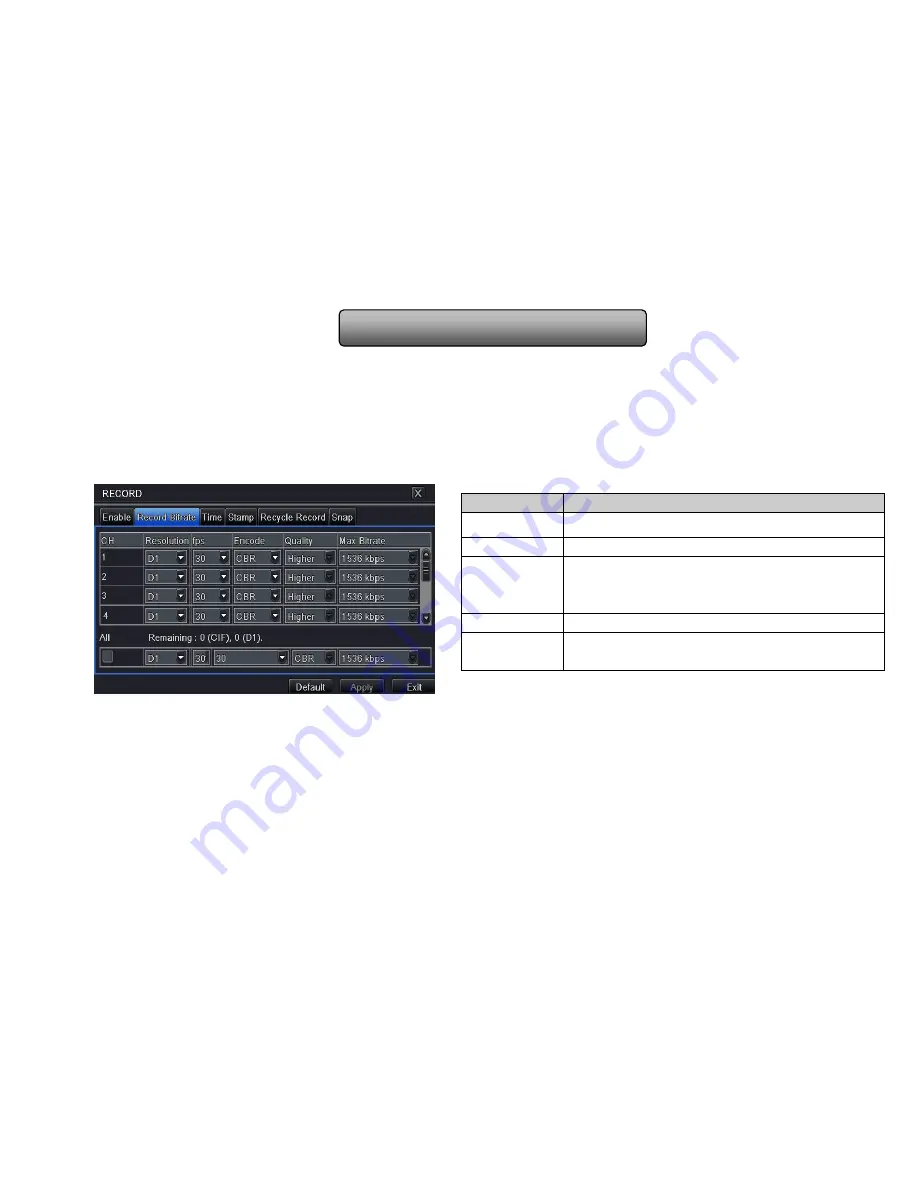
record bit rate; refer to Fig 4-12: 

Step2: setup rate, resolution, quality, encode and max bit stream   
Step3: user can setup all channels with same parameters, tick off 

“All”, then to do relevant setup. 

Step4:  click 

“default” button to resort default setting; click  “apply” button to save the setting; click  “exit” button to exit current 

interface. 

Note: if the rate value set is over high the maximum resources of the device, the value will be adjusted automatically. 


Fig 4-12 record configuration-record bit rate 


4.3.3  Time 

Step1: enter into system configuration

record configuration

 time; refer to Fig 4-13: 

Pre-alarm  record  time: 

the  record  time  before  event  happen  i.e.  record  time  before  motion  detection  or  sensor  alarm  is 

triggered. 

Post-alarm record:

 set the post recording time after the alarm is finished, five options: 10s, 15s, 20s, 30s, 60s, 120s, 180s and 

300s.     

Parameter 

Meaning 

Rate 

Range from: 1-30

NTSC

1-25(PAL) 

Resolution 

Support CIF and D1 

Quality 

The higher the value is, the clearer the recorded   
image is. Six options:    lowest, lower, low, 
medium, higher and highest.   

Encode 

VBR and CBR 

Max bit 

stream 

Range from: 64 Kbps, 128 Kbps, 256 Kbps,   
512 Kbps, 768 Kbps, 1Mbps, 2 Mbps 

Summary of Contents for ADR8100ME Series

Page 1: ...DVR User Manual ADR8100ME Series All rights reserved...

Page 2: ...h a dry cloth Do not block any ventilation openings And ensure well ventilation around the machine Do not power off the DVR at normal recording condition The correct operation to shut off DVR is to st...

Page 3: ...ter 4 2 2 Front Panel Descriptions 5 2 3 Rear Panel Instructions 6 2 3 1 Rear Panel Interface 6 2 4 Remote Controller 10 2 5 Control with Mouse 12 2 5 1 Connect Mouse 12 2 5 2 Use Mouse 12 3 Basic Fun...

Page 4: ...3 1 Enable 23 4 3 2 Record stream 24 4 3 3 Time 24 4 3 4 Stamp 25 4 3 5 Recycle record 26 4 3 6 Snap 26 4 4 Schedule configuration 26 4 4 1 Schedule 26 4 4 2 Motion 27 4 4 3 Sensor 28 4 5 Alarm config...

Page 5: ...45 5 Record search playback and backup 46 5 1 Time search 46 5 2 Event search 47 5 3 File management 48 5 4 Image 49 5 5 Backup 49 6 Manage DVR 50 6 1 Check system information 50 6 1 1 System informa...

Page 6: ...Surveillance 70 8 1 By Phones with Windows mobile 70 8 2 By Phones with Symbian 71 8 3 The Software installation for iPhone mobile clients 73 8 4 The installation operation methods for Android mobile...

Page 7: ...Digital Video Recorder User Manual Appendix F 16 CH DVR Specifications 103...

Page 8: ...view by phones etc which ensure its powerful functions and high stability Due to these distinctive characteristics it is widely used in banks telecommunication transportation factories warehouse and i...

Page 9: ...and event search Support 4 8 16 screen playback simultaneously Support deleting and locking the recorded files one by one Support remote playback in Network Client through LAN or internet ALARM 1 chan...

Page 10: ...wser to do remote view Support setup client connection amount Support dual stream Network stream is adjustable independently to fit the network bandwidth and environment Support picture snap and color...

Page 11: ...y for security and safe field 2 Please calculate HDD capacity according to the recording setting Please refer to Appendix B Calculate Recording Capacity Step1 Unscrew and Open the top cover Step2 Conn...

Page 12: ...ce please make the object as the standard Item Type Name Description 1 Work state indicator Power Power indicator when connection the light is blue HDD When HDD is writing and reading the light is blu...

Page 13: ...or status 3 Digital button 1 9 Input number 1 9 or choose camera 0 10 Input number0 10 and the above number together with other digital keys 4 Input button Direction button Change direction to select...

Page 14: ...Z Connect to speed dome 5 K B Connect to keyboard 6 ALARM IN Connect to external sensor1 4 7 Video in Video input channels from 1 4 8 VGA port VGA output connect to monitor 9 LAN Network port 10 USB...

Page 15: ...nly video display no menu show 3 Audio out Audio output connect to the sound box 4 Video in Video input channels from 1 8 5 POWER INPUT DC12V 6 FAN For cooling the device 7 VGA port VGA output connect...

Page 16: ...ig 2 7 Rear Panel for 16 ch Item Name Description 1 P Z Connect to speed dome 2 K B Connect to keyboard 3 ALARM IN Connect to external sensor1 16 4 HDMI port Connect to high definition display device...

Page 17: ...7 POWER INPUT DC12V Tab 2 3 Definitions of Rear Panel Buttons 2 4 Remote Controller It uses two AAA size batteries and works after loading batteries as following Step1 Open the battery cover of the Re...

Page 18: ...ulti screen display mode 6 SEARCH Button To enter search mode 7 MENU Button To enter menu 8 ENTER Button To confirm the choice or setup 9 Direction Button Move cursor in setup or pan title PTZ 10 Butt...

Page 19: ...more convenient to operate we don t recommend user to set the device ID too long Step3 Cancel controller to control DVR turn the IR sensor of the remote controller to the IR receiver that on the front...

Page 20: ...the wheel when the value blinks It supports mouse drag I e Set motion detection area click customized hold left button and drag to set motion detection area Set schedule hold left button and drag to...

Page 21: ...er the device power on if there is no menu or only has live image display user can long press ESC button to switch Notice this serial device can only display menu on VGA monitor or BNC monitor at one...

Page 22: ...t Fig 3 1 Login Notice the default user name and password is admin and 123456 The concrete operation steps for change password add or delete user please refer to Fig 4 7 User management configuration...

Page 23: ...6 Digital Video Recorder User Manual 3 3 1 Live playback Click Play button to playback the record Refer to Figure3 3 User can do concrete operation by click the buttons on screen Fig 3 3 live playback...

Page 24: ...el which needs to amplify Click the right mouse select Zoom in button and then click the left mouse to amplify the image Press left mouse to drug the cursor user can view the image Double click the le...

Page 25: ...uration basic configuration system refer to Fig 4 3 Step2 in this interface user can setup the device name device ID video format max network users VGA resolution and language The definitions for ever...

Page 26: ...1280 1024and CVBS Note When switch between VGA and CVBS will change the menu output mode please connect to relevant monitor Language setup the menu language Note after changed the language and video o...

Page 27: ...ration DST 4 2 Live configuration Live configuration includes four submenus live host monitor Spot and mask 4 2 1 Live In this interface user can setup camera name adjust colors brightness hue saturat...

Page 28: ...s with same parameters tick off all then do relevant setup 4 2 2 Main monitor Step1 enter into system configuration live configuration main monitor refer to Fig 4 8 Step2 select split mode 1 1 2 2 2 3...

Page 29: ...n setup current picture group Click button to setup the previous channel groups of dwell picture Click button to set the latter channel groups of dwell picture Step5 click apply button to save the set...

Page 30: ...ecord stamp and snap 4 3 1 Enable Step1 enter into system configuration record configuration enable refer to Fig 4 11 Fig 4 11 record configuration enable Step2 tick off record audio and record time S...

Page 31: ...will be adjusted automatically Fig 4 12 record configuration record bit rate 4 3 3 Time Step1 enter into system configuration record configuration time refer to Fig 4 13 Pre alarm record time the reco...

Page 32: ...e setting click exit button to exit current interface Fig 4 13 record configuration time 4 3 4 Stamp Stamp User can overlap the channel name and time stamp on video Step1 enter into system configurati...

Page 33: ...n to resort default setting click apply button to save the setting click exit button to exit current interface 4 3 6 Snap In this interface User can set up Resolution quality snap interval snap number...

Page 34: ...lected schedule Copy user can copy the specify schedule to other dates Click OK button to save the setting click Exit button to exit current interface If the user wants to apply the schedule setting o...

Page 35: ...iguration schedule configuration alarm refer to Fig 4 18 Step2 the setup steps of alarm are familiar with schedule user can refer to 4 4 1 Schedule for details Note the default schedule of motion dete...

Page 36: ...do relevant setup Step4 click default button to resort default setting click apply button to save the setting click exit button to exit current interface Alarm handling Step1 enter into system config...

Page 37: ...rent interface To record Select recoding channels It will record the camera when alarm is triggered Click OK button to save the setting click Exit button to exit the current interface To P T Z set lin...

Page 38: ...ndling for more details Fig 4 23 alarm configuration motion Step4 click Area button a dialog box will pop up as Fig 4 24 Fig 4 24 motion area Step5 in the Area interface user can drag slide bar to set...

Page 39: ...onfiguration alarm configuration schedule refer to Fig 4 25 Step2 the setup steps of alarm schedule are familiar with schedule user can refer to 4 4 1 Schedule for details Fig3 25 alarm configuration...

Page 40: ...e device will alarm after user selects buzzer and the channel to alarm out Disconnect if the disconnect happens the device will the device will alarm after the user selects buzzer and the channel to a...

Page 41: ...e for details Fig 4 28 system configuration alarm out Note the default schedule of motion detection is full selected that is the color of schedule setting interface is blue Buzzer Step1 enter into sys...

Page 42: ...t via ADSL and then input the user name and password Next click TEST button to test the effectiveness of the relevant information Fig 4 29 network configuration network 4 6 2 Sub stream Step 1 enter i...

Page 43: ...il address password Receive address receiver s email address Here user can add at least three mail addresses Click TEST button to test the validity of the mailbox Attaching image After selecting it th...

Page 44: ...e following method Double click the My Network Places icon on the desktop in PC select Show icons for networked UPnP devices in the Network Tasks list box a information window will pop up click YES bu...

Page 45: ...common tasks in folders in the Tasks check box to display the UPnP icon 1 Domain name Registration Take www dyndns com for example Note Users can self define the hostname username and password Input w...

Page 46: ...ynamic DNS Hosts dialog box will be displayed Next create user account For example the username is bcd password is 123456 Click Create Account button to create user account 2 DVR Setting 1 Domain name...

Page 47: ...iptions of network configuration DDNS server DDNS server Website provided by dynamic domain name supplier The optional www dns2p net www meibu com www dyndns comandwww no ip com User name User name fo...

Page 48: ...ter the the user can log in DVR on the binding computer after set the specific binding MAC address Authority Step 1 enter into Add user authority refer to Fig 4 35 Step 2 In the authority interface as...

Page 49: ...ers Fig 4 36 P T Z configuration serial port Definitions and descriptions of network stream Advance Step 1 enter into system configuration P T Z configuration advance refer to Fig 4 37 Step 2 in the A...

Page 50: ...serial number of the preset point Click button to enable the PTZ wiper and click button to enable the PTZ light Note PTZ must support wiper and light these two functional buttons can take effect At th...

Page 51: ...int User can click those icons to adjust the position of preset point Click Preview button to preview the cruise line click OK button to save the setting click Exit button to exit current interface c...

Page 52: ...ttings the device will reboot 4 9 2 Import Export User can export the data files into mobile storage devices as backup function and then import specified data files from mobile storage device to DVR 4...

Page 53: ...nfiguration time search refer to Fig 5 1 Fig 5 1 Search configuration time search Step2 select channel screen display mode the highlight date in the calendar means have record data Step3 select a date...

Page 54: ...ill appear a hide button click this button the whole interface can be expanded 5 2 Event search Step1 enter into Search configuration event search refer to Fig 5 2 Fig 5 2 Search configuration event s...

Page 55: ...ter clicking Search button the searched files will be displayed in the file list box user can select date channels accordingly Lock select a file and click Lock button to lock this file after that tha...

Page 56: ...5 Backup This unit supports backup by built in SATA DVD Writer with USB Flash User also can make backup by IE browser via internet Refer to 7 3 2 Remote backup Step1 enter into backup configuration r...

Page 57: ...1 3 Log information In this interface user can check relevant log information according to set date User can export the data files into mobile storage devices as backup function 6 1 4 Network informa...

Page 58: ...tric material of the disk analysis the potential problems of the disk and warn so as to protect its data 6 4 Upgrade At present it only supports USB update Get the software from your vendor when there...

Page 59: ...ber after IP address For example set HTTP port as 82 need input IP address like 192 168 0 25 82 User name and password here are the same with that used on the DVR The default is admin and 123456 7 1 2...

Page 60: ...nd Dopod S1 WM6 which work fine with the DVR It wants to make mobile surveillance need first enable network service on the DVR and refer to Chapter 4 6 Network configuration The below is the use instr...

Page 61: ...g down menu of Channel refer below picture in the right 7 3 By Phones with Symbian Please use the smart phones with symbian version supported by this unit The detail information is as follows Symbian...

Page 62: ...me window will pop up and requires a package Click the software name to download Refer picture in the right Step4 A security windows will pop up after downloading and ask if install the package Click...

Page 63: ...ess points in different countries or from service providers Step9 Enter Live View it will connect the server and display pictures Refer picture in the left Notice User name and password here are the s...

Page 64: ...installation for iPhone mobile clients 1 Install through iphone Step 1 Open App Store function of iphone Step 2 Enable search function to search SuperCam Step 3 Click SuperCam enter into introduce int...

Page 65: ...ep 4 Input iTunes Store password and then click OK the software will be installed automatically Note if it was the first time for user to operate please enter user ID if there is no Store account user...

Page 66: ...9 Digital Video Recorder User Manual Step 1 Install iTunes store in PC and then login Step 2 Connect iPhone and PC Step 3 Enable search function to search SuperCam Step 4 Click free application button...

Page 67: ...synchronously apply program and SuperCam and then click apply button Operation Instruction for SuperCam iphone 1 Login interface Enter server s IP address or domain name user name and password Click R...

Page 68: ...nel status Switch channels PTZ click to switch to Fig 2 interface Snap picture Record Playback playback record file Image image view Log log record Server List device list Live live view Settings soft...

Page 69: ...the PTZ Rightward rotates the PTZ Stop rotating the PTZ Zoom In Focus In Iris Add Zoom Out Focus Out Iris Sub Preset elect the preset point Group Set the cruise line Speed Rotate speed of the PTZ H Re...

Page 70: ...eo files Reserved disk space Reserved SD Card disk space when the disk space is less than setup value the video will be stopped Display config Display mode User can select one live picture display or...

Page 71: ...64 Digital Video Recorder User Manual 7 5 The installation operation methods for Android mobile clients Software Installation Step 1 run Google Market program Step 2 search SuperCam...

Page 72: ...l Video Recorder User Manual Step 3 press Install button Step 4 click OK button Step 5 user can view the download and install process in notifications finished download the software will install autom...

Page 73: ...to save the setting click button can quick input saved server address user name and password Main menu Playback playback record file Image image view Log log record Server List device list Live live v...

Page 74: ...2 Mark 1 Current viewing channel Mark 2 Channel status Switch channels PTZ click to switch to Fig 2 interface Snap record talk Live audio Full screen Return Upward rotates the PTZ Downward rotates th...

Page 75: ...Focus In Iris Add Zoom Out Focus Out Iris Sub Preset Select the preset point Group Set the cruise line Image view Record playback Fig 3 Fig 4 Previous Next Zoom out Delete Zoom in Return to main menu...

Page 76: ...tion happen trigger vibrate alarm Storage setting User can setup the relevant parameters of mobile video This function can be valid only insert SD card Path Save path for mobile video files the defaul...

Page 77: ...70 Digital Video Recorder User Manual Config interface Information view setup value change another video files Remove all recorder files before delete all current video files...

Page 78: ...t 7 6 1 Installation instruction for BlackBerry Mobile phone Client 1 Open the browser of BlackBerry phone and enter sever address 2 Click SuperCam to link 3 Click Download button on the popup interfa...

Page 79: ...to Menu Option Browser Configuration configure referring to the following figure in the left 2 Enter into Menu Option Cache Operations clear up browser cache Refer below picture in the right Note When...

Page 80: ...ting click button can quick input saved server address user name and password 2 Main interface 3 Live view Playback playback record file Image image view Log log record Server List device list Informa...

Page 81: ...74 Digital Video Recorder User Manual Note User can click Return button on the Blackberry phone to return the previous interface...

Page 82: ...h to Fig 2 interface Snap Full screen Background alarm Stop rotating the PTZ Upward rotates the PTZ Downward rotates the PTZ Leftward rotates the PTZ Rightward rotates the PTZ Zoom In Focus In Iris Ad...

Page 83: ...received from your ISP Next click Apply The DVR will connect to the server and would give a confirmation message Step 2 When accessing the remote interface of DVR user can input WAN IP to access dire...

Page 84: ...client end just only supports 32 bit mode so the safari browser shall start 32 bit mode If the browser is the earlier MACOS version the default setting is 32 bit mode and the setting can be skipped Th...

Page 85: ...78 Digital Video Recorder User Manual Third Select open in 32 bit mode...

Page 86: ...79 Digital Video Recorder User Manual 7 7 1 On LAN Step 1 After starting Apple computer click icon The following window will pop up Please select System Preferences Internet Wireless click Network...

Page 87: ...e to manually input IP address Subnet Mask and Gateway according to the configuration of PC The network segment should be the same as the PC If using DHCP please enable DHCP in the DVR and router Step...

Page 88: ...to enter into the login interface of DVR 7 7 2 On WAN There are also two ways for DVR to connect to Internet 1 Connect the DVR to internet through router or virtual server Step 1 The network setups a...

Page 89: ...eview interface Symbol and function Definitions Channel indicator Screen display mode Volume Snapping picture Start manual record Start IE record Bidirectional talk Playback Color PTZ control Master s...

Page 90: ...or adjustment Drag the slide bar to adjust Brightness Contrast Hue and Saturation Click Default to reset them to original value Buttons Description Drag the scroll bar to adjust the brightness of chan...

Page 91: ...the dome Iris button Click button near Iris button to increase light of the dome Click button near Iris button to decrease light of the dome Zoom button Click button near Zoom button to zoom in the l...

Page 92: ...dwidth All to master sub stream set all channel to master stream or sub stream Enable audio enable or disenable audio Full screen In full screen status the live preview picture will display with full...

Page 93: ...gital Video Recorder User Manual Fig 7 5 Play record file interface This DVR supports remote time search event search and file management By Time Search Step1 Enter into Search time search refer to Fi...

Page 94: ...the area means have record data click those data select the record channels in area Step3 User can set the data playing time and display mode in the area as required Step4 Select certain item from th...

Page 95: ...88 Digital Video Recorder User Manual research etc refer to Fig 7 7 Fig 7 7 Time search playback By Event Search Step1 Enter into Search event search refer to Fig 7 8...

Page 96: ...light date and select record channels and then tick off the event type motion and sensor Then click search button Step3 the events will be display in the event list box and then double click certain i...

Page 97: ...rtain file item in the file list box and then click Lock button to lock this file that ca not be deleted or overlaid Unlock select a locked file and then click unlock button to unlock this file Delete...

Page 98: ...10 Fig 7 10 remote backup interface Step1 select channels set the start and end time and then click search button to display the file information in the file list box Step2 select backup files and cl...

Page 99: ...ation User should firstly select an item in the menu list on the left and then setup the relative parameters When one user setup parameters of a certain item others cannot setup this one Click Config...

Page 100: ...the period of work User can view information such as username IP address and so on Enter into INFO Log User can set the start time to view the log record as follows Fig 7 12 Remote information search...

Page 101: ...on the DVR and refer to Chapter 4 6 Network configuration The below is the use instructions on mobile client end for two OS 8 1 By Phones with Windows mobile Step1 Firstly activate the network access...

Page 102: ...ht 8 2 By Phones with Symbian Please use the smart phones with symbian version supported by this unit The detail information is as follows Symbian S40 support Symbian UIQ support Symbian S80 support S...

Page 103: ...me window will pop up and requires a package Click the software name to download Refer picture in the right Step4 A security windows will pop up after downloading and ask if install the package Click...

Page 104: ...ill connect the server and display pictures Refer picture in the left Notice User name and password here are the same with that used on the DVR The default is admin and 123456 Step10 In Live View user...

Page 105: ...ecorder User Manual Step 3 Click SuperCam enter into introduce interface and then click FREE it will change into INSTALL Step 4 Input iTunes Store password and then click OK the software will be insta...

Page 106: ...Manual Note if it was the first time for user to operate please enter user ID if there is no Store account user needs to apply one 2 Install through PC Step 1 Install iTunes store in PC and then logi...

Page 107: ...Manual Step 3 Enable search function to search SuperCam Step 4 Click free application button Step 5 Input apple ID and password then click acquire Step 6 Tick off synchronously apply program and Super...

Page 108: ...r server to save the setting click button can quick input saved server address user name and password 10 Main Interface 11 Live View Interface Playback playback record file Image image view Log log re...

Page 109: ...urrent channel Live audio Switch to the single image Switch to four images Upward rotates the PTZ Downward rotates the PTZ Leftward rotates the PTZ Rightward rotates the PTZ Stop rotating the PTZ Zoom...

Page 110: ...interface refer below picture in the left 13 Record Playback interface refer below picture in the right Click the record file to playback 14 Server list Interface refer to below picture in the left 15...

Page 111: ...the video will be stopped Display config Display mode User can select one live picture display or four live picture displays Remember display order User can choose whether to remember display order o...

Page 112: ...105 Digital Video Recorder User Manual Step 1 run Google Market program Step 2 search SuperCam Step 3 press Install button Step 4 click OK button...

Page 113: ...process in notifications finished download the software will install automatically Login Enter into server s IP address or domain name user s ID and password Click Remember server to save the setting...

Page 114: ...w Fig 1 Fig 2 Playback playback record file Image image view Log log record Server List device list Live live view Settings software setting Information device information view Help software help cent...

Page 115: ...Snap record talk Live audio Full screen Return Upward rotates the PTZ Downward rotates the PTZ Leftward rotates the PTZ Rightward rotates the PTZ Stop rotates the PTZ Zoom In Focus In Iris Add Zoom Ou...

Page 116: ...109 Digital Video Recorder User Manual Record playback Fig 3 Fig 4 Click the record file Fig 3 to playback Fig 4 Server list Play pause Full screen stop Return to record file interface Fig 3...

Page 117: ...p the relevant parameters of mobile video This function can be valid only insert SD card Path Save path for mobile video files the default catalog is SDCard Click button to change path Reserved disk s...

Page 118: ...t 8 5 1 Installation instruction for BlackBerry Mobile phone Client 1 Open the browser of BlackBerry phone and enter sever address 2 Click SuperCam to link 3 Click Download button on the popup interfa...

Page 119: ...nto Menu Option Browser Configuration configure referring to the following figure in the left 2 Enter into Menu Option Cache Operations clear up browser cache Refer below picture in the right Note Whe...

Page 120: ...ting click button can quick input saved server address user name and password 8 Main interface 9 Live view Playback playback record file Image image view Log log record Server List device list Informa...

Page 121: ...channel Mark 2 Channel status Switch channels PTZ click to switch to Fig 2 interface Snap Full screen Background alarm Stop rotating the PTZ Upward rotates the PTZ Downward rotates the PTZ Leftward r...

Page 122: ...115 Digital Video Recorder User Manual 10 Server list 11 Software configuration 12 Information view...

Page 123: ...is not enough Please remove the HDD or change an adapter to try b The video format of the DVR is different from that of the monitor c Connection problem Please check the cable and the ports of monitor...

Page 124: ...ease refer to 4 3 Record configuration Chang a new HDD or enable recycle d The HDD is damaged Change a new one Q7 Cannot use mouse a wait 1 2 minutes after mouse connected b Not detected Plug unplug s...

Page 125: ...lug ins refer to Fig 8 2 Then click ok to finish setup b Other plug ins or anti virus block activeX Please uninstall or close them Fig8 1 Fig8 2 Q9 How to deal with when DVR starts it displays please...

Page 126: ...controller Q11 Why is the hard disk used in a DVR identified a new hard disk if directly used to another same type DVR And why must we format it again When DVR only uses one hard disk the hard disk re...

Page 127: ...4600 Motherboard G31 P31 chip HDD 80G RAM 1GB VGA GMA3100 NVIDIA GeForce 8400 ATI RADEON HD3450 OS Windows 2000 SP4 above Windows XP SP2 above VISTA DirectX 9 0 Q14 How to handle the situation when co...

Page 128: ...121 Digital Video Recorder User Manual b Right click IE browser refer to Fig 14 2 select Run as administrator to run browser...

Page 129: ...8k 56 PAL CIF 25 Highest 1M 466 Higher 768k 295 Medium 512k 235 Low 384k 175 Lower 256k 112 Lowest 128k 56 4 The calculation format is Total Recording capacity Used space per hour MB h coverage rate o...

Page 130: ...patible USB drive after test Brand Capacity SSK 512MB 1G 2GB Netac 4GB Kingston 2GB Aigo 2GB Smatter vider 1GB SanDisk 4GB 2 Compatible SATA CD DVD writers after test Brand Model TECLAST GH22NP20 TL 2...

Page 131: ...5T Seagate SV35 3 ST31000340SV 1T Seagate Pipeline HD 2 500G Seagate Barracuda 7200 10 320G Seagate Barracuda 7200 10 ST3250310AS 250G Seagate Barracuda 7200 11 ST3160813AS 160G Seagate Barracuda 7200...

Page 132: ...0FPS PAL 120FPS NTSC Record Frame Rate 100 25FPS PAL 12030FPS NTSC Audio input RCA X4 Audio output RCA X1 Alarm input NO or NC 4CH Alarm output 1CH Record Mode Manual Sensor Timer Motion detection Sim...

Page 133: ...0FPS PAL 240FPS NTSC Record Frame Rate 200 50FPS PAL 240 60FPS NTSC Audio input RCA X4 Audio output RCA X1 Alarm input NO or NC 8CH Alarm output 1CH Record Mode Manual Sensor Timer Motion detection Si...

Page 134: ...FPS PAL 480FPS NTSC Record Frame Rate 400 100FPS PAL 480 120FPS NTSC Audio Input RCA X4 Audio output RCA X1 Alarm Input NO or NC 16CH Alarm output 1CH Record Mode Manual Sensor Timer Motion detection...

Reviews: