background image


29 


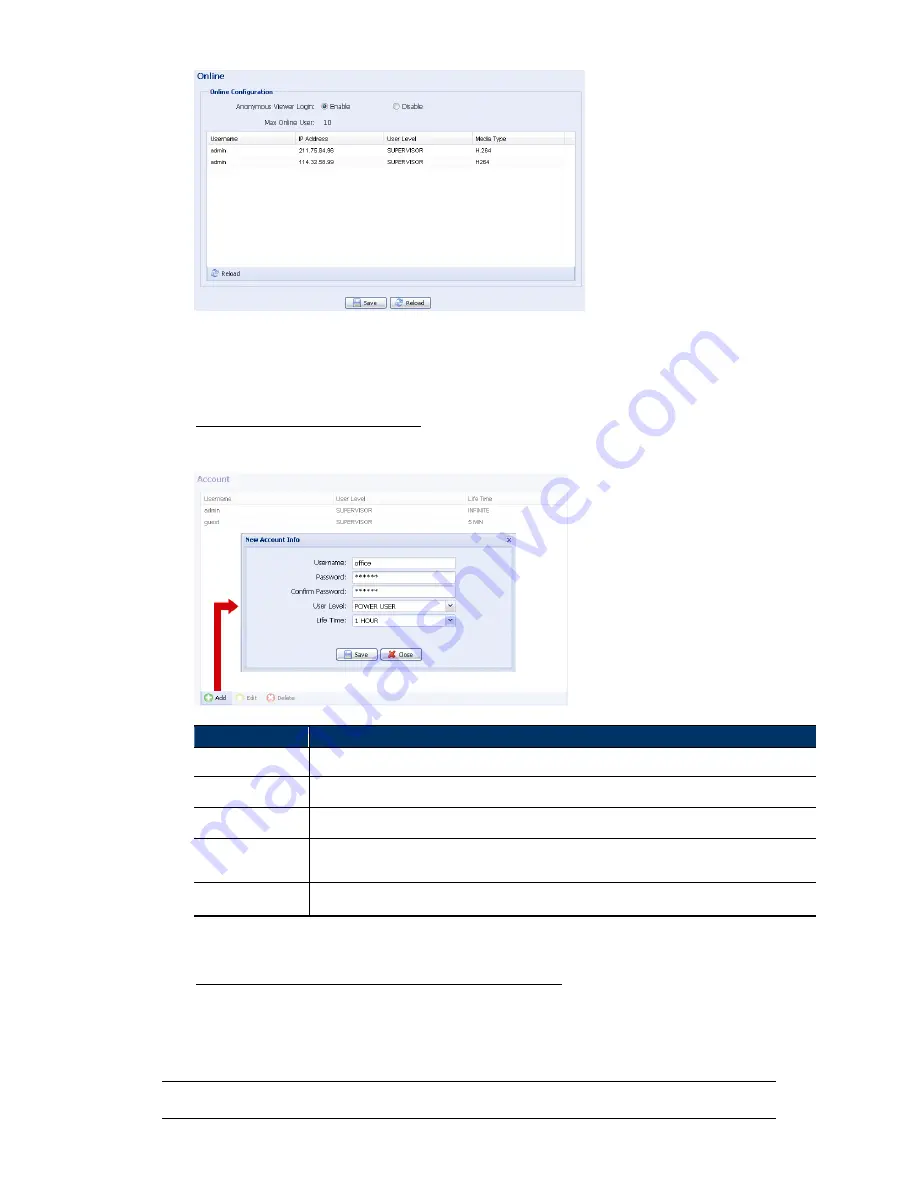
4.8.4 Account 

Potete creare un nuovo account con diversi privilegi di accesso per l’utente, o cancellare o 
modificare le impostazioni di un account esistente. 

Come creare un nuovo account 

Fase 1: Cliccare su "New" (Nuovo), e completare le seguenti colonne. 


Colonna


Descrizione


User Name (Nome 
utente) 

Impostare un nome utente da utilizzare per l’accesso alla videocamera.


Il nome utente può essere composto 

da un massimo di 16 caratteri alfanumerici. 

Password  

Impostare una password da utilizzare per l’accesso remoto.


La password può essere composta da un 

massimo di 16 caratteri alfanumerici. 

Confirm Password 
(Conferma password) 

Inserire di nuovo la password per confermare. 

User Level


(Livello 

utente) 

Impostare il livello di sicurezza di un account per fornire l’autorizzazione al controllo delle differenti 
funzioni.


Sono disponibili 4 livelli utente:


SUPERVISORE, POWER USER, UTENTE NORMALE e 

OSPITE. 

Life Time (Durata) 

Permette di selezionare per quanto tempo è consentito stare in linea a questo account (1 MIN/5 MIN/10 
MIN/1 ORA/1 GIORNO/INFINITO). 

Fase 2: Quindi, fare clic su “Salva” per salvare le proprie impostazioni e creare un nuovo 

account. 

Come modificare o cancellare un account esistente 

Fase 1: Selezionare l’account che si vuole modificare o cancellare. 

Fase 2: Per modificare l’account, cliccare su "Edit" (Editare) per cambiare le impostazioni e 

cliccare su "Save" (Salva)

.


Per rimuovere l’account, cliccare su "Delete" (Cancella). 

Nota: 

Non è permesso rimuovere l’account se nella account list (lista degli account) c’è 
un solo account. 

Summary of Contents for AVN263

Page 1: ...plorer Mozilla Firefox Safari Google Chrome and Opera are supported c Apple s media player QuickTime is also one tool you can use To monitor and control multiple network devices you can also install o...

Page 2: ...N263_263V_system_V1 3 OUTDOOR IR NETWORK CAMERA SERIES USER MANUAL Please read instructions thoroughly before operation and retain it for future reference...

Page 3: ...logos are the property of Research In Motion Limited and are registered and or used in the U S and countries around the world Used under license from Research In Motion Limited Android is a trademark...

Page 4: ...3 4 4 E Map 7 4 CAMERA CONFIGURATIONS VIA WEB BROWSER 12 4 1 Accessing the camera 12 4 2 Control panel overview 13 4 3 System configuration menu 14 4 4 Network 15 4 4 1 Network 15 4 4 2 QoS 15 4 4 3...

Page 5: ...best cost performance outdoor solution with IP67 IR effective distance up to 40 meters with 56 IR LEDs Smart Light Control to avoid overexposure Excellent outdoor ID design with cable management Low...

Page 6: ...he insulating coating of these two wires and twist them together to reset default This will reset all parameters including the IP address to factory default settings Note Disconnect power before twist...

Page 7: ...u have configured the network settings and the network connection is fine For Video Viewer installation please refer to 3 1 Installing Video Viewer at page 3 For network configurations please refer to...

Page 8: ...completed a shortcut icon will be placed on your PC desktop 3 2 Accessing the camera Step1 Double click on your PC desktop to open Video Viewer By defaults the Address Book panel will be displayed on...

Page 9: ...4 3 3 Control panel overview Two control panels are available and can be switched depending on your using habit 3 3 1 Simplified version Default...

Page 10: ...g this program The changes will take effect when this program is closed and executed again Log Click to view all event and recording logs search the desired log s by date or playback the recording of...

Page 11: ...capacity in Free MB When Manual is checked click or on the main control panel to start the manual recording immediately and the recordings will be saved in the location specified in Record Path When M...

Page 12: ...failed The camera will reboot after the upgrade Step5 Select the IP address of the camera and click again to check if the firmware is upgraded 3 4 4 E Map Video Viewer is also a Central Management Sys...

Page 13: ...8 STEP2 Right click to show the shortcut menu on the top left panel and select the E Map group you want to add There are three E Map groups you can add Google E MAP Single E MAP and Building E MAP...

Page 14: ...p Icon Description The connected device is camera When it s selected it will become red The connected device is DVR When it s selected it will become red For any motion or alarm event it will appear o...

Page 15: ...nu list and select Edit E MAP or Remove E MAP as needed You can also add a single E Map group Add Single E MAP or Building E Map group Add Building E MAP into the existing Google E Map group For Singl...

Page 16: ...11 For Building E Map Group Right click on the group name to show the shortcut menu list and select Edit Building E MAP or Remove E MAP as needed...

Page 17: ...e 3 Before using the network camera make sure you have configured the network settings and have the IP address user name and password used for accessing the camera in hand If not please refer to the i...

Page 18: ...n from the drop list 4CIF CIF Snapshot Supervisor Power User Normal User Click to take a snapshot for the current view and a new browser window will be opened to display the captured image Full Screen...

Page 19: ...sen in General Trigger Filter Choose to permit or block the IP address es which can access this camera UPnP Suitable for Windows based operating system Allow this camera to be detected among devices w...

Page 20: ...rom 256 to 10240 kbps 4 4 3 DDNS Select On when the selected network type in Network is PPPOE or DHCP For details please refer to the installation guide 4 4 4 SNTP SNTP Simple Network Time Protocol is...

Page 21: ...d e mails Mail From Enter the entire mail address to ensure e mails will not be blocked by SMTP SSL Encryption Select Yes if your e mail server is using SSL encryption to protect your e mail content f...

Page 22: ...70 characters you want to send with the text message Test To know whether your SMS setting is correct click this button to immediately send a SMS to your phone Note This testing is not free and you w...

Page 23: ...Enable to allow the network camera to be detected among devices within the same network area and set the identification name of the camera in Friendly name When this function is activated the other PC...

Page 24: ...s function is activated Select ALL to display the camera title and smart zoom status Select OFF to disable this function Title Enter the title for the camera with up to 15 alphameric characters Positi...

Page 25: ...necessary You can preview the result on the right side of this page Item Description Back Light It is the function to adjust the image to compensate for an area that is overpowered by brightness becau...

Page 26: ...ft Normal Sharp Color Color helps to set the color level of image through the camera There are three options available Light Normal Colorful Smart Zoom Level Sensitivity Here sets the sensitivity of c...

Page 27: ...owing columns Column Description User Name Set a user name that will be used for camera access The user name allows up to 16 alphanumeric characters Password Set the password that will be used for rem...

Page 28: ...disable the motion detection function Motion Detection Area Setting When Enable is selected click Detection to enter the motion detection area setting page as follows Level of Sensitivity Set the dete...

Page 29: ...eo Set the image resolution quality and frame rate Item Description JPEG MPEG H264 Select the image resolution and quality Image Resolution CIF 4CIF Image Quality BEST HIGH NORMAL LOW Frame Rate The f...

Page 30: ...lick to browse to where you save the upgrade files and select them one by one until all files are selected up to four files Step2 To make a system backup for restore all camera configurations later cl...

Page 31: ...NTSC 752 H x 582 V PAL Min Illumination 0 05 Lux F1 8 0 Lux IR ON Shutter Speed 1 60 1 50 to 1 100 000 sec S N Ratio More than 48dB AGC off Lens f4 0mm f9 0mm Viewing Angle 75 36 IR LED 56 units IR E...

Page 32: ...lease follow the steps below for application Step1 Go to http www clickatell com login php In New Customers select Clickatell Central API from the drop down list Step2 Fill in your information to crea...

Page 33: ...ll send an activation code to that number for verification Check if you receive a text message from Clickatell Step4 Go back to Clickatell and click the tab Manage my Products Then select HTTP from th...

Page 34: ...ntrance Network translation H 264 Static No one coming in and out Dynamic One or two people coming in and out Resolution Quality Frame Rate Dynamic kbps Static kbps 4CIF Best FULL 2786 1546 High 1375...

Page 35: ...Italian_N36x_26x_system_V1 0 Telecamera IP con LED IR da esterno MANUALE D USO Leggere accuratamente le istruzioni prima dell uso e conservarle per riferimenti futuri...

Page 36: ...ento qualsiasi contenuto di questo manuale Non facciamo garanzie n ci assumiamo alcuna responsabilit legale nei riguardi dell accuratezza completezza o utilit di questo manuale I contenuti di questo m...

Page 37: ...OCAMERA VIA BROWSER 13 4 1 Accedere alla videocamera 13 4 2 Descrizione del pannello di controllo 14 4 3 Configurazioni IVS 15 4 3 1 Intelligent Video System 16 4 3 2 Face Tracking 17 4 4 Operazioni P...

Page 38: ...e Extender adattatore per cavo RJ45 Messa a Terra Disponibile solo per il Modello 3 CD ROM comprende il manuale d uso e il software CMS Video Viewer 1 3 Dimensioni 246 87 282 4 236 03 212 63 117 89 1...

Page 39: ...l rivestimento isolante di questi due cavi e avvolgerli insieme per resettare il default Questo resetter tutti i paramentri incluso l indirizzo IP e li riporter alle impostazioni di default di fabbric...

Page 40: ...a ottimale Per l installazione di Video Viewer consultare la sezione 3 1 Installing Video Viewer Installare Video Viewer a pagina 4 Per le configurazioni di rete consultare la guida all installazione...

Page 41: ...izzata l icona di collegamento rapido 3 2 Accedere alla videocamera Fase 1 Cliccare due volte su sul desktop del vostro PC per aprire Video Viewer Come impostazione predefinita il pannello della Addre...

Page 42: ...Controlli vari Registro Registra Istantanea Informazioni Controllo PTZ Notifica eventi e Lista di controllo rapido Versione Riduci Cambia visualizzazione completa Chiudi programma Rotazione immagine d...

Page 43: ...zionati Registra Arresta registrazione Il pulsante di registrazione sar disabilitato quando la capacit del disco riservata impostata in Impostazione di Registrazione maggiore della capacit attuale del...

Page 44: ...Se la voce Manual Manuale selezionata cliccare su o nel pannello di controllo principale per avviare immediatamente la registrazione manuale la registrazione sar salvata nel posto specificato in Perc...

Page 45: ...La videocamera si riavvier dopo l upgrade Fase 5 Selezionare l indirizzo IP della videocamera e cliccare su di nuovo per controllare se il firmware stato aggiornato 3 4 4 E Map Video Viewer anche un...

Page 46: ...Inserire un indirizzo specifico o punto di riferimento e fare clic su Search Cerca OPPURE Spostare e trascinare la mappa sulla posizione desiderata Fare clic e trascinare l indirizzo IP sul punto dove...

Page 47: ...dispositivo su E Map per mostrare la veduta dal vivo Come si aggiunge un gruppo edifici E Map Inserire il nome del gruppo edifici E Map Inserire i livelli totali dell edificio Selezionare il livello...

Page 48: ...Remove E MAP Rimuovi E Map come necessario Si pu anche aggiungere un gruppo E Map livello singolo Add Single E MAP o un gruppo E Map su pi livelli Add Building E MAP al gruppo Google E Map esistente P...

Page 49: ...ppi E Map su pi livelli Fare clic col tasto destro del mouse sul nome del gruppo per mostrare il menu e selezionare Edit Building E MAP Modifica E Map su pi livelli o Remove E MAP Rimuovi E MAP come n...

Page 50: ...zzare la videocamera in rete assicuratevi di aver configurato le impostazioni di rete e di avere sotto mano l indirizzo IP user name e password usati per accedere alla videocamera Se non li avete fate...

Page 51: ...alla videocamera Quality Qualit Supervisore Utente power Utente normale Cliccare e trascinare lo slider per selezionare la qualit del video MIGLIORE NORMALE ALTA BASE Selezionare la risoluzione dell i...

Page 52: ...Supervisore Utente power Utente normale Cliccare e trascinare lo slider per selezionare la qualit del video Migliore Normale Alta Base Video Resolution Risoluzione Video Supervisore Utente power Utent...

Page 53: ...e cliccarla per decidere l orientamento del rilevamento a seconda di ci che avete selezionato in Tracking Mode Modalit Inseguimento Per Flow Counting Conteggio di Flusso IN ENTRATA Una persona che pr...

Page 54: ...APRI SU VOLTO E una funzione di zoom sul volto per stringere allargare quando il soggetto dell inseguimento lascia l area di sorveglianza Sensitivity Sensibilit Imposta la sensibilit della funzione d...

Page 55: ...deocamera La modalit auto potrebbe essere Sequence Sequenza o Auto Pan Movimento in orizzontale auto specificato in Config Configura Camera Telecamera Cruise Muovi Active Mode Modalit Attiva Nota Ques...

Page 56: ...loccare l indirizzo i che pu possono accedere alla videocamera UPnP Permetti che la videocamera sia rilevata tra i dispositivi all interno della stessa area di rete per un utilizzo veloce e rapido Cam...

Page 57: ...tivazione QoS e impostare la velocit massima di caricamento da 256 a 10240 kbps 4 6 3 DDNS Selezionare On quando il tipo di rete selezionata in Network Rete PPPOE o DHCP Fare riferimento alla guida pe...

Page 58: ...SMTP Server Server SMTP Inserire l indirizzo del server SMTP fornito dal proprio provider di posta elettronica Port Porta Inserire il numero della porta fornito dal proprio provider di posta elettroni...

Page 59: ...rnazionale per ricevere il messaggio di testo Si possono inserire 5 numeri di telefono Transfer Interval Intervallo di Trasferimento Inserire il tempo di intervallo in minuti tra l invio di due messag...

Page 60: ...a funzione disponibile solo per il Modello 3 UPnP l acronimo Universal Plug and Play che permette ai dispositivi di collegarsi ininterrottamente negli ambienti home e corporate e di semplificare l ins...

Page 61: ...00 Kbps 1 M 1000 Kbps 640 Kbps 512 Kbps 256 Kbps 128 Kbps 64 Kbps IR Control Controllo IR Selezionare AUTO per attivare automaticamente i LED IR secondo le condizioni di illuminazione correnti o OFF p...

Page 62: ...restabiliti Qui viene definito come funzioner la modalit automatica della videocamera quando viene selezionato Sequenza o Panoramica Automatica Panoramica automatica Quando viene selezionato Auto Pan...

Page 63: ...Back to Default Torna al Default 4 7 6 Ora Impostare l ora legale e l orario corrente e cliccare su Save Salva per confermare Funzione Descrizione Configurazione Orario Date Data Permette di impostare...

Page 64: ...izzato per ruotare le immagini orizzontalmente a seconda della situazione di installazione Le opzioni sono ON OFF Color Mode Modalit Colore Il colore aiuta a regolare il livello di colore dell immagin...

Page 65: ...valore maggiore la sensibilit 4 8 Generale 4 8 1 Generale In General Generale potete selezionare la lingua UI Interfaccia Utente tra inglese e cinese e controllare l indirizzo MAC della videocamera 4...

Page 66: ...confermare User Level Livello utente Impostare il livello di sicurezza di un account per fornire l autorizzazione al controllo delle differenti funzioni Sono disponibili 4 livelli utente SUPERVISORE P...

Page 67: ...su Clear All Cancella tutto per rimuovere il rilevamento dell intera area Fare clic su Select All Seleziona tutto per impostare il rilevamento dell intera area Trigger Duration Durata Trigger Impostar...

Page 68: ...iore a quello specificato 4 8 7 Google Maps Nota Questa funzione disponibile solo per il Modello 3 Questa funzione serve a farvi sapere dove ubicata la videocamera in rete Il sistema vi richieder di o...

Page 69: ...onare uno dei file da aggiornare Nota Non consentito aggiornare pi file contemporaneamente Fare riferimento ai rispettivi manuali d uso Fase 4 Solo per il Modello 3 Per effettuare un backup del sistem...

Page 70: ...1 60000 Rapport S N segnale rumore Pi di 48dB AGC off Lente f6 4mm f14 4mm f6 0mm Numero F F2 2 f 6 4mm F2 8 f 14 4mm F1 8 Angolo di Visuale 50 22 62 IR LED 56 unit Gamma Effettiva IR Fino a 20 metri...

Page 71: ...R ON Velocit Otturatore 1 60 1 50 1 100 000 sec Rapport S N segnale rumore Pi di 48dB AGC off Lente f4 0mm f9 0mm Angolo di Visuale 75 36 IR LED 56 unit Gamma Effettiva IR Fino a 40 metri Controllo In...

Page 72: ...1 messaggio Seguire i passi indicati di seguito per la richiesta Fase 1 Collegarsi al sito http www clickatell com login php In New Customers Nuovi Clienti selezionare Clickatell Central API Centrale...

Page 73: ...ero come verifica Controllate se avete ricevuto un messaggio da Clickatell Fase 4 Tornare su Clickatell e cliccare sul tab Manage my Products Gestisci i miei Prodotti Quindi selezioanre HTTP dall elen...

Page 74: ...37...

Page 75: ...DE_N263_263V_system_V1 3 Outdoor IR Netzwerkkameraserie Bedienungsanleitung Bitte lesen Sie die Anweisungen vor der Inbetriebnahme aufmerksam durch und bewahren sie zum zuk nftigen Nachschlagen auf...

Page 76: ...zugeh rigen Marken Namen und Logos sind Eigentum von Research In Motion Limited sie sind in den Vereinigten Staaten und anderen L ndern weltweit eingetragen und oder werden dort verwendet Verwendet i...

Page 77: ...tualisierung 7 3 4 4 E Karte 7 4 Kamerakonfiguration per Webbrowser 12 4 1 Auf die Kamera zugreifen 12 4 2 bersicht ber das Kontrollpanel 13 4 3 Systemkonfigurationsmen 15 4 4 Netzwerk 17 4 4 1 Netzwe...

Page 78: ...h mit IP67 Effektive IR Reichweite von bis zu 40 Metern mit 56 IR LEDs Intelligente Lichtsteuerung zur Vermeidung von berbelichtung Ausgezeichnetes Outdoor ID Design mit Kabelverwaltung Video Streamin...

Page 79: ...tzen auf die Standardwerte zusammen Dadurch werden alle Parameter inklusive der IP Adresse auf die werkseitigen Standardeinstellungen zur ckgesetzt Hinweis Unterbrechen Sie die Stromversorgung bevor S...

Page 80: ...gen konfiguriert haben und die Netzwerkverbindung funktioniert Einzelheiten zur Installation von Video Viewer finden Sie unter 3 1 Video Viewer installieren auf Seite 3 Bei der Netzwerkkonfiguration h...

Page 81: ...Schritt 1 Doppelklicken Sie zum ffnen von Video Viewer auf auf Ihrem PC Desktop Standardm ig wird das Address Book Adressbuch Panel auf der rechten Seite des Kontrollpanels angezeigt Schritt 2 Klicke...

Page 82: ...bersicht ber das Kontrollpanel Es stehen zwei Kontrollpanels zur Verf gung zwischen denen je nach Nutzungsgewohnheiten gewechselt werden kann 3 3 1 Vereinfachte Version Standard 3 3 2 Vollfunktionsve...

Page 83: ...Programm geschlossen und wieder ausgef hrt wird Log Zur Anzeige aller Ereignis und Aufnahmeeintr ge zur Suche nach dem den gew nschten Eintrag Eintr gen per Datum oder zur Wiedergabe der Aufzeichnung...

Page 84: ...nn das Manual Manuell Kontrollk stchen mit einem H kchen versehen ist klicken Sie zum sofortigen Start der manuellen Aufnahme auf dem Hauptkontrollpanel auf oder die Aufzeichnungen werden in dem unter...

Page 85: ...ie die Firmware Aktualisierung Hinweis Es dauert einige Minuten bis der Aktualisierungsvorgang abgeschlossen ist Unterbrechen Sie die Stromversorgung w hrend der Firmware Aktualisierung nicht andernfa...

Page 86: ...Kontextmen s auf dem Panel oben links w hlen Sie die E Map E Karte Gruppe die Sie hinzuf gen m chten Es k nnen drei E Map E Karte Gruppen hinzugef gt werden Google E MAP Google E Karte Single E MAP E...

Page 87: ...ziehen Sie die IP Adresse auf den Standort der aktuellen Etage Klicken Sie zum Speichern und Beenden auf Apply Anwenden Hinzuf gen einer Geb ude E Map Gruppe Geben Sie den Namen dieser Geb ude E Map...

Page 88: ...Sie eine bestehende E Map E Karte Gruppe Bei einer Google E MAP Google E Karte Gruppe Rechtsklicken Sie zum Einbelden der Kontextmen liste auf den Gruppennamen w hlen Sie je nach Bedarf Edit Building...

Page 89: ...w hlen Sie je nach Bedarf Edit E MAP E Karte bearbeiten oder Remove E MAP E Karte entfernen Bei einer Building E MAP Geb ude E Karte Gruppe Rechtsklicken Sie zum Einbelden der Kontextmen liste auf den...

Page 90: ...zwerkeinstellungen konfiguriert und IP Adresse Benutzername und Kennwort zum Zugriff auf die Kamera zur Hand haben Falls nicht halten Sie sich bitte an die Installationsanleitung 4 1 Auf die Kamera zu...

Page 91: ...s Reglers Basic Basis Normal High Hoch Best Optimal Video Resolution Videoaufl sung Supervisor Administrator Power User Privilegierter Benutzer Normal User Normaler Benutzer W hlen Sie die Videoaufl s...

Page 92: ...rivilegierter Benutzer Normal User Normaler Benutzer Zur Aktivierung der intelligenten Zoomfunktion anklicken Smart Zoom 10 Intelligenter Zoom 10 Supervisor Administrator Power User Privilegierter Ben...

Page 93: ...Echtzeit Streaming DDNS Eingabe der DDNS Informationen wenn der Netzwerktyp PPPoE oder DHCP ist SNTP Synchronisierung Ihrer Kamerazeit mit den Computersystemen im Netzwerk FTP Eingabe der FTP Informat...

Page 94: ...r aktuellen Online Benutzer 2 Einstellen der anonymen Anmeldung 3 Einstellen der Bildcodeverifizierung bei der Anmeldung Account Konto 1 Erstellen eines neuen Benutzerkontos mit verschiedenen Zugangsr...

Page 95: ...hwindigkeit auf 256 bis 10240 kpbs ein 4 4 3 DDNS W hlen Sie On Ein wenn der unter Network Netzwerk ausgew hlte Netzwerktyp PPPOE PPPoE oder DHCP ist Einzelheiten entnehmen Sie bitte der Installations...

Page 96: ...von Ihrem eMail Systemanbieter bereitgestellte Portnummer ein Falls diese Spalte leer bleibt nutzt der eMail Server zum Versenden von eMails Port 25 Mail From eMail von Geben Sie die vollst ndige eMa...

Page 97: ...nummern erlaubt Transfer Interval bertragungsintervall Stellen Sie das Intervall zwischen dem Versenden von zwei Mitteilungen in Minuten ein Die Optionen sind 0 15 30 und 60 Reset Counter Z hler zur c...

Page 98: ...m Sie die IP Adresse bei Rule Regel eingeben und Add Hinzuf gen anklicken Sie k nnen einen vorhandenen Eintrag aus der IP Adressliste entfernen indem Sie das gew nschte Element anklicken und Delete L...

Page 99: ...len der Kamerabildschirmanzeige Funktion Beschreibung Display Anzeige W hlen Sie zur Anzeige des bei Title Titel festgelegten Kameratitels CAMERA Kamera W hlen Sie zur Anzeige des aktuellen Status von...

Page 100: ...egenlicht Diese Funktion dient der Bildanpassung zur Kompensation in Umgebungen die berm ig ausgeleuchtet sind Das Bild wird zur deutlichen Anzeige angemessen beleuchtet Sie k nnen diese Funktion akti...

Page 101: ...er Smart Zoom Intelligenter Zoom Funktion die Empfindlichkeit des Vergleichs zwischen zwei verschiedenen Bildern ein Je geringer der Wert desto h her die Empfindlichkeit Smart Zoom Level Sensitivity I...

Page 102: ...ibung Username Benutzername Geben Sie einen Benutzernamen zum Kamerazugriff ein Der Benutzername darf aus bis zu 16 Buchstaben bestehen Passwort Kennwort Stellen Sie das Kennwort zur externen Anmeldun...

Page 103: ...egungserkennungsbereichs Wenn Enable Aktivieren ausgew hlt ist klicken Sie zum Aufrufen der folgenden Einstellungsseite des Bewegungserkennungsbereichs auf Detection Erkennung Level of Sensitivity Emp...

Page 104: ...lement Beschreibung JPEG MPEG H264 W hlen Sie Bildaufl sung und Qualit t Bildaufl sung CIF 4CIF Bildqualit t BEST Beste HIGH Hoch NORMAL LOW Gering Bildfrequenz Die erlaubte Bildfrequenz einzelner Ben...

Page 105: ...eien auf w hlen Sie sie einzeln bis alle Dateien bis zu vier ausgew hlt sind Schritt 2 Erstellen Sie eine Systemsicherung durch Anklicken von Backup Sichern dadurch k nnen Sie sp ter bei Bedarf alle K...

Page 106: ...ux IR ein Verschlusszeit 1 60 1 50 bis 1 100 000 Sek Signal Rausch Verh ltnis Mehr als 48 dB AGC aus Objektiv f4 0 mm f9 0 mm Betrachtungswinkel 75 36 IR LED 56 St ck Effektive IR Reichweite Bis zu 40...

Page 107: ...1 Mitteilung fallen Geb hren an Bitte befolgen Sie zur Anmeldung die nachstehenden Schritte Schritt 1 Rufen Sie http www clickatell com login php auf W hlen Sie unter New Customers die Option Clickate...

Page 108: ...ngscode an diese Nummer Pr fen Sie ob Sie eine Textmitteilung von Clickatell erhalten haben Schritt 4 Kehren Sie zu Clickatell zur ck und klicken auf das Manage my Products Register W hlen Sie dann HT...

Page 109: ...Eingangsbereich Netzwerk bersetzung H 264 Statisch Niemand geht hinein oder heraus Dynamisch Ein oder zwei Personen gehen hinein oder heraus Aufl sung Qualit t Bildfrequenz Dynamisch kbps Statisch kbp...

Reviews: