background image


Page 

14

 of 

31


Accessing the Web UI 

The AC-AEX-RC-HUB features the built-in AVPro Edge User Interface (AEUI) and can be accessed through a 
web browser for configuration and control. For initial setup, it is recommended to connect the AC-AEX-RC-
HUB to a local area network (LAN) with a computer on the same network to access the built-in Web UI and 
check for any firmware updates to the unit. 

OTA Cloud Services 

Firmware updates to the unit can be performed OTA (Over-the-Air) by enabling the 

Cloud Services


setting on the Web UI. This allows the unit to search the Cloud for the latest versions of firmware. If a 
newer version is detected that what is currently installed on the unit, a dialog box will prompt the new 
update is available from the Web UI. 

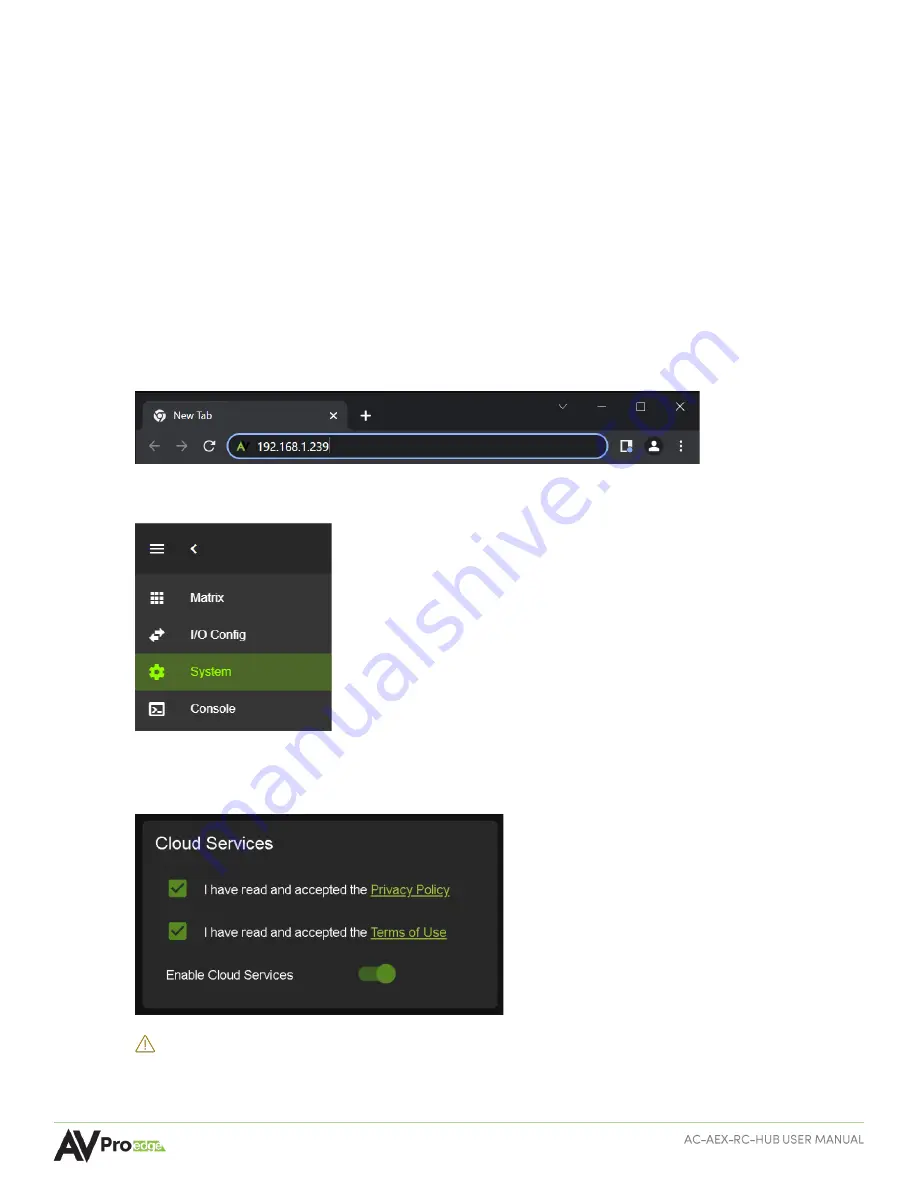
1


Enter in the 

unit’s 

IP address into a Chrome or Edge web browser to 

access the unit’s 

Web UI. 


2


Navigate to the 

System 

tab page. 


3


In the 

Cloud Services

 section, review the 

Privacy Policy

 and 

Terms of Use

, then check both boxes and 

select the 

Enable Cloud Services

 toggle setting. 


IMPORTANT:   

This is a required step in order for the unit to perform OTA firmware updates. 


Summary of Contents for AC-AEX-RC-HUB

Page 1: ...AUDIO CENTRALIZER WITH STEREO MATRIXING AC AEX RC HUB User Manual ...

Page 2: ...unding Cable 10 Front Panel Control 10 View Input Output Mapping 10 Configure Mode 10 Wiring and Connections 11 Audio Connections 11 RS 232 Control 12 LAN Wiring 12 Initial Setup 13 Connecting the Devices 13 Locating the IP Address 13 Accessing the Web UI 14 OTA Cloud Services 14 Navigating the Web UI 16 Matrix 17 Matrix Switching 17 I O Config 18 Stereo Audio Input Settings 18 Stereo Audio Output...

Page 3: ...eb Interface 23 Cloud Services 24 Hardware 25 Console 26 Command List 26 Troubleshooting 28 Maintenance 28 Damage Requiring Service 28 Support 29 Warranty 29 The Basics 29 Coverage Details 29 Red Tape 29 Obtaining an RMA 30 Shipping 30 Limitation on Liability 30 Exclusive Remedy 31 ...

Page 4: ...ORTANT Provides special information that is critical for installing configuring and operating the equipment CAUTION Provides special information for avoiding situations that may cause damage to the devices WARNING Provides special information for avoiding situations that may cause physical danger to the installer end user etc Electrical Shock Prevention ELECTRIC SHOCK The source power poses an ele...

Page 5: ...y If the provided plug does not fit into your outlet consult an electrician for replacement of the obsolete outlet 10 Protect the power cord from being walked on or pinched particularly at plugs convenience receptacles and the point where they exit from the devices 11 Only use attachments and accessories specified by the manufacturer 12 Unplug these devices during lightning storms or when unused f...

Page 6: ...elow shows the basic application of the AC AEX RC HUB The audio path can either come from the audio sources directly or from a separate output non HDMI like the AC AEX T as shown below Compatible Devices AC AEX T The AVPro Edge AC AEX T is a digital analog audio transmitter that extends stereo signals over a single Category cable with PoC Power over Cable when connected to the AC AEX RC HUB Ideal ...

Page 7: ...z 192 kHz Latency 30ms Mute Available on all outputs Audio Inputs AEX Audio 8 RCA 4 Digital TOSLINK 4 Audio Outputs AEX Audio 0 RCA 12 Digital TOSLINK 12 Control Interfaces RS 232 IP LAN Power Total Power Consumption 24 Watts Maximum DC Power DC 12V 2A Dimensions Height x Width x Depth Standalone Unit Millimeters 44 45 x 444 5 x 234 95 Inches 1 75 x 17 5 x 9 25 Height x Width x Depth Packaged Unit...

Page 8: ...ded Twisted Pair STP up to 130 meters 426 ft IMPORTANT Each A LINK port must be paired with an AC AEX T digital analog audio extender transmitter for complete operation 5 AUDIO IN 4x Stereo RCA line level analog audio inputs 4x TOSLINK optical digital audio inputs 6 AUDIO OUT 12x Stereo RCA analog audio outputs 12x TOSLINK optical mirrored digital audio outputs 7 NETWORK 8 pin RJ 45 female connect...

Page 9: ...n 1 Align the holes on the mounting brackets with the holes on both sides of the rack 2 Attach the mounting brackets to the rack with rack screws not included Mounting Feet Assembly The 4x mounting feet can be assembled to the AC AEX RC HUB with the 4x provided mounting screws 1 Align the holes on the mounting feet with the holes underneath the AC AEX RC HUB 2 Attach the mounting feet to the AC AE...

Page 10: ...se the front panel Input Left and Right buttons to navigate the blue LED to the desired input s port number Output LEDs mapped to the selected input will then light up Configure Mode Press the OK button this will light up one of the input LEDs and all output indicators will pulse on followed by a blinking output LED Press the Left and Right Input buttons to navigate the blue LED to the desired inp...

Page 11: ...onnections AVPro Edge recommends using shielded RCA interconnected cabling between the AC AEX RC HUB and the connected analog devices to maintain a high level of audio performance The diagram below shows the audio connections of the AC AEX RC HUB ...

Page 12: ...modem serial cable adapter and set the serial communications to Baud 57600 no parity 8 data bits and 1 stop bit with no handshaking Add a carriage return Enter key after each command when using direct commands The unified command list ASCII can be located here LAN Wiring The IP control port located in the bottom right corner on the rear panel is used to communicate with the AC AEX RC HUB via a LAN...

Page 13: ... of the unit to a suitable power source with the supplied power cable 4 Connect the NETWORK port on the back of the unit to a LAN router or third party control system Locating the IP Address The default IP setting is DHCP mode an IP address will automatically be assigned to the unit by the DHCP server within the router Use a control PC on the same network to locate the unit s IP address then enter...

Page 14: ... Over the Air by enabling the Cloud Services setting on the Web UI This allows the unit to search the Cloud for the latest versions of firmware If a newer version is detected that what is currently installed on the unit a dialog box will prompt the new update is available from the Web UI 1 Enter in the unit s IP address into a Chrome or Edge web browser to access the unit s Web UI 2 Navigate to th...

Page 15: ...tically populate into the File input field from the Cloud Select the Upload button 7 From this screen newer versions of firmware can be viewed before they are installed Select the Upgrade button The unit will now begin installing the latest versions of firmware DO NOT refresh the webpage or power off the unit during the update 8 Once the progress bar reaches 100 select the Close button and refresh...

Page 16: ... menu column on the left side of the screen 1 Enter the unit s IP address into a web browser such as Chrome or Edge to access the Web UI 2 To hide the navigation menu select the hamburger menu icon 3 To hide the navigation menu text and show only the menu icons select the left arrow icon 4 To navigate through the different pages select the individual tab pages from the navigation menu This will hi...

Page 17: ...ls to the outputs Matrix Switching 1 From the Inputs column select the desired input This will highlight the input with a green text to indicate the selection was made 2 From the Outputs grid select the desired output s to route the selected input to This will highlight the output s with a green border to indicate the selection was made 3 The selected input s audio signals are now routed to the se...

Page 18: ...t the volume by using the slider bar or entering a value 0 100 in the text field Stereo Audio Output Settings 1 Port Shows the audio output port number 2 Label Select the text field to enter in a custom name for the output Limit of 15 characters 3 Enabled Select the toggle switch to enable or disable the audio output 4 Muted Select the toggle switch to mute or unmute the audio output 5 Volume Adju...

Page 19: ...Source Only Matrix to the same input as the selected followed output Volume Only Set volume equivalent to the selected following output including if the followed output is muted Source and Volume Matrix to the same input and set volume equivalent to the selected followed output Once selected an additional drop down menu is provided to match the output it will follow NOTE Once an output is set to f...

Page 20: ...hic equalizer showing the individual frequency bands of the output s audio NOTE This graphic equalizer is only intended to be used as a visual reference of the individual audio frequency gains Manual adjustments cannot be made to it 3 Balance Adjust the Left and Right volume by using the slider bar or entering a value 10 to 10 in the text field NOTE 10 is balanced left 0 is balanced and 10 is bala...

Page 21: ...er in a custom name for the unit The default shows unit s model number 2 Model Name Shows the unit s AVPro Edge model number 3 Serial Number Shows the unit s unique serial number 4 MAC Address Shows the unit s unique MAC address 5 IP Assignment Select the dropdown menu to set the unit s IP mode to DHCP default or Manual Static IP then select the Apply button 6 IP Address Shows the unit s IP addres...

Page 22: ...et port 23 Admin Web Interface Select the Secure toggle switch to enable green or disable red When enabled the username and password can be changed With the Admin Web Interface enabled the only menu that will be accessible on the Web UI will be the Matrix tab page The rest of the settings will require the Admin login Default username admin Default password admin ...

Page 23: ...first be enabled before this setting can be changed With the Admin and User Web Interfaces enabled no menus will be accessible on the Web UI without first logging in Logging in with the User credentials the only the menu that will be accessible on the Web UI will be the Matrix tab page The rest of the settings will require the Admin login Default username user Default password user123 ...

Page 24: ...omplete It is always recommended to backup and save your settings and configurations before updating firmware 1 Review the Privacy Policy and Terms of Use then select both check boxes and select the Enable Cloud Services toggle setting IMPORTANT This is a required step in order for the unit to perform OTA firmware updates 2 If the unit is already installed with the latest version of firmware a not...

Page 25: ...he unit during the update 6 Once the progress bar reaches 100 select the Close button and refresh the webpage 7 The unit will automatically reboot once the firmware updates are complete After the unit reboots refresh the webpage to verify that the firmware update was successful Hardware This section shows the unit s current firmware versions and provides options for updating firmware factory reset...

Page 26: ...ET OUTx AS IN y Set Audio Output x to Input y x 0 12 0 all y 1 12 SET OUTx FOLLOW y OUTz Set Audio Output x follow settings x 0 12 0 all excluding self Follow Modes 0 None 1 Source 2 Volume 3 Source Volume If Follow Mode 0 then OUTz is the output that will be followed SET OUTx MUTE UNMUTE Set Audio Output Mute Unmute x 1 12 0 all SET OUTx VOL y Set Output x EQ Audio Volume Level y x 0 12 0 all y 0...

Page 27: ...twork Setup Commands SET RIP xxx xxx xxx xxx Set Route IP Address to xxx xxx xxx xxx xxx 000 255 SET HIP xxx xxx xxx xxx Set Host IP Address to xxx xxx xxx xxx xxx 000 255 SET NMK xxx xxx xxx xxx Set Net Mask to xxx xxx xxx xxx xxx 000 255 SET TIP zzzz Set TCP IP Port to zzzz zzzz 0001 9999 SET DHCP y Set DHCP y 0 1 0 Dis 1 Enable GET RIP Get Route IP Address GET HIP Get Host IP Address GET NMK Ge...

Page 28: ...the same reference value for their signals and reduces the possibility of a ground loop which can result in a shift in video signals and main frequencies to exhibit a buzzing or humming noise in audio systems MAINTENANCE To ensure reliable operation of this product as well as protecting the safety of any person using or handling this device while powered please observe the following instructions U...

Page 29: ...has developed a warranty that anyone can get behind We really wanted to take all the red tape out of a warranty and just make is simple Our 10 YEAR NO BS warranty hinges on 3 elements If you are having trouble call us We will attempt to troubleshoot your issue over the phone If it s broken we will replace it in advance on our dime and we ll also cover the return shipping Repair is an option too bu...

Page 30: ...RMA directly from AVPro Edge and will be referred back to the Dealer Re seller or Installer Shipping For USA not including Alaska and Hawaii Shipping is covered on advanced replacements for FedEx Ground some expressed exceptions may apply Defective product return shipping is covered by AVPro Edge using an emailed return label Item must be returned within 30 days of receipt of replacement product a...

Page 31: ...arranties remedies and conditions whether oral or written express or implied To the maximum extent permitted by law AVPro Global Holdings LLC specifically disclaims any and all implied warranties including without limitation warranties of merchantability and fitness for a particular purpose If AVPro Global Holdings LLC cannot lawfully disclaim or exclude implied warranties under applicable law the...

Reviews: