background image


MaaXBoard-Linux-Debian-UM-V1.2 

http://www.avnet.me/maaxboard 

17 

The storage node for U disk is /dev/sda1, system will mount the storage device to /run/media path 
automatically. 
MaaXBoard also supports other USB device such as key board, mouse, Camera, etc. 

3.9.2  USB Device 

USB0 support USB Device function could be used to burn the system image or use as USB Network 
adapter. 

3.9.2.1  BURNING MODE 

Connect USB0 and PC before power on the board. The system will not boot normally, it will enter burning 
mode. Then users could burn the system image to the development board using uuu tools. For the detail 
information, refer to MaaXBoard EMMC burning Guide. 

3.9.2.2  USB NETWORK ADAPTER 

To use USB0 as USB slave device: network adapter, users should modify the value of fdt_file in uEnv.txt 
and reboot the system. 

fdt_file=em-sbc-imx8m-usb0-device.dtb 

When choose this value, the displayer is HDMI. 
Connect USB0 to PC after the system start up, open the device manager, and check if the following 
device is recognized:   


Please follow the steps listed below to finish USB Device test (Use Windows 7 as example). 
1)  Install Linux USB Ethernet driver (In release package: LinuxTools), then the device manager will list 
the Network Adapter: Linux USB Ethernet/RNDIS Gadget 


2)  Execute the following instructions to set and view the IP address of USB OTG port 
The below IP address are example, you can select any other IP, but make sure it is NOT the same 
network segment as your PC’s Ethernet port. 

root@maaxboard:~# ifconfig usb0 up 
root@maaxboard:~# ifconfig usb0 192.168.1.115 
root@maaxboard:~# ifconfig usb0 

The terminal window will print information as shown below 

usb0      Link encap:Ethernet  HWaddr 92:a9:b6:be:8b:3f   
          inet addr:192.168.1.115  Bcast:192.168.1.255  Mask:255.255.255.0 
          inet6 addr: fe80::90a9:b6ff:febe:8b3f/64 Scope:Link 
          UP BROADCAST RUNNING MULTICAST  MTU:1500  Metric:1 

Summary of Contents for MaaXBoard AES-MC-SBC-IMX8M-G

Page 1: ...MaaXBoard AES MC SBC IMX8M G Debian Linux User Manual V1 2 ...

Page 2: ...ributed or duplicated in any approach and form without the written permission issued by Avnet Manufacturing Services Disclaimer Avnet Manufacturing Services does not take warranty of any kind either expressed or implied as to the program source code software and documents provided along with the products and including but not limited to warranties of fitness for a particular purpose The entire ris...

Page 3: ...board 3 Revision History Rev Description Author Date V1 0 Initial version Sandy 20190301 V1 1 1 Add MIPI displayer USB Device and Demo 2 Modify Wi Fi and Camera operation Sandy 20190705 V1 2 3 Add Bluetooth Audio 4 Add Debian Weston system Sandy 20200119 ...

Page 4: ... 1 Connect and Disconnect Wi Fi Connection 19 3 10 2 Delete Wi Fi Connection 20 3 10 3 Wi Fi Hotspot 20 3 10 4 Configure Via GUI 20 3 11 1 Initialize the Bluetooth Module 20 3 11 2 Scan the Bluetooth Device 21 3 11 3 Connect the Bluetooth Device 21 3 12 1 Check CAN Module 21 3 12 2 Configure and Open CAN 21 3 12 3 CAN Transmit and Receive 21 3 12 4 Shut down CAN 22 4 8 1 Manage Ethernet connection...

Page 5: ...aluation image Debian 10 Qt 5 10 1 library Desktop Weston 5 0 Development based on NXP i MX 8M Micro SD boot HDMI display HDMI audio output 1 Gigabit Ethernet RJ45 2 USB 3 0 can work in host device mode 2 UART TTL include debug port External interfaces I2C UART SPI SAI and GPIO WIFI BLE 4 2 LVDS display MIPI DSI display MIPI camera Dual display TBD ...

Page 6: ...apter 4 For the hardware connection and accessories details please check the QSG 2 1 Boot from SDCard Install the Serial Communication software e g PUTTY select the corresponding port number baudrate as 115200 data bits as 8 stop bits as 1 parity as none Connect the debug interface to PC with USB to TTL converter Pin 6 8 and 10 of J10 to the GND RXD and TXD pin of the USB to TTL converter ...

Page 7: ...ace power to J4 When the system boot up the serial terminal will print the following information Enter username as root to login Enter password as avnet to login After the boot screen will show the desktop environment Connect a HDMI monitor up to your MaaXBoard Users could connect keyboard and mouse to MaaXBoard to use it For detail refer to Weston Desktop Environment ...

Page 8: ...MaaXBoard Linux Debian UM V1 2 http www avnet me maaxboard 8 ...

Page 9: ...lated tools apt update apt install evtest 3 2 USER LED User can control the 2 single color LED indicators LED0 and LED1 corresponding to usr_led and sys_led on MaaXBoard Board Execute the following instructions in serial terminal to control them Light out LED root maaxboard echo 0 tee sys class leds usr_led brightness root maaxboard echo 0 tee sys class leds sys_led brightness Light up LED root ma...

Page 10: ...370000 snvs snvs powerkey dev input event1 gpio_keys dev input event2 bd718xx pwrkey Select the device event number 0 2 1 Input driver version is 1 0 1 Input device ID bus 0x19 vendor 0x1 product 0x1 version 0x100 Input device name gpio_keys Supported events Event type 0 EV_SYN Event type 1 EV_KEY Event code 102 KEY_HOME Event code 412 KEY_PREVIOUS Properties Testing interrupt to exit Event time 1...

Page 11: ...e MaaXBoard file system The default displayer is HDMI screen Screen Type Interface HDMI Default screen J9 Standard HDMI Interface MIPI DSI J16 LVDS J16 Display device could be chosen by modify the fdt_file value in uEnv txt Modification Method After the system start up use nano or vi command to modify the uEnv txt under path boot use sync command to synchronize then reboot the system to make the m...

Page 12: ... displayer and the Audio devices play the audio file root maaxboard aplay audio_sample wav root maaxboard gst play 1 0 audio_sample wav Note aplay command support audio file in wav format gst play command support wav mp3 and aac format 3 6 2 USB Audio Device MaaXBoard could support USB audio device which do not need specified driver to play audio When using MIPI DSI or LVDS screens you can play au...

Page 13: ...etooth device through the desktop application Blueman manager For detail refer to Weston Desktop Environment 3 7 UART MaaXBoard supports 2 UART interface MaaXBoard CPU Interface Type UART1 UART TTL Debug Interface UART2 UART TTL 3 7 1 UART 2 In the Yocto system the node for UART2 is dev ttymxc1 The system image provides a test application uart_test which could be used for a loop back test Short co...

Page 14: ...n UM V1 2 http www avnet me maaxboard 14 root maaxboard uart_test d dev ttymxc1 b 115200 dev ttymxc1 RECV 10 total dev ttymxc1 RECV 1234567890 The result of RECV as above means test passed Note Press CTRL C to exit the test ...

Page 15: ...st 192 168 22 255 inet6 fe80 b093 522a 7bd4 5c15 prefixlen 64 scopeid 0x20 link ether 4a e0 a6 6f e9 06 txqueuelen 1000 Ethernet RX packets 924 bytes 259139 253 0 KiB RX errors 0 dropped 0 overruns 0 frame 0 TX packets 928 bytes 74715 72 9 KiB TX errors 0 dropped 0 overruns 0 carrier 0 collisions 0 root maaxboard ping www baidu com 3 8 2 Configure IP Via Command Line To Configure IP address we can...

Page 16: ...one is USB0 USB0 and USB1 both support USB HOST function USB0 support USB Device function 3 9 1 USB Host Insert a U disk to USB0 or USB1 serial terminal will display the disk information 541 484723 usb 2 1 new SuperSpeed USB device number 2 using xhci hcd 541 548910 usb storage 2 1 1 0 USB Mass Storage device detected 541 558886 scsi host0 usb storage 2 1 1 0 542 593679 scsi 0 0 0 0 Direct Access ...

Page 17: ... usb0 device dtb When choose this value the displayer is HDMI Connect USB0 to PC after the system start up open the device manager and check if the following device is recognized Please follow the steps listed below to finish USB Device test Use Windows 7 as example 1 Install Linux USB Ethernet driver In release package LinuxTools then the device manager will list the Network Adapter Linux USB Eth...

Page 18: ...nnection Local Area Connection 5 select Properties Networking Internet Protocol Version 4 TCP IPv4 then select Properties to open the following window Set an IP address that is in the same network segment as the USB OTG port then click OK 5 Execute the following instruction to verify the network connection root maaxboard ping 192 168 1 15 PING 192 168 1 15 192 168 1 15 56 84 bytes of data 64 bytes...

Page 19: ...est WiFi is the SSID of the WIFI 12345678 is the password root maaxboard nmcli dev wifi con Embest WiFi password 12345678 ifname wlan0 If the connection succeeds it will print the following info Device wlan0 successfully activated with 12551227 ee19 4054 9f43 0c9b83b75995 Enter nmcli dev wifi to check Connected with Embest WiFi root maaxboard nmcli dev wifi IN USE SSID MODE CHAN RATE SIGNAL BARS S...

Page 20: ... 12345678 In above instruction MyHostspot is connection name MyHostspotSSID is the SSID 12345678 is the password Users could connect the hotspot with Wi Fi device Close the Wi Fi hotspot To temporary close the hotspot see Connect and Disconnect Wi Fi Connection Delete the Wi Fi hotspot root maaxboard nmcli con del MyHostspot 3 10 4 Configure Via GUI Debian Weston system support nmcli GUI version u...

Page 21: ...AN module connect the module to USB Host then use the following instructions to control it 3 12 1 Check CAN Module Use the following command to check if a CAN module connected root maaxboard ifconfig a can0 flags 128 NOARP mtu 16 unspec 00 00 00 00 00 00 00 00 00 00 00 00 00 00 00 00 txqueuelen 10 UNSPEC RX packets 0 bytes 0 0 0 B RX errors 0 dropped 0 overruns 0 frame 0 TX packets 0 bytes 0 0 0 B...

Page 22: ...ase seg1 7 phase seg2 2 sjw 1 gs_usb tseg1 1 16 tseg2 1 8 sjw 1 4 brp 1 1024 brp inc 1 clock 48000000 re started bus errors arbit lost error warn error pass bus off 0 0 0 4 1 0 numtxqueues 1 numrxqueues 1 gso_max_size 65536 gso_max_segs 65535 RX bytes packets errors dropped overrun mcast 128 16 0 0 0 0 TX bytes packets errors dropped carrier collsns 14 3 0 0 0 0 3 12 4 Shut down CAN root maaxboard...

Page 23: ...support USB Camera and MIPI CSI Camera System provide a Camera application based on QT Lib could be used with desktop environment to preview photograph and record video For detail refer to Weston Desktop Environment 3 16 QT GPU File system integrated QT5 10 or higher version and GPU development Library such as EGL OpenCL and Open VG It also provides several test programs GPU test program saved in ...

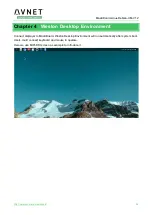
Page 24: ...aaxboard 24 Chapter 4 Weston Desktop Environment Connect displayer to MaaXBoard Weston Desktop Environment will run automatically after system boot Users could connect keyboard and mouse to operate Here we use MIPI DSI screen as example to introduce it ...

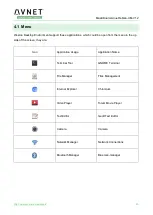
Page 25: ...uld be open from the menu in the up side of the screen they are Icon Application Usage Application Name Terminal Tool GNOME Terminal File Manager Files Management Internet Explorer Chromium Video Player Totem Movie Player Text Editor Gedit Text Editor Camera Camera Network Manager Network Connections Bluetooth Manager Blueman manager ...

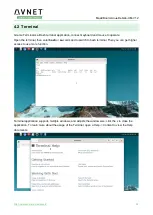
Page 26: ...use to operate Open the terminal then enter bash or su command to switch to bash terminal Then you can get higher access to use more function Terminal application supports multiple windows and adjusts the window size click the x to close the application To learn more about the usage of the Terminal open a Help Content to view the Help documents ...

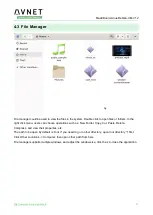
Page 27: ...ht click menu users can choose operations such as New Folder Copy Cut Paste Delete Compress and view their properties etc The path to be open by default is root if you need to go to other directory open root directory first Click Other Locations Computer then open other path from here File manager supports multiple windows and adjust the window size click the x to close the application ...

Page 28: ...MaaXBoard Linux Debian UM V1 2 http www avnet me maaxboard 28 ...

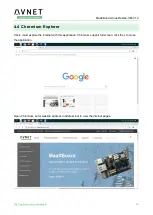
Page 29: ...avnet me maaxboard 29 4 4 Chromium Explorer Users could explore the internet with this application Chromium support full screen click the x to close the application Open Chromium enter website address in address bar to view the internet pages ...

Page 30: ...w avnet me maaxboard 30 4 5 Movie Player Totem Movie Player support play video file in several format the largest support resolution is 4K use with 4K HDMI Displayer 1 Open Totem click button choose Add Local Video to add files to playlist ...

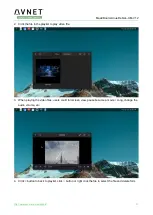
Page 31: ...ick the file in the playlist to play video file 3 When playing the video files users could full screen view pause resume a movie song change the audio volume etc 4 Click button to back to playlist click button or right click the file to select the file and delete form ...

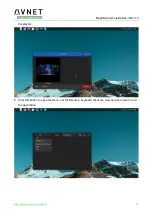
Page 32: ...MaaXBoard Linux Debian UM V1 2 http www avnet me maaxboard 32 the playlist 5 Click this button to open the menu set Preferences keyboard shortcuts view help document or exit the application ...

Page 33: ...Linux Debian UM V1 2 http www avnet me maaxboard 33 6 If connected to internet users could open Channels and play online video 7 In file manager double click the video audio file system will use Totem to play it ...

Page 34: ...2 http www avnet me maaxboard 34 8 To learn more about Totem open Totem Movie Player Manual 4 6 Text Editor Gedit is a GUI text editor support edit text file such as txt shell script etc 1 Open Gedit it will new a Untitled Document ...

Page 35: ...MaaXBoard Linux Debian UM V1 2 http www avnet me maaxboard 35 2 Click Open Other Documents to open exist text file to edit ...

Page 36: ...MaaXBoard Linux Debian UM V1 2 http www avnet me maaxboard 36 3 Click to create new file 4 Click this button to use more function ...

Page 37: ...MaaXBoard Linux Debian UM V1 2 http www avnet me maaxboard 37 5 To learn more click Help to view the gedit help guide ...

Page 38: ...ib could be used with desktop environment to preview photograph and record video Connect a displayer camera to MaaXBoard make sure the desktop environment is start up 1 Open Camera application system will detect the Camera connected or Camera interface Choose uvcvideo when you use the USB camera choose mx6s csi when you use MIPI CSI camera Click Reload button to refresh ...

Page 39: ...en to open Camera and preview the video 3 Click Capture button to take a photo and show the thumbnail in the right side of the window Click Video it will record yuv video file in yuyv format users could copy it to PC to check with YUVplayer The photo and video files will be saved in root Pictures ...

Page 40: ...an UM V1 2 http www avnet me maaxboard 40 4 Click the thumbnail to close the camera preview and show the whole image in current window Camera application supports adjust the window size click the x to close the application ...

Page 41: ...ger could be used to manage the Ethernet and Wi Fi connection 4 8 1 Manage Ethernet connection The default Ethernet connection is Wired connection 1 choose this connection then click setting button to edit In Ethernet page users could check MAC address Speed Duplex mode etc Click Save button to ...

Page 42: ...MaaXBoard Linux Debian UM V1 2 http www avnet me maaxboard 42 save the modification In IPv4 IPv6 Settings page users could change IP address DNS servers etc Click Save button to save the modification ...

Page 43: ...avnet me maaxboard 43 4 8 2 Manage Wi Fi Connection 1 Wi Fi connection need to be adding manually click button then select Wi Fi in the pop up window 2 In Wi Fi Page enter the SSID for the Wi Fi network and choose work mode band and device to ...

Page 44: ...ww avnet me maaxboard 44 use If we connect Wi Fi with exist Wi Fi connection choose Client in Mode Automatic in Band If we set a new Wi Fi Hotspot choose Hotspot in Mode 2 4GHz or 5GHz in Band and modify the channel parameter if necessary ...

Page 45: ...n UM V1 2 http www avnet me maaxboard 45 3 In Wi Fi Security page choose the Wi Fi security method and enter password 4 In IPv4 IPv6 Settings page change IP address DNS servers etc Click Save button to save the modification ...

Page 46: ...aaxboard 46 4 9 Bluetooth Manager 4 9 1 Search and Connect Device 1 Click Search button to search for available Bluetooth device 2 Select the device to connect then click Pair button in Right click menu Device menu or Quick menu bar to pair the device ...

Page 47: ...http www avnet me maaxboard 47 3 Sometimes the device will ask the system to confirm pairing request 4 To cancel the pair select the device then click Remove button in Right click menu Device menu or Quick menu bar to pair the device ...

Page 48: ...XBoard Linux Debian UM V1 2 http www avnet me maaxboard 48 4 9 2 Transmit and Receive Files 1 Pair with a Bluetooth device such as smart phone then click Send File button 2 Choose the file in pop up window ...

Page 49: ...e smart phone 4 Select the inform window press Esc button on keyboard to close it 4 9 3 Connect Bluetooth Audio MaaXBoard supports connect the Bluetooth audio device such as Bluetooth headset to play video or audio files Pair the device at first then choose Connect to Audio Sink in Right click menu or Device ...

Page 50: ...MaaXBoard Linux Debian UM V1 2 http www avnet me maaxboard 50 menu Users could also click Setup button follow the guide to configure the Bluetooth connection ...

Page 51: ...V1 2 http www avnet me maaxboard 51 4 9 4 Other Configuration 1 In Adapter preferences user can modify the device name of the Bluetooth adapter 2 In View Local Services user can change the incoming folder for received files etc ...

Page 52: ...et me maaxboard 52 4 10 Image Viewer In file manager double click the image file system will use Image Viewer to show the picture on the screen In Image Viewer users could full screen to view the picture zoom rotate check picture properties etc ...

Page 53: ...MaaXBoard Linux Debian UM V1 2 http www avnet me maaxboard 53 To learn more open the help content by click the thumbnail in the menu bar ...

Page 54: ...stem Image to SD Card under Windows OS 1 Firstly you should prepare a SD card which is no less than 8GB 2 Then download and install Win32 Disk Imager from https sourceforge net projects win32diskimager 3 Select the system images file eg MaaXBoard Debian Image SDcard V1 1 1r10 img 4 Click Write button to burn the images ...

Page 55: ...dc dev sdc2 dev sda1 dev sda5 dev sdb1 dev sdb5 dev sdc1 3 If SD Card is mounted umount it sudo umount dev sdc1 sudo umount dev sdc2 4 Burn the SD card with following instructions bmaptool create o burn map MaaXBoard Debian Image SDcard V1 1 1r10 img sudo bmaptool copy bmap burn map MaaXBoard Debian Image SDcard V1 1 1r10 img dev sdc 5 3 Update System Image in eMMC USB0 The lower one in USB interf...

Page 56: ...MaaXBoard Linux Debian UM V1 2 http www avnet me maaxboard 56 Chapter 6 Appendix 6 1 Hardware For the detail hardware introduction please refer to MaaXBoard Hardware user manual ...

Reviews: