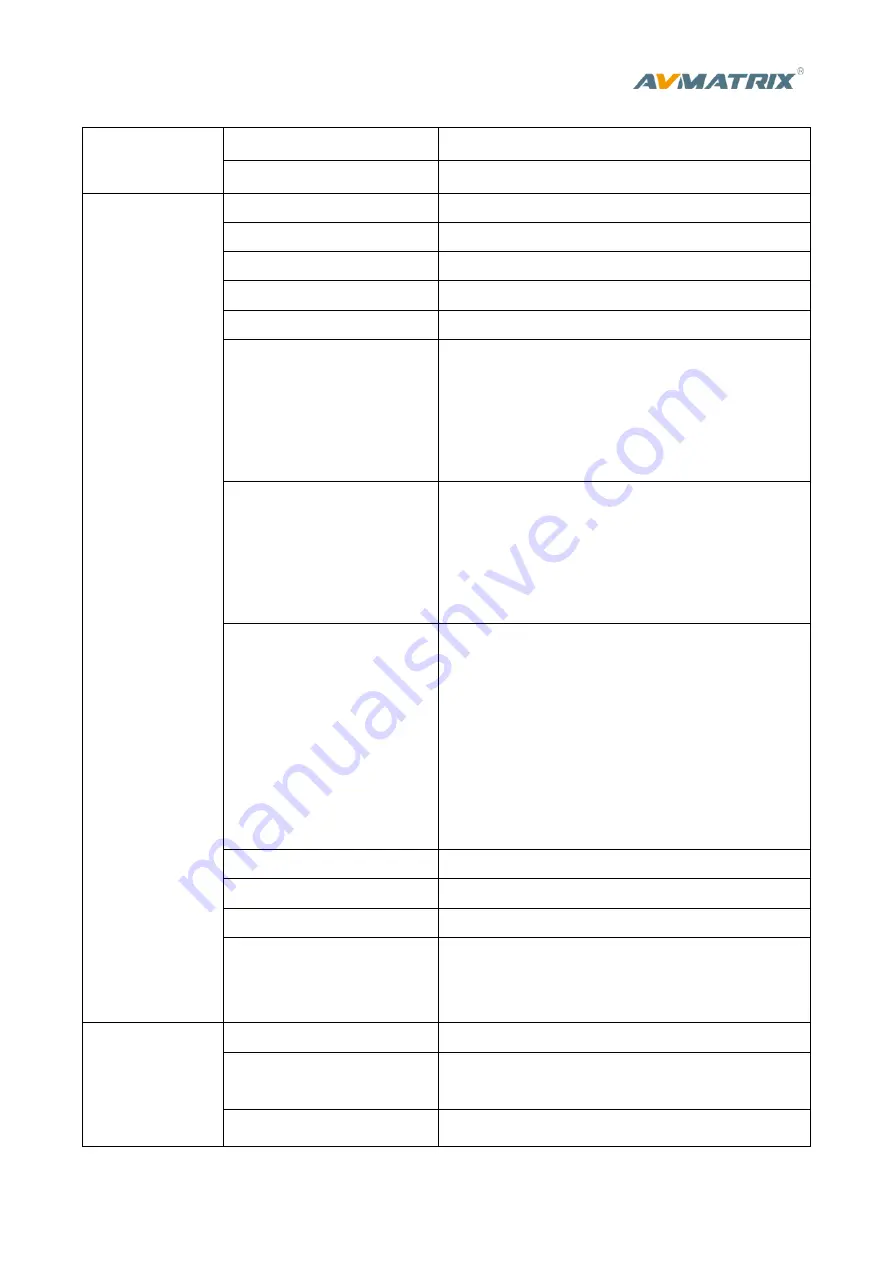
AVMATRIX PVS0615 User Manual Download Page 6


Specification 

LCD Display


Size 

15.6 inch 

Resolution 

1920×1080 

Inputs 

Video Inputs 

SDI×4, HDMI/DVI/VGA/USB×2  

Bit Rate 

270Mbps~3Gbps 

Return Loss 

>15dB, 5MHz~3GHz 

Signal Amplitude 

800mV±10% (SDI/HDMI/DVI/VGA) 

Impedance 

75Ω (SDI/VGA), 100Ω (HDMI/DVI) 

SDI Input Format 

1080p 60/59.94/50/30/29.97/25/24/23.98 

1080psF 30/29.97/25/24/23.98 

1080i 60/59.94/50 

720p 60/59.94/50/30/29.97/25/24/23.98 

625i 50 PAL, 525i 59.94 NTSC 

HDMI Input Format 

4K 60/50/30, 2K 60/50/30  

1080p 60/59.94/50/30/29.97/25/24/23.98/23.976 

1080i 50/59.94/60 

720p 60/59.94/50/30/29.97/25/24/23.98 

576i 50, 576p 50 

VGA/DVI Input Format 

1920×1080 60Hz/ 1680×1050 60Hz/  

1600×1200 60Hz/ 1600×900 60Hz/  

1440×900 60Hz/ 1366×768 60Hz/  

1360×768 60Hz/ 1 280×1024 60Hz/ 

1280×960 60Hz/ 1280×800 60Hz/  

1280×768 60Hz/ 1280×720 60Hz/  

1152×864 60Hz/ 1024×768 60Hz/  

640×480 60Hz 

SDI Video Rate 

Auto detection, SD/HD/3G-SDI 

SDI Compliance 

SMPTE 259M/ SMPTE 292M/ SMPTE 424M 

Bit Rate 

270Mbps~3Gbps 

Color Space and Precision 

SDI: YUV 4:2:2, 10-bit;  

HDMI: RGB 444 8/10/12bit; YUV 444 8/10/12bit; 

YUV 422 8/10/12bit 

Outputs


PGM Outputs 

3×HD/3G-SDI; 2×HDMI Type A 

PGM Output Format 

1080p 50/60/30/25/24 

1080i 50/60 

Multiview Output


1×HDMI Type A 


Summary of Contents for PVS0615

Page 1: ......

Page 2: ...avoid possible fire electrical hazards Ensure unit is properly grounded at all times to prevent electrical shock hazard Do not operate unit in hazardous or potentially explosive atmospheres Doing so could result in fire explosion or other dangerous results Do not use this unit in or near water Do not allow liquids metal pieces or other foreign materials to enter the unit Handle with care to avoid ...

Page 3: ...rview PVS0615 is an all in one 6 channel video switcher that allows video switching audio mixing and video recording The unit integrated a 15 6 LCD monitor which can be used in wide variety of venues for events seminars etc ...

Page 4: ...MI multiview output SDI output 3 is AUX output can be selected as PGM or PVW Input format auto detected and PGM outputs select able Luma Key Chroma Key for virtual studio T Bar AUTO CUT transitions Mix Fade Wipe transition effects PIP POP mode size and position adjustable Audio mixing TRS audio SDI audio and USB media audio Support record by SD card up to 1080p60 ...

Page 5: ...ut 3 TRS Balanced Analog Audio In 4 2 HDMI Out PGM 5 3 SDI Out PGM SDI Out 3 can be for AUX output 6 4 SDI In 7 2 HDMI DVI I In 8 2 USB Input Media player 9 HDMI Out Multiviewer 10 GPIO Reserve for Tally 11 SD Card Slot 12 RJ45 For Sync Time firmware upgrade 13 Earphone Out ...

Page 6: ...25 24 23 98 23 976 1080i 50 59 94 60 720p 60 59 94 50 30 29 97 25 24 23 98 576i 50 576p 50 VGA DVI Input Format 1920 1080 60Hz 1680 1050 60Hz 1600 1200 60Hz 1600 900 60Hz 1440 900 60Hz 1366 768 60Hz 1360 768 60Hz 1 280 1024 60Hz 1280 960 60Hz 1280 800 60Hz 1280 768 60Hz 1280 720 60Hz 1152 864 60Hz 1024 768 60Hz 640 480 60Hz SDI Video Rate Auto detection SD HD 3G SDI SDI Compliance SMPTE 259M SMPTE...

Page 7: ...t 1 TRS L R 50 Ω Audio Output 1 TRS L R 50 Ω 3 5mm Earphone 1 100 Ω Others LAN RJ45 SD Card Slot 1 Power DC 12V 2 75A Consumption 33W Operation Temperature 20 60 Storage Temperature 30 70 Operation Humidity 20 70 RH Storage Humidity 0 90 RH Dimension 375 271 5 43 7mm Weight 3 8Kg Warranty 2 Year Limited Accessories Accessories 1 Power Supply DC12V 5A 1 User Manual ...

Page 8: ...ontrol 10 Power Switch 3 Video Source of Channel 5 and Channel 6 11 PIP POP 4 MIX WIPE FADE Inverse Transition Effect 12 Luma Key Chroma Key 5 Menu Control 13 Transition Speed 6 USB Media Control 14 AUTO 7 Program Row 15 CUT 8 Preview Row 16 T bar Manual Transition ...

Page 9: ...ecording process and press it again to continue Video Source of Channel 5 and Channel 6 Press IN5 to switch the video source of Channel 5 between HDMI 5 DVI 5 VGA 5 USB 5 Press IN6 to switch the video source of Channel 6 between HDMI 6 DVI 6 VGA 6 USB 6 Transition Effects 3 transition effects MIX WIPE and FADE WIPE starts from different direction INV button for alternating the direction inverted M...

Page 10: ...iew to color bar FTB FTB Fade to black Press this button it will fade the current video Program source to black The button will flash to indicate that it s active When press the button again it acts in reverse from complete black to the currently selected Program video source and button stop flashing Power Press the POWER button to turn on the device Long press POWER button 3s to turn off the devi...

Page 11: ...he studio the presenter is actually standing in front of a blue or green background This technique is also referred to as color keying color separation overlay green screen or blue screen CUT and AUTO CUT performs a simple immediate switch between Program and Preview The selected transition WIPE MIX or FADE is not used AUTO performs an automated switch between Program and Preview The selected tran...

Page 12: ...M out is without any overlays 2 The following 6 windows come from the 6 input signals The signal source of window 5 and 6 can be selected from HDMI DVI VGA USB 3 The lower right corner displays the menu and status information The CH1 CH2 CH3 are the channel selection of the 3 audio sources for audio mixer There is a real time Digital clock Analog clock displayed beside the menu ...

Page 13: ...2 of PVW at same time KEEP pressing the buttons until all calibration process finish 2 Turn on the video switcher then the LED indicators will be turn on from bottom to top 3 Adjust the T Bar to A BUS or B BUS until all LED indicators turn on Below image is an example of the LED indicators status when switching the T Bar from B BUS to A BUS 4 Then the T Bar calibration is finished and you can rele...

Page 14: ... to green LED The selected PGM source will circled in red border while the selected PVW source will be circled in green border For example switching the PGM source to SDI 1 and PVW source to SDI 2 The button selection as below The default sources of PVW and PGM are SDI 1 and SDI 2 when the first turn the video switch on When operating the AUTO or T Bar transition the selection from PGM row and PVW...

Page 15: ...Effects AUTO performs an automated switch between Preview and Program views The timing of the transition is set by the chosen speed button The selected transition WIPE MIX or FADE will also be used T Bar manual transition performs similar to AUTO but it is more flexible that the timing of the transition depends on the speed of the manual switch FTB Fade to Black Press FTB button it will fade the c...

Page 16: ...o USB as point 4 3 4 then manage the USB media play from the control panel Press USB5 or USB6 button to select the one which you want to manage The VIDEO IMAGE button is for switching the media format between video and picture The default setting is video format when the video switcher power on There are Play Pause Fast Forward Fast Backward NEXT and BACK buttons to control the media source from U...

Page 17: ...deo switcher is coming with 1 channel L R analog audio input output and SDI embedded audio Audio Mode 1 Mixing Mode Rotary and press the knob button to set audio mode as mixing Press CH1 CH2 CH3 button to enable the mixing audio mode total 3 channels for mixing Press SRC 1 SRC 2 SRC 3 buttons to select the audio source from SDI1 SDI2 SDI3 SDI4 IN5 IN6 TRS IN 2 Following Mode after that the video s...

Page 18: ...ansition When button LED turns on it is active Then use T Bar or AUTO to operate the transition The MIX transition effect as below WIPE Transition WIPE is a transition from one source to another and is achieved by replacing the current source by another source Press the WIPE button and the LED turns on then it is active There are total 9 WIPE selections wiping start from different directions Such ...

Page 19: ...DE button and use T Bar or AUTO to operate the FADE transition PIP and POP When the T Bar located at B BUS to active the PIP POP there will be a small image display on the top left corner of the PVW window as following image Press button 1 6 from PVW row to switch the video source of PIP POP When press PIP POP button the menu will enter into an interface as below image The window size position and...

Page 20: ...ey Then enter into the Key menu to configure the value of Luma Key Using CUT AUTO or T Bar to switch the subtitle to overlay in the PGM window 2 When you press Luma key button indicator turns on and menu enter into the key setting interface as below image The color gamut of the Luma Key can be set from the menu by the knob Chroma Key Turn on the Chroma Key a color from the key source will be remov...

Page 21: ...e value of Chroma Key Using CUT AUTO or T Bar to switch the image to overlay in the PGM window 2 When you press Chroma Key button indicator turns on and menu enter into the key setting interface as below image The KEY background can be switch between Green and Blue The color gamut of the Chroma Key can be set from the menu by the knob ...

Page 22: ...the card to take it out Use a card reader to play or copy the video files in a computer Recording Control Press REC button start recording Meantime the key indicator turns on During recording press PAUSE button the recording pause and press PAUSE button again recording continue Press REC button recording stops and save the video file to SD card Record video resolution is same to SDI PGM output res...

Page 23: ...ing and save the file first then new record the video in new resolution Otherwise the record video files in SD card will be abnormal Recording Settings Entering into the recording settings in main menu and set the encoding format of the recording between VBR and CBR User can also choose the video recording quality they need there is Ultra High High Medium Low for choice ...

Page 24: ...n Analog or Digital Clock Time Setting Connect video switcher to a PC and download a time control software from AVMATRIX official website Open the software and click Scan to search and connect the device then the clock time will be changed to same time to the PC s time Network Settings Network There are two ways to acquire the IP Dynamic IP configured by router and Static set IP freely by yourself...

Page 25: ...ss to the same IP range as video switcher the video switcher s default IP address 192 168 1 215 or set the video switcher s IP address to the same IP range as PC s IP address NetMask Set the NetMask The default setting is 255 255 255 0 GateWay Set the GateWay according to current IP address Save the configuration when network setting finish ...

Reviews: