background image

12

5. Reset

This function cancels certain or all settings and makes the unit return to default settings.

To access the reset menu switch the unit to standby (power button (1)). Then press and hold the STOP (10)
AND REPAET key (6). While holding that key switch the unit on (power button (1)). The display now will
show the reset menu. Release the buttons.

Press PLAY (12) for a complete reset, PAUSE (11) to reset only the names or STOP (10) to exit without
resetting.

6. Remote control

The CD8 is delivered together with the remote control transmitter RC3. The available functions depend on
the IR control mode setting (see 4.2).

Player only

The buttons STOP, PLAY, SKIP on the remote control are used to control the CD drive. PLAY switches
between play and pause if pressed several times. STOP ejects the disc if pressed twice. SKIP if pressed for
more than one second activates fast forward / rewind (only while disc is playing). If pressed shortly the player
will skip to the next / previous title.

All functions

The buttons STOP, PLAY, SKIP on the remote control are used to control the CD drive as described above.
Additionally the output volume can be set using the VOLUME buttons on the RC3, input is selected using
INPUT keys. CD is selected using the PLAY key.

If the unit doesn’t react or reacts only over short distances, the batteries of the RC3 must be changed:

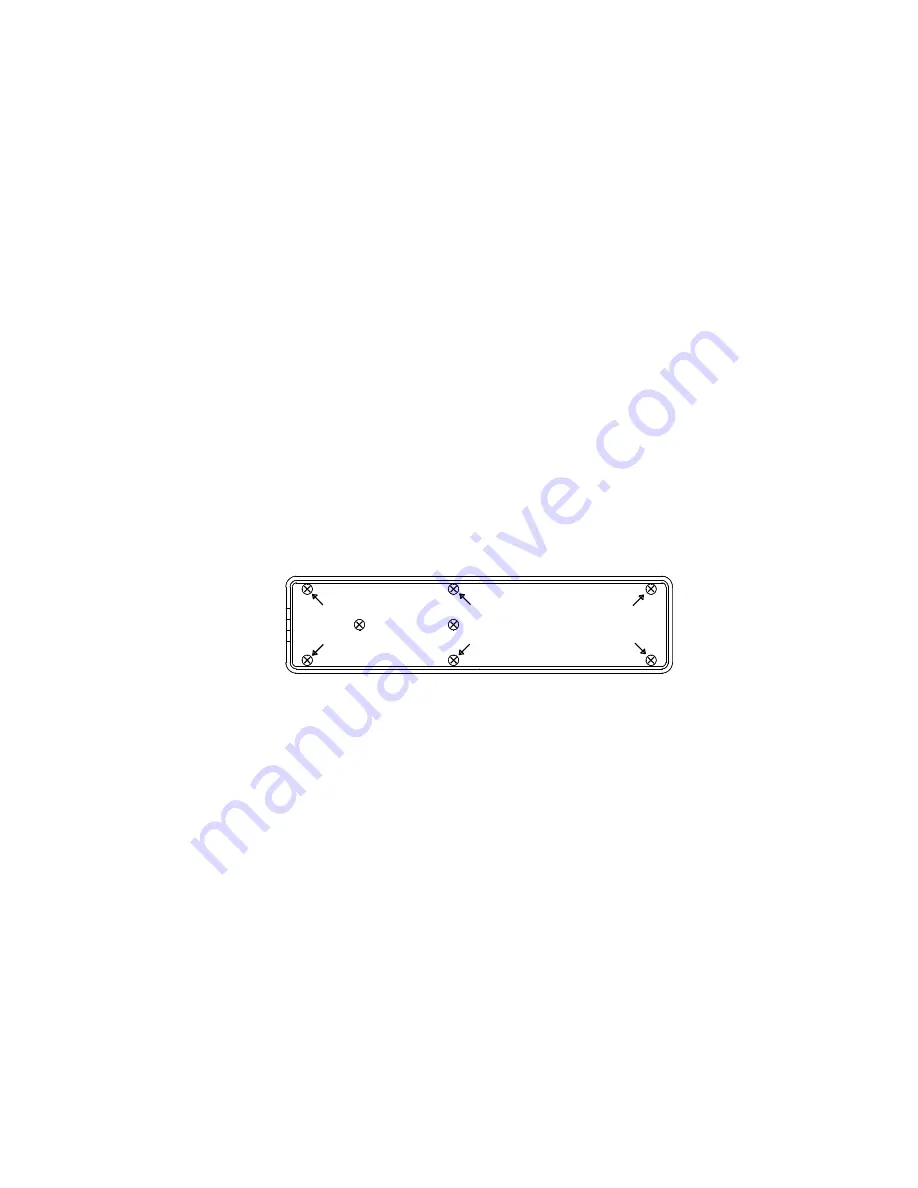
Bottom view RC3

Unscrew the 6 marked screws (CAUTION, do NOT unscrew the 2 unmarked screws in the middle). Take the
bottom plate with the mounted pcb out. Remove the worn batteries and replace them with two new batteries
(type CR2032, 3V Lithium cells). Make sure that polarity is correct (the "+" sign must be on top). Insert the
bottom plate and screw it tight.

NOTE:

 For best function point with the RC3 directly to the front panel of your hi-fi set.

7. Cleaning

Use a soft cloth and normal glass cleansing fluid.

CAUTION: Make sure that no fluid comes into the unit. Do not use scouring cleaners. They may
damage the surface.

Summary of Contents for OVATION CD 8T

Page 1: ...operating instructions CD players DACs OVATION CD8 CD 8T CD drive CD8D ...

Page 2: ...Type Ga Al As Wavelength 755 815 nm 25 C Output power 0 7 mW max NOTE Use only high quality cables for connection between the unit and the other components of Your hifi set We recommend cable lengths under 50 cm to avoid interferences which can affect the reception of radio and TV tuners Declaration of conformity for EC only We herewith confirm that the unit to which this manual belongs fullfills ...

Page 3: ...an amplifier 7 2 7 Connection to digital recorders external DACs 7 2 8 External remote control 7 3 Basic operation 8 3 1 Switching on standby 8 3 2 Display 8 3 2 1 Display in CD player mode 8 3 2 2 Display in D A converter mode CD8 CD8T 8 3 3 Insert eject disc 8 3 4 Playable disc formats 9 3 5 Playing CDs 9 3 6 Repeat 9 3 7 Programming a playlist 9 3 8 Random play 10 3 9 Select input CD8 CD8T 10 3...

Page 4: ...CD8T has it s own power supply It uses a 25 VA toroidal transfomer and a combination of capacitors and chokes for smoothing the DC voltage The high voltage for the tubes is generated by an additional power supply which is fed by a precisely regulated DC voltage A 300 Hz sine generator followed by a power stage and a toroidal transformer generate the regulated high voltage This power supply operate...

Page 5: ...ifferent sampling frequency re clocking That means that the sampling frequency of the original signal and the upsampled signal are fully independent of each other Thus if the upsampling converter has a stable jitter free clock the upsampled signal contains less jitter than the original digital signal The musical advantages of re clocking are the second reason why the AVM CD8 CD8T are equipped with...

Page 6: ... skip search down 14 Button I skip search up 15 Button EJECT Rear panel CD8 CDT CD8D 28 27 26 24 23 22 21 20 19 18 17 16 O I 29 30 26 23 24 28 27 O I 16 Analogue outputs XLR 17 Analogue outputs RCA cinch 18 Digital input AES EBU 19 Digital inputs RCA cinch 1 2 20 Digital inputs optical 1 2 21 Digital input USB1 22 Digital input USB2 23 Dig out optical 24 Dig out coax 25 RS232 Communication port 26...

Page 7: ...special USB audio driver on your computer in order to provide correct signals to this input To play music stored on your computer you must set it s output to USB and the volume to maximum These settings and how to create playlists how to play certain music titles depend on the software you use Please refer to the corresponding software manual 2 6 Connection to an amplifier CD8 CD8T only Connect th...

Page 8: ...ogrammed TRACK If programmed PGM actual program number and total program count Middle line On the left side the actual track on CD and the number of available tracks In the middle the total playing time while STOP or the actual playing time while PLAY or PAUSE 3 2 2 Display in D A converter mode CD8 CD8T only Middle line On the left side the name of the actual input In the middle NO SIGNAL if the ...

Page 9: ...t If a disc is inside the player You can program Your individual playing sequence as follows Tip on the button program 4 to enter the playlist menu Pressing STOP 10 exits the menu and the unit will return to normal mode Pressing PAUSE 11 generates a random playlist Pressing PLAY 12 leads you to the programming menu The display shows on the left side the actual title TRCK below the playing time of ...

Page 10: ...Bit sharp 176 4 kHz 24 Bit smooth 176 4 kHz 24 Bit sharp 96 kHz 24 Bit smooth 96 kHz 24 Bit sharp 88 2 kHz 24 Bit smooth 88 2 kHz 24 Bit sharp 48 kHz 24 Bit smooth 48 kHz 24 Bit sharp 44 1 kHz 24 Bit smooth 44 1 kHz 24 Bit sharp sharp means a flat amplitude and a sharp filter slope at the end of the passband with noticeable phase deviation slow means a slight amplitude error at the end of the pass...

Page 11: ...laying If pressed shortly the player will skip to the next previous title All functions the CD8 CD8T can be used as digital preamplifiers If this mode is activated the buttons STOP PLAY SKIP on the remote control are used to control the CD drive as described above Additionally the output volume can be set using the VOLUME buttons on the RC3 input is selected using INPUT keys CD is selected using t...

Page 12: ... only while disc is playing If pressed shortly the player will skip to the next previous title All functions The buttons STOP PLAY SKIP on the remote control are used to control the CD drive as described above Additionally the output volume can be set using the VOLUME buttons on the RC3 input is selected using INPUT keys CD is selected using the PLAY key If the unit doesn t react or reacts only ov...

Page 13: ...for up to three years from date of purchase The warranty covers the costs of material and working time transport costs are to be borne by the owner Provisions for this warranty are The unit must have been purchased from an authorized dealer Equipment from other sources will not be repaired not even at charge The warranty registration card together with a copy of the bill of sale must be received b...

Page 14: ...up to 192 kHz 24 Bit Frequency response 20 Hz 20 kHz up to 90 kHz depending on input sample rate Deemphasis automatically Input format dig in opt SPDIF linear PCM 33 kHz 96 kHz 16 24 bits Input format dig in RCA cinch SPDIF linear PCM 33 kHz 192 kHz 16 24 bits USB input USB1 up to 48 kHz 16 bits linear PCM USB input USB2 option up to 192 kHz 24 bits linear PCM Input impedance dig in RCA cinch 75 O...

Reviews: