background image

Matrix Switcher Series

User Manual 

57 


)

 For 

0: General

 selecting, you have to adjust the switcher ID on the real panel to 

“0” 

that means the device with ID

 “0”

 will be upgraded.


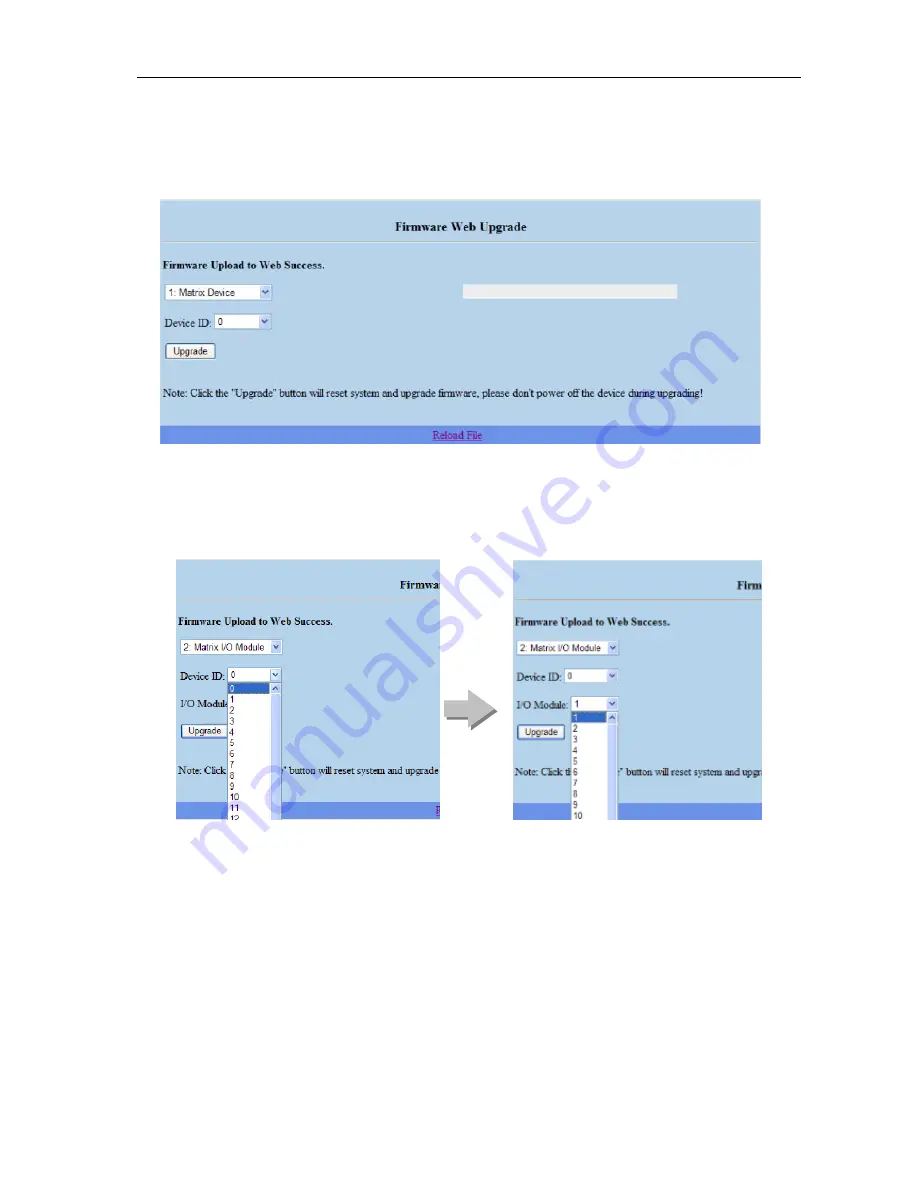
4. For 

1: Matrix Device 

will allow you to select target device based on ID 0 to 31 for 

upgrading firmware. 


5. Select

 “2: Matrix I/O Module”

 will allow you to upgrade I/O modules. You have to 

decide which device you want to configure, and then select the suitable Device ID 

and I/O Module from the drop-down menu. Click

 “Update” 

to upgrade. 


)

 HX-331616 supports 8 modules for upgrading; you have to upgrade each module 

individually. 


Summary of Contents for HX-2444

Page 1: ...ed in any form or by any means without written permission from the product manufacturer Changes are periodically made to the information in this document They will be incorporated in subsequent editions The product manufacturer may make improvements and or changes in the product described in this document at any time All the registered trademarks referred to this manual are belonging to their resp...

Page 2: ...d do not use near water It is better to keep it in a dry environment The system should be installed indoor only Install either on a sturdy rack or desk in a well ventilated place Only use the power cord supported with the device Do not use liquid or aerosol cleaners to clean the device Always unplug the power to the device before cleaning Unplug the power cord during lightning or after a prolonged...

Page 3: ...6 Ports and Switchers 18 6 6 1 RS 232 18 6 6 2 RS 485 20 6 6 3 LAN Port 22 6 6 4 DIP Switcher 8 Pins 23 6 6 5 DIP Switcher 2 Pins 23 6 6 6 Device ID Settings 24 7 Matrix Application Software 26 7 1 Software Introduction 26 7 1 1 Software Description 26 7 1 2 Software Activation 26 7 1 3 Connect Matrix Switcher and PC 27 7 2 Matrix Configuration 27 7 2 1 Main Operation Interface 29 7 2 2 Disconnect...

Page 4: ...ication 47 8 Operation Examples 48 9 Troubleshooting 52 Appendix A Matrix Switcher Remote Controller 54 Appendix B IR Mini Controller 55 Appendix C Firmware Upgrade 56 Appendix D RS 232 Communication Protocol 59 D 1 Host Request 59 D 1 1 Device Byte 59 D 1 2 Request Byte 60 D 1 3 Index Byte 62 D 1 4 Value Byte 63 D 1 5 CRC Byte 64 D 2 Device ACK Packet 65 D 2 1 ACK Type A 65 D 2 2 ACK Type B 66 D ...

Page 5: ...X 331616 Matrix Switcher can through the extended accessory devices to over long distances for transmitting data or detecting signal HX 331616 Matrix Switcher is used mainly in TV broadcasting projects multimedia conference halls and large display performances TV teaching and command control centers It boasts features of power interruption protection during power surge LCD display and synchronous ...

Page 6: ...munication Connected Cable Power Cord IR Receiver Cable IR Blaster Cable LAN Line Female 1x5 Pole Captive Screw Socket 2 Matrix Switcher Remote Controller AAA Battery 2 AV Matrix Software CD User Manual 1 3 Accessories Optional IR Mini Controller IR Receiver Cable IR Blaster Cable ...

Page 7: ...pport original 3D pass through Support High Definition Audio Dolby TrueHD Dolby Digital Plus and DTS HD MA IR pass through supports all IN and OUT ports IR pass through supports all kinds of IR frequency band IR pass through supports duplex transmission between IN and OUT ports IR pass through switch is based on HDMI switched by controller Support IR remote control Support IR Mini Controller to se...

Page 8: ...ount kits Weight 7 5kg Dimensions LxWxH 336x482x130mm 3U high full rack wide without grips Multimedia Max Resolution 1080P 60Hz 12 bit Highest TMDS Frequency 225MHz Control Information HDMI Cable Distance At least 10 meter Baud Rate 9600 bps 8 data bits 1 stop bit no parity Ethernet Protocol HTTP DHCP TCP IP ICMP ping Program Control Web Server AVM Application Serial Control Port RS 232 9Pin Femal...

Page 9: ...8 4 Device Installation The Matrix Switcher has a black metallic housing It can be placed on a sturdy desk directly or installed on a 19 in bracket See Figure 4 1 below Figure 4 1 Mount the Device on a Standard Bracket with 3U Rack mount ...

Page 10: ...d of number keys upon memory selections ALL This key allows user to set single input channel to all output channels The usage of ALL key is the same as output key Press the ALL key Select the one of the IN 1 16 keys The selected IN x key will transfer the input signal to all output channels You can also press the ALL key and then press the OFF key to disable all the displayed switching settings OF...

Page 11: ...rresponding relations up to 8 sets for a memory control Press the STO key firstly Arrange memory location Support up to 8 sets of memories user can select the memory location through OUT1 OUT8 IN1 IN8 The relations among all settings will be saved in the memory permanently RCL The Retriever Key retrieves all settings that are saved in the memory Press the RCL key firstly Then make a random to sele...

Page 12: ... the Matrix Switcher RS 232 Use a 9 pin RS 232 cable to connect both computer serial port COM1 or COM2 and Matrix Switcher RS 232 communication port refer to 6 6 1 RS 232 The computer then can be deployed to control the Matrix Switcher after installing of application software Refer to 7 1 Software Introduction for a software control or Appendix D RS 232 Communication Protocol for an individual con...

Page 13: ...pe A Connector pin definition Pin Signal Pin Signal 1 TMDS Data2 11 TMDS Clock Shield 2 TMDS Data2 Shield 12 TMDS Clock 3 TMDS Data2 13 CEC NC on device 4 TMDS Data1 14 Utility NC on device 5 TMDS Data1 Shield 15 DDC SCL 6 TMDS Data1 16 DDC SDA 7 TMDS Data0 17 DDC Ground 8 TMDS Data0 Shield 18 5V Power 9 TMDS Data0 19 Hot Plug Detect 10 TMDS Clock IR Tx1 16 Ports Used to connect to the IR Blaster ...

Page 14: ...6 Connections The HX 331616 supports up to 8 I O modules for reparation or upgrade Each module can be configured individually based on module number You can search these module numbers by pressing PLUG and INFO keys simultaneously when you want to upgrade firmware version Figure 6 2 Modules Deployment ...

Page 15: ... connect the Input serial jack No 1 No 16 to the HDMI jack of the Blu ray DVD player graphics workstations number displays and output serial jack No 1 No 16 to the HDMI jack of HDTVs projectors video recorders displays and multiplexers so on Figure 6 3 Input Connections Figure 6 4 Output Connections ...

Page 16: ...R Receiver Cable can be connected to IR Rx ports or IR EXT on the rear panel On the other hand IR Blaster Cable can be connected to IR Tx ports on the rear panel Support you an IR channel to control the player from TV or control the TV from player Support all kinds of IR frequency band IR pass through switch is based on HDMI switched Figure 6 5 IR Extended Aiming Multimedia ...

Page 17: ...difficult for you to aim at IR Receiver on the front panel due to the location of Matrix Switcher please connect IR Receiver Cable to the IR EXT port located on the rear panel for optional position Figure 6 6 IR EXT Connection 6 4 Power Connection Use the included power cord to connect from the power port on the rear panel of HDMI Matrix Switcher to the outlet Figure 6 7 Power Connection ...

Page 18: ...plication software Aside from using the front panel keys for switching operation you are also permitted to use the RS 232 connection port for remote operation Figure 6 8 RS 232 and Control PC connection HX 331616 also supports a LAN port allows you to control all the series connection devices through PC Browser Figure 6 9 LAN port and Control PC Connection HX 331616 supports RS 232 and RS 485 on t...

Page 19: ... for key switching operation you can also use the RS 232 or RS 485 serial communication port to carry out remote operation 6 6 1 RS 232 The RS 232 Pin functions are described as below Pin No Abbreviation Description 1 N u Null 2 TXD Send 3 RXD Receive 4 N u Null 5 GND Ground 6 N u Null 7 N u Null 8 N u Null 9 N u Null The Matrix Switcher RS 232 port is defined by DCE ...

Page 20: ... Switcher Series User Manual 19 Figure 6 10 a RS 232 From Female DB9 PC to Male DB9 Matrix Figure 6 10 b RS 232 From Female DB9 PC to Male DB9 Matrix Figure 6 11 RS 232 From Female DB25 PC to Male DB9 Matrix ...

Page 21: ...allows you to control more than one Matrix Switcher If the master device is specified for LAN it allows you to control all the series devices with web browser Remember all the ID of each device upon series connection has to be uniquely See Pin definitions as below RS 485 Figure 6 12 RS 485 Port Serial connection between Matrix RS 485 Pin1 TX TX Transmitted Data Pin2 TX TX Transmitted Data Pin3 Gnd...

Page 22: ...Matrix Switcher Series User Manual 21 Figure 6 13 RS 485 Connection for HX 331616 Figure 6 14 RS 485 Connection for HX 331616 and other Matrix Switcher ...

Page 23: ... 331616 supports a network RJ45 registered jack using 8P8C modular connector which specifies the physical male and female connectors as well as the pin assignments of the wires in a telephone cable A common LAN cable is available Figure 6 15 RJ45 Connector ...

Page 24: ... DIP Switcher Pin 7 Switch between RS 232 port and LAN port connection ON RS 232 OFF LAN D DIP Switcher Pin 8 Reset the web server IP address to 192 168 0 3 The steps are as below 1 Please adjust the pin8 to ON and re start HX 331616 2 After the HX 331616 re starts about 10 seconds shut down it 3 For a normal operation please adjust the pin8 to OFF then power on HX 331616 again The IP address will...

Page 25: ...SW1 0 00 00000 ON ON ON ON ON 1 01 00001 ON ON ON ON OFF 2 02 00010 ON ON ON OFF ON 3 03 00011 ON ON ON OFF OFF 4 04 00100 ON ON OFF ON ON 5 05 00101 ON ON OFF ON OFF 6 06 00110 ON ON OFF OFF ON 7 07 00111 ON ON OFF OFF OFF 8 08 01000 ON OFF ON ON ON 9 09 01001 ON OFF ON ON OFF 10 0A 01010 ON OFF ON OFF ON 11 0B 01011 ON OFF ON OFF OFF 12 0C 01100 ON OFF OFF ON ON 13 0D 01101 ON OFF OFF ON OFF 14 ...

Page 26: ...tcher Series User Manual 25 26 1A 11010 OFF OFF ON OFF ON 27 1B 11011 OFF OFF ON OFF OFF 28 1C 11100 OFF OFF OFF ON ON 29 1D 11101 OFF OFF OFF ON OFF 30 1E 11110 OFF OFF OFF OFF ON 31 1F 11111 OFF OFF OFF OFF OFF ...

Page 27: ...r matrix testing and application The software operation environment is as below Window98 2000 NT XP operating systems 32M internal memory or above 10M hard disk space or above CD ROM At least one serial communication port 7 1 2 Software Activation Power on the computer Implement the AV Matrix msi in the bundled CD ROM to activate installation window as below click Next And follow the instructions ...

Page 28: ...32 Refer to the previous section 6 6 1 RS 232 7 2 Matrix Configuration After finishing installation click to active AV Matrix Application In the Options window select the connected PC Port number and Baud rate and then click OK Figure 7 2 AV Matrix Options Window The software controls signal connection between the corresponding input port and output port as required The AV Matrix software applicat...

Page 29: ...f all output ports for audio video EDID Type FIX fix mode and TV1 access the first output channel selection key FIX mode The Matrix Switcher will supply a set of fixed EDID values to support up to only 1080P high performance TV Output1 mode The Matrix Switcher will access the EDID values of high performance TV that connected to the first output channel and copy the EDID value to all the input chan...

Page 30: ...004 to the right of the blue configuration area and select the Input number key 001 to the bottom Then press consecutively the previously selected Output number keys 002 003 and 004 This way you have selected Input 001 and Output 002 003 and 004 switching Step 2 First select the Output number key 001 to the right of the blue configuration area and select the Input number key 003 to the bottom Then...

Page 31: ...he device name located on the left of main configuration window is empty you can click the Scan to research and update the device ID and Name and other related information End the Scan function by pressing the Scan again during scanning process And the left of main configuration window will show you the detected information presently Options Allows you to configure the Port number and Baud rate Ex...

Page 32: ...own in Figure 7 4 a below Figure 7 4 Disconnect Function Key a Follow the steps as below to disable the output ports including port 003 002 and 001 Step 1 First press down the output number keys 003 then 002 and final 001 to the right of the blue configuration area Step 2 Press the Disconnect key Step 3 Press the previously pressed output number keys 003 then 002 and final 001 to complete the oper...

Page 33: ...Matrix Switcher Series User Manual 32 The final results will be as shown in Figure 7 4 b below Figure 7 4 Disconnect Function Key b ...

Page 34: ...lume Bass Treble Subwoofer and Delay by sliding the scrollbar You can also enable disable the Mute function here Figure 7 5 Audio Configuration Window Mute Function Description To mute the volume A specific example of the Mute One Function is described below Select one port configuration section as light blue block then click Mute check box to mute blocked section The icon will become This functio...

Page 35: ... One Port Configuration A specific example of Mute all function is described below Click Select all check box all of configuration sections will become as light blue block then click Mute check box to mute all blocked sections All of the icon will become ...

Page 36: ...Matrix Switcher Series User Manual 35 Figure 7 7 Mute All Ports Configuration ...

Page 37: ...nchronously Beside all ports for EDID functions are also processed entirely You cannot configure the port separately FIX mode The Matrix Switcher will supply a set of fixed EDID values to support up to only 1080P high performance TV Output1 mode The Matrix Switcher will access the EDID values of high performance TV that connected to the first output channel and copy the EDID value to all the input...

Page 38: ...input output switching relations to Location 1 First select Location 1 as shown below Then click the Save key to save all the present input output switching relations to Location 1 Figure 7 9 Retrieve Function Description To retrieve the saved input output switching relations A specific example of the Retrieve Function is described below To retrieve the all settings saved in Location 1 First selec...

Page 39: ...r select one of the COM ports as shown in Figure 7 11 b for an example in Baud rate select 9600 for signal transmission as shown in Figure 7 11 a 7 2 7 Other Application In the right main window displays the presently saved switching status as shown in Figure 7 12 below Figure 7 12 Memory Configuration Status When input corresponding to Output is enabling it shows the Output ports correspond to th...

Page 40: ...mmand Code Communication Protocol Baud rate 9600bps no odd or even calibration bit address 8bit transmission address 1bit stop address Please refer to the Command list pdf in the CD ROM for more relative Command Code information Also see Appendix D RS 232 Communication Protocol ...

Page 41: ...n the rear panel Beside please adjust the DIPs to LAN and Master for the web control device Set Click this button to set the connected combinations both output and input ports OFF Disable the entire output channels Refresh To refresh the values of the configuration window Any changed settings directly on the HX 331616 equipment will not respond to the AV Matrix operating interface you have to clic...

Page 42: ...e on the window the all channels output will become 5 value Figure 7 14 All Output Check Box Function AV Link Link between audio and video Key In A Hot key that is for key in the value 0 99 quickly After setting the value click Enable to take effect For HX 2488 is useful from 1 to 8 values upon 8 output ports and HX 341616 is useful from 1 to 8 values upon 8 output ports Previous and Next If the c...

Page 43: ... 7 3 2 Video Configuration For video configuration click Video button directly to pop up Video Settings window Figure 7 17 Video Operation In Video Settings window you can click Change button to switch EDID Output1 and Default port Figure 7 18 Video Configuration Default Port Used The LCD will appear FIX when you switch to Default alternately it will appear OUT1 with Output1 selection If the Matri...

Page 44: ...otal Memory Total Output and Total Input information Click Refresh button to renew related information in real time Figure 7 21 Device Status Information 7 3 4 Device Output View When your Matrix Switcher supports more than 8 output ports the output configuration view of browser application will over one page Click to go to the first page of output configurations to go to last page to go to prior ...

Page 45: ...ut to channel 2 3 and 4 output channel 3 inputs to channel 1 output Figure 7 23 AV Matrix Control Step 1 For channel 2 3 4 Output please key in the value 1 in the Audio fields Step 2 For channel 1 Output please key in the value 3 in the Audio fields Step 3 Click Set button Upon completion of the above 3 steps you have actually completed the switching operation of having channel 1 input to channel ...

Page 46: ...ng relations to Location 2 First select Location 2 as shown in the figure below Then click the Save button to save the present input output switching relations to Location 2 Retrieve Function Description RCL Load To retrieve the saved input output switching relations A specific example of the Retrieve Function is described below To retrieve the input output corresponding relations saved in Locatio...

Page 47: ...gure 7 25 Network Settings In the Network Settings window you can set the IP information by yourself Fix IP or click the Enable DHCP check box to get the IP from the DHCP Float IP Click the Default button to restore to default IP address After changing the IP you have to restart power off then power on the Device to make the changed values take effectively You can also use the blue Switcher on the...

Page 48: ... values The entire connected Device name will be showed on the Console List as Figure 7 26 For this model the software utility will show at least 1 up to 32 devices The example as below shows you an ID 0 for the Name HX 331616 presently When the Console List is empty please pay attention to the location of switcher pin on the rear panel of Device is correctly Then click Scan to research the config...

Page 49: ...egin to flicker 2 Press the NO 1 key of the Input channel Example 2 Switch the NO 1 and NO 2 input signals to NO 1 and NO 2 output channels Key LCD Display Operation 1 Press the NO 1 key of the output channel then the input channel will begin to flicker 2 Press the NO 1 key of the Input channel 3 Press the NO 2 key of the output channel then the input channel will begin to flicker 4 Press the NO 2...

Page 50: ... ALL key on the front panel and then press the OFF key to cancel all the settings 2 Press ALL key then select input 1 16 that indicate all outputs will switch to selected inputs E g Input is 16 Example 4 EDID functions Key LCD Display Operation Press the EDID key to switch FIX and OUT1 refer to EDID ...

Page 51: ...anel The Recall from Memory begins to flicker about 8 seconds 4 Press the IN1 key or OUT1 key to Load the previously saving Example 6 STO and RCL combinations restore to factory default values Key LCD Display Operation 1 Press and hold the STO and RCL keys about 2 3 seconds simultaneously on the front panel to restore all settings to factory default values Follow the screen information press STO k...

Page 52: ...used Example 8 INFO function Key LCD Display Operation Press the INFO key individually to show you the device information Example 9 PLUG and INFO combinations Key LCD Display Operation 1 Press the PLUG and INFO keys simultaneously on the front panel The screen will show you the firmware version of module 2 If one of modules firmware upgrade is fail the screen will show you V0 0 00 error informatio...

Page 53: ...Also check if the computer communication port is in good order Check the ID address and DIP Switcher are configured correctly Refer to 6 6 6 Device ID Settings and 6 6 5 DIP Switcher 2 Pins 4 What to do if the corresponding audio signal fails to output during HDMI Matrix switching Answer 1 Check if there is signal on the input end If there is no input signal it could be that the input connection c...

Page 54: ... of the product please send for repair by qualified technical engineer 7 What to do if operation and function failure occurred Answer Check if the equipment and the Matrix system are in proper connection If the problem persists send the product to the maintenance center for repair 8 How to avoid the equipment failure due to the high temperature Answer Place the equipment in a ventilate location If...

Page 55: ...to control the channels and video features switch of Matrix Switcher through remote controller OSD SCAN AUDIO VIDEO and 10 keys are useless ID key is the same as INFO function on the front panel Power key is the same as RETURN function on the front panel except for on the main screen status On the main screen press Power key can disable the LCD light ...

Page 56: ...ted input simultaneously In order to avoid the event occurs described above you can configure the positions of your IR receivers based on different environments The IR Mini Controller is optional 0 9 keys are used for channel selection and keys are used to increase or decrease channel is specified to decrease channel alternately is specified to increase channel For example press keys to add increa...

Page 57: ...your device from web server Follow the steps as below to upgrade the firmware 1 Open the Browser on your PC key in the default IP address http 192 168 0 3 to login the AV MA TRIX Control configuration Click Upgrade to begin firmware upgrade 2 Click Browser to select upgraded bin firmware then click Upload to upload the firmware to web server 3 Select 0 General form the drop down list and click Upg...

Page 58: ...will allow you to select target device based on ID 0 to 31 for upgrading firmware 5 Select 2 Matrix I O Module will allow you to upgrade I O modules You have to decide which device you want to configure and then select the suitable Device ID and I O Module from the drop down menu Click Update to upgrade HX 331616 supports 8 modules for upgrading you have to upgrade each module individually ...

Page 59: ... though the web connection is fail suddenly Please check with the LCD screen to confirm the firmware upgrade has been finished successfully or wait at least 2 minutes then power off to restart your PC 7 If there is a firmware already exists on the web server during firmware upgrade The Erase Flash information window will appear to notice you to remove the existed firmware before upgrading the new ...

Page 60: ...nt panel keys for operation you are also permitted to use the RS 232 connection port for remote operation D 1 Host Request A standard command is 5 bytes Device Request Index Value CRC Byte 1 Device Byte DB Byte 2 Request Byte RB Byte 3 Index Byte IB Byte 4 Value Byte VB Byte 5 CRC Byte CB Host must send CRC code to follow the last byte D 1 1 Device Byte Name Bit 7 Bit 6 Bit 5 Bit 4 Bit 3 Bit 2 Bit...

Page 61: ...o Status Setting Memory A 2 3 0x05 Recall Video Status Setting Memory A 2 0x06 Recall Audio Status Setting Memory A 2 0x07 Request Video Output Channel Output Memory B 0x08 Request Audio Output Channel Output Memory B Plug Detect 0x09 Request Video Input Plug Status Input 0 B 0x0A Request Audio Input Plug Status Input 0 B 0x0B Request Video Output Plug Status Output 0 B 0x0C Request Audio Output P...

Page 62: ...Control Audio Output Delay High Output Delay2 A 2 0X1F Request Audio Output Delay High Output Memory B Video Control 0x20 Select Input EDID Type 0 EDID A 2 0x21 Request Input EDID Type 1 0 B Device Information 0x30 Request Protocol Version 0 0 C 1 0x31 Request Firmware Version 0 0 C 0x3F Request Device Information 0 0 D 1 0x3F Request Extend Information 1 0 E Command Note 1 All devices support the...

Page 63: ...equest List and Table Command Index List Table Command Index List Index Description Output The output that will be selected Port 1 1 Port 2 2 Port n n 0 All outputs Input The input that will be selected Port 1 1 Port 2 2 Port n n 0 All inputs Setting The setting type that will be selected 0 All Settings 1 Switch Settings only 2 Video Audio Settings only Don t care ...

Page 64: ... Status Can t be stored Enable 1 Enable Status example Mute Plug 0 Disable Status example Unmute Unplug Level Level Range 0 100 0x81 Increase a step 0x82 Decrease a step Delay Audio delay time is 16 bit data Unit 5 ms or 10 ms Delay1 The audio delay time low byte Bit0 Bit7 Delay2 The audio delay time high byte Bit8 Bit15 The audio delay time unit decided by the DTUF flag of the extend information ...

Page 65: ...C 2F 71 93 CD 90 11 4F AD F3 70 2E CC 92 D3 8D 6F 31 B2 EC 0E 50 A0 AF F1 13 4D CE 90 72 2C 6D 33 D1 8F 0C 52 B0 EE B0 32 6C 8E D0 53 0D EF B1 F0 AE 4C 12 91 CF 2D 73 C0 CA 94 76 28 AB F5 17 49 08 56 B4 EA 69 37 D5 8B D0 57 09 EB B5 36 68 8A D4 95 CB 29 77 F4 AA 48 16 E0 E9 B7 55 0B 88 D6 34 6A 2B 75 97 C9 4A 14 F6 A8 F0 74 2A C8 96 15 4B A9 F7 B6 E8 0A 54 D7 89 6B 35 Example switch output 6 to th...

Page 66: ...1 CB Type E AB LB EXINF VEINF AEINF PLUG CB D 2 1 ACK Type A ACK Byte CRC Byte Total 2 Bytes Name Bit 7 Bit 6 Bit 5 Bit 4 Bit 3 Bit 2 Bit 1 Bit 0 AB ACC 0 0 Device ID 0 31 CB CRC ACC The devices acknowledge status Accept or Reject 1 device accepts this request ACK acknowledge 0 device rejects this request NAK negative acknowledge The device sends the Nak packet is always 2 bytes NAK CRC 0 Reserve ...

Page 67: ...Response the status refers to the table Request Description Index Value 0x07 Request Video Output Channel 0x08 Request Audio Output Channel Output Input 0x09 Request Video Input Plug Status 0x0A Request Audio Input Plug Status Input 0x0B Request Video Output Plug Status 0x0C Request Audio Output Plug Status Output Enable 1 Plug 0 Unplug 0x11 Request Audio Output Mute Status 0 Unmute 1 Mute 0x13 Re...

Page 68: ...VERB VERC Version Type A RS 232 Protocol Version contains the VER1 and VER2 ex VER1 VER2 VER1 Data 1 Bit 7 Bit 0 Range 0 99 VER2 Data 2 Bit 7 Bit 0 Range 0 99 If the Data 1 is 0x01 and Data 2 is 0x07 VER1 1 and VER2 7 RS 232 protocol version is v1 07 If the Data 1 0x23 and Data 2 0x45 VER1 0x23 35 and VER2 0x45 69 RS 232 protocol version is v35 69 Version Type B Firmware Version contains the VERA ...

Page 69: ...e data bytes not include the AB LB and CB The maximum LB value of the ACK Type D is 19 INFO Device information Bit 7 1 Support Audio switch tools request Request 0x02 0x04 0x06 and 0x08 0 Not support Audio switch tools request Bit 6 1 Support Video switch tools request Request 0x01 0x03 0x05 and 0x07 0 Not support Video switch tools request Bit 5 1 Extended information exists Request 0x3F 0x01 0 E...

Page 70: ...Matrix Switcher Series User Manual 69 ...

Page 71: ...nd 0 The maximum LB is 64 Bytes default 1 The maximum LB is 128 Bytes 2 The maximum LB is 254 Bytes 255 is reserved 3 Reserved The LB value of the Ack packet is not limited by LBMAX If the extended information does not exist the default maximum length is 128 FWVER Firmware version command flag Request 0x31 1 Support Firmware version command 0 Not support Firmware version command VEINF Video Extend...

Page 72: ...0 the device support Request 0x04 0x02 and 0x06 0x02 PLUG Plug Detect Support Information VIPD Video input plug detection command flag Request 0x09 1 Support Video input plug detection 0 Not support Video input plug detection AIPD Audio input plug detection command flag Request 0x0A 1 Support Audio input plug detection 0 Not support Audio input plug detection VOPD Video output plug detection comma...

Reviews: