AVIX Autonomic Mark II User Manual Download Page 9

8

User Manual AVIX Autonomic Mark II - Version 2.0

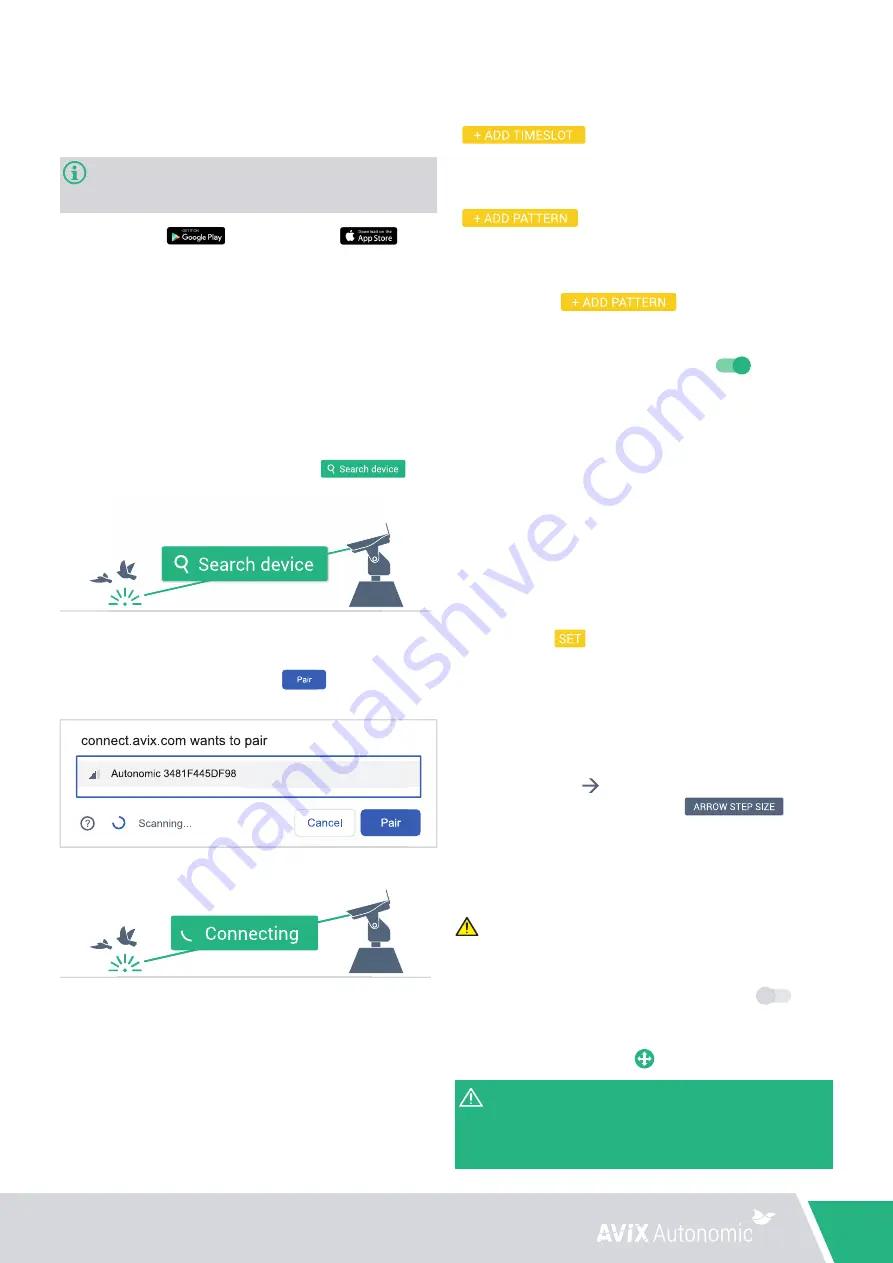
4.3 Configuring the device

To start configuration, add at least one timeslot by pressing the 


 ) button.

Step 8


After creating at least one timeslot, create a pattern by pressing the  

 ) button. The screen as shown in figure 2.2 on 

page 3 will appear.

Step 9


 After pressing the ( 

 ) button the pattern 

configuration screen as shown in figure 2.3 on page 3 will appear.

9.1

  The pattern is active by default, to deactivate the pattern without 

having to remove it, press the toggle button ( 

 ) Only active 

patterns will be executed.

9.2

  Set a pattern name.

9.3

  Set a value for cycles between 1 and 10. The amount represents 

the number of times the pattern is repeated before the next pattern 

is played (if more than one pattern is active within a timeslot). 

Example; if ‘Pattern A’ has been set to 1 cycle and ‘Pattern B’ is 
set to 3 cycles, and they both are active within the same timeslot, 
‘Pattern B’ will be played 3 times for each time ‘Pattern A’ is played 

within that timeslot.

9.4

  Set the speed between 1-100%.

9.5

  Set the laser brightness between 1-100%.

9.6

  Select at least one timeslot during which this pattern will be played.

9.7

  Finally, press ( 

 ) to set up waypoints.

Step 10


The waypoint screen as shown in figure 2.4 will appear:

10.1

  To start creating waypoints, first press and drag the joystick 


in the center of the window to any direction to start moving the 

Motor Platform. For accurate movement, the four 


fine-tune buttons ( 

 ) on the side of the joystick area can be 

used. When, in the top of the screen, ( 

 ) is 

pressed, the sensitivity of the fine-tune buttons can be adjusted.

Direct the laser towards an area in which it is safe to switch ON the 

laser.

 WARNING

: In the next step, the laser will be switched on. Do not 

stare into the laser beam.

10.2

  Switch ON the laser by pressing the toggle button ( 

 ) to 

the right top of the joystick area. After enabling the laser, the 

laser brightness can be adjusted at the top of the window and the 
joystick button turns green ( 

 ).

 The laser brightness setting in this window only affects the 
brightness during setup, and has no effect on the laser brightness 
when the device plays the pattern during normal autonomous 
operation (this brightness setting has been defined in Step 9)

4.2 Connecting to the device

Before establishing a connection, make sure:
• 

You have a mobile device with Bluetooth functionality.


It is recommended to use an Android version 6.0 (or higher) or 
IOS version 10.0 (or higher) and Bluetooth version 4.0 (or higher).

• Google Play Store 

 or the IOS App Store 


are available on your phone. 

• 

You have an active internet connection.

• 

Bluetooth and location are enabled on your mobile device.

Step 1

  Open Google Play Store (in case of Android) or the  

IOS App Store (in case of iOS).

Step 2

  Search for an app named “

AVIX Connect

”.

Step 3

 Download and install the app.

Step 4

 Login with your AVIX Connect account. 

Step 5

 Select

 ‘Autonomic configuration’.

Step 6

 The following window will appear. 

Press ( 

 ).

Step 6


A list of AVIX Autonomic devices within Bluetooth range will appear. 

Select the desired Autonomic and press ( 

 ). If no devices are 

shown 

in the list, move closer to the Autonomic and try again.

The following window will appear:

The connection will be established with the Autonomic (this could 

take a moment). If no connection is established after 1 minute, please 
refresh the page and try again.

Step 7


After the connection is established, the dashboard screen as shown in 

figure 2.1 on page 3 will appear.

Summary of Contents for Mark II

Page 1: ...1 AVIX Autonomic Mark II User manual Version 2 0 ...

Page 2: ...1 User Manual AVIX Autonomic Mark II Version 2 0 F General overview Package contents 1x 1x 1x 1x 1x B C D E A M I J L K H G O N P ...

Page 3: ...2 Assembly Figure 1 1 Figure 1 2 ...

Page 4: ...3 User Manual AVIX Autonomic Mark II Version 2 0 Figure 2 4 Figure 2 2 Figure 2 1 Figure 2 5 Figure 2 3 ...

Page 5: ...page 6 3 Assembly page 6 4 Configuration page 7 5 Maintenance page 9 6 Warranty page 9 7 Spare parts page 10 8 Accessories page 10 9 Troubleshooting page 11 English A CEE Plug B Mains Power Adapter C Power Switch Module D Motor Platform E Power socket F Payload G Rear Cap H Light Module inside Payload I Beam shutter lock J Laser aperture K Accessory slot L Beam shutter M LED status indicator N Pro...

Page 6: ...er s failure willful or otherwise to operate the product in a correct and safe manner WARNING Carefully read all safety warnings and all instructions Retain all safety warnings and all instructions for future reference 1 Technical specifications AVIX Autonomic Mark II Laser class wavelength maximum output power divergence diameter at aperture NOHD MPE 3B 520 nm green continuous wave 500 mW 0 05 mr...

Page 7: ...ht conditions These effects may have indirect safety implications if experienced by users during the performance of safety critical operations CAUTION The operator of the device must complete a laser safety training before using the AVIX Autonomic The AVIX Autonomic is to be used only by adults The AVIX Autonomic is to be used only for the purpose of repelling birds The Laser module Rear Cap Motor...

Page 8: ...or Platform with the holes on the sides of the Payload Make sure to position the Payload in the correct orientation as shown in the Assembly overview on page 2 CAUTION Although the Payload may rest on the Motor Platform it is not yet connected Perform the next step carefully so the Payload will not drop 4 Use the 4 four screws to secure the Payload to the Motor Platform Use the Hex Key to tighten ...

Page 9: ...fe to switch ON the laser WARNING In the next step the laser will be switched on Do not stare into the laser beam 10 2 Switch ON the laser by pressing the toggle button to the right top of the joystick area After enabling the laser the laser brightness can be adjusted at the top of the window and the joystick button turns green The laser brightness setting in this window only affects the brightnes...

Page 10: ...tions The warranty is valid if the AVIX Autonomic is used in accordance with the instructions in this manual and for the purpose for which it was designed The warranty is valid when a valid receipt is presented that shows the date of purchase the name of the dealer and the product name 10 3 Move the laser to the desired position of the first waypoint and press the button Move the laser to the next...

Page 11: ...ed disassembly Any repairs or attempts at repairs have been carried out by unauthorized persons Any defects have occurred as a result of using equipment other than provided by Bird Control Group including but not limited to using a different power adapter Any defects have occurred as a result of misuse or use in environments that are not prescribed The defect is a result of normal wear of replacea...

Page 12: ...working because of the emergency stop on the Power Switch Module has been pressed After the emergency stop has been released the color of the AVIX Autonomic remains red Blinking red Error The AVIX Autonomic has encountered an error and user action is required If the autonomic was bursting it will automatically try to resolve this error every minute To check the error type please connect to the AVI...

Page 13: ...12 ...

Page 14: ......

Page 15: ......

Page 16: ...The Netherlands T 31 23 230 2030 E hello birdcontrolgroup com W www birdcontrolgroup com W www avix com North American Office 27350 SW 95th Ave Suite 3022 Wilsonville OR 97070 United States T 1 844 406 9280 toll free CONFIDENTIAL AVIX Autonomic is designed and manufactured by Published 01 05 2020 V2 0 ...

Reviews: