background image

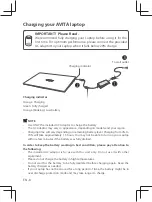
IMPORTANT!  Please Read.

We recommend fully charging your laptop before using it for the first time. 

For optimal operation, please connect the provided AC adapter to your laptop 

when it falls below 20% charge.

¡IMPORTANTE! Favor de leer.

Recomendamos cargar completamente su computadora portátil antes de usarla por 

primera vez. Para un funcionamiento óptimo, conecte el adaptador de CA suministrado a 

su computadora portátil cuando cae por debajo del 20% de carga.

 cations

Power:

 DC 19V (operate with AC adapter) 

Card Reader:

 MicroSD Card Slot support max 256GB

WiFi Connection:

 IEEE 802.11 b/g/n/ac

USB Port:


USB 3.0 Type-C x 1

USB 3.0 Type A x 2

Corriente:

 DC 19V (operar con adaptador de CA) 

Lector de tarjetas:

 Soporte de ranura para tarjeta MicroSD máximo de 256 GB

Conexión WiFi:

 IEEE 802.11 b/g/n/ac

Puerto USB:


Puerto USB 3.0 Tipo C x 1

Puerto USB 3.0 Tipo A x 2

 NOTE

•  Use ONLY the included AC Adapter to charge the battery. The AC Adapter may vary in 

appearance, depending on models and your region.

•  Charging time will vary depending on remaining battery level. Charging from 0% to 70% will 

take approximately 1.5 hours. You may not be able to turn on your laptop within a few minutes 

if the battery was fully drained. 

 NOTA

•  Utilice SOLAMENTE el Adaptador de CA incluido para cargar la batería. El Adaptador de CA 

puede variar en apariencia, según los modelos y su región.

•  El tiempo de carga variará dependiendo del nivel de batería restante. La carga de 0% a  70% 

tomará aproximadamente  1.5 horas. Es posible que no pueda encender su computadora 

portátil en pocos minutos si la batería se descarga completamente.

 caciones

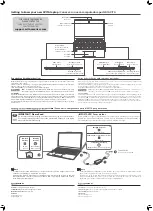
Getting to know your new AVITA laptop

 / Conozca su nueva computadora portátil AVITA

Avisos de derechos de autor y marcas registradas

Windows y el logotipo de Windows son marcas comerciales o marcas comerciales registradas de Microsoft 

Corporation en los Estados Unidos y / o en otros países. 

La marca denominativa y el logotipo de 

Bluetooth®

 son marcas registradas propiedad de 

Bluetooth

 SIG, Inc. Otras 

marcas registradas y nombres comerciales son de sus dueños respectivos.

El logotipo CERTIFICADO Wi-Fi es una marca de certificación de Wi-Fi Alliance.

HDMI, el logotipo de HDMI y High-Definition Multimedia Interface son marcas comerciales, marcas 

registradas, o marcas de servicio de HDMI Licensing LLC en los Estados Unidos y otros países.

Acerca de HDMI

La interfaz multimedia de alta deinición (siglas del inglés High-Deinition Multimedia Interface, HDMI), permite 

transmitir vídeo de alta deinición y audio multicanal sin comprimir. Proporciona imágenes y sonido de alta calidad. 

La tecnología HDMI es totalmente compatible con DVI. Como requiere el estándar HDMI, si se conectan productos 

HDMI o DVI sin HDCP (protección de contenido digital de banda ancha) no habrá salida de vídeo ni de audio.
Todas las demás marcas comerciales que aparecen en este documento son propiedad de sus respectivos dueños. 

Las especificaciones están sujetas a cambios sin previo aviso.

HDMI,  the  HDMI  logo  and  High-Definition  Multimedia  Interface  are  trademarks,  registered 

trademarks, or service marks of HDMI Licensing, LLC in the United States and/or other countries.

About HDMI

High-Definition Multimedia Interface (HDMI) is a high-speed digital interface that can transmit uncompressed 

high definition video and digital multichannel audio. It delivers high quality picture and sound quality. HDMI 

is fully backward compatible with DVI. As required by the HDMI standard, connecting to HDMI or DVI products 

without HDCP (High bandwidth Digital Content Protection) will result in no Video or Audio output.
All other trademark appearing herein are the property of their respective owners. Specifications subject to change 

without notice.

Copyright and trademark notices

Windows and windows logo are trademarks or registered trademarks of Microsoft Corporation in the United 

States and/or other countries. 

The 

Bluetooth

®

 word mark and logos are registered trademarks owned by the 

Bluetooth SIG

 Inc. Other trademarks 

and trade names are those of their respective owners.

The Wi-Fi CERTIFIED Logo is a certification mark of the Wi-Fi Alliance.

 rst time

 / 

Encender su computadora portátil AVITA por primera vez

Power on

Encienda

Standby

Standby

(White)

(Blanco)

(White-breathing)

(Blanco-parpadeo)

FOR SUPPORT AND SERVICE, 

PLEASE CONTACT US

PARA ASISTENCIA Y SERVICIO, 

CONTÁCTENOS EN

support.avita-americas.com

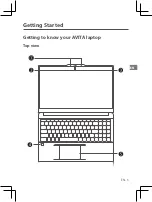
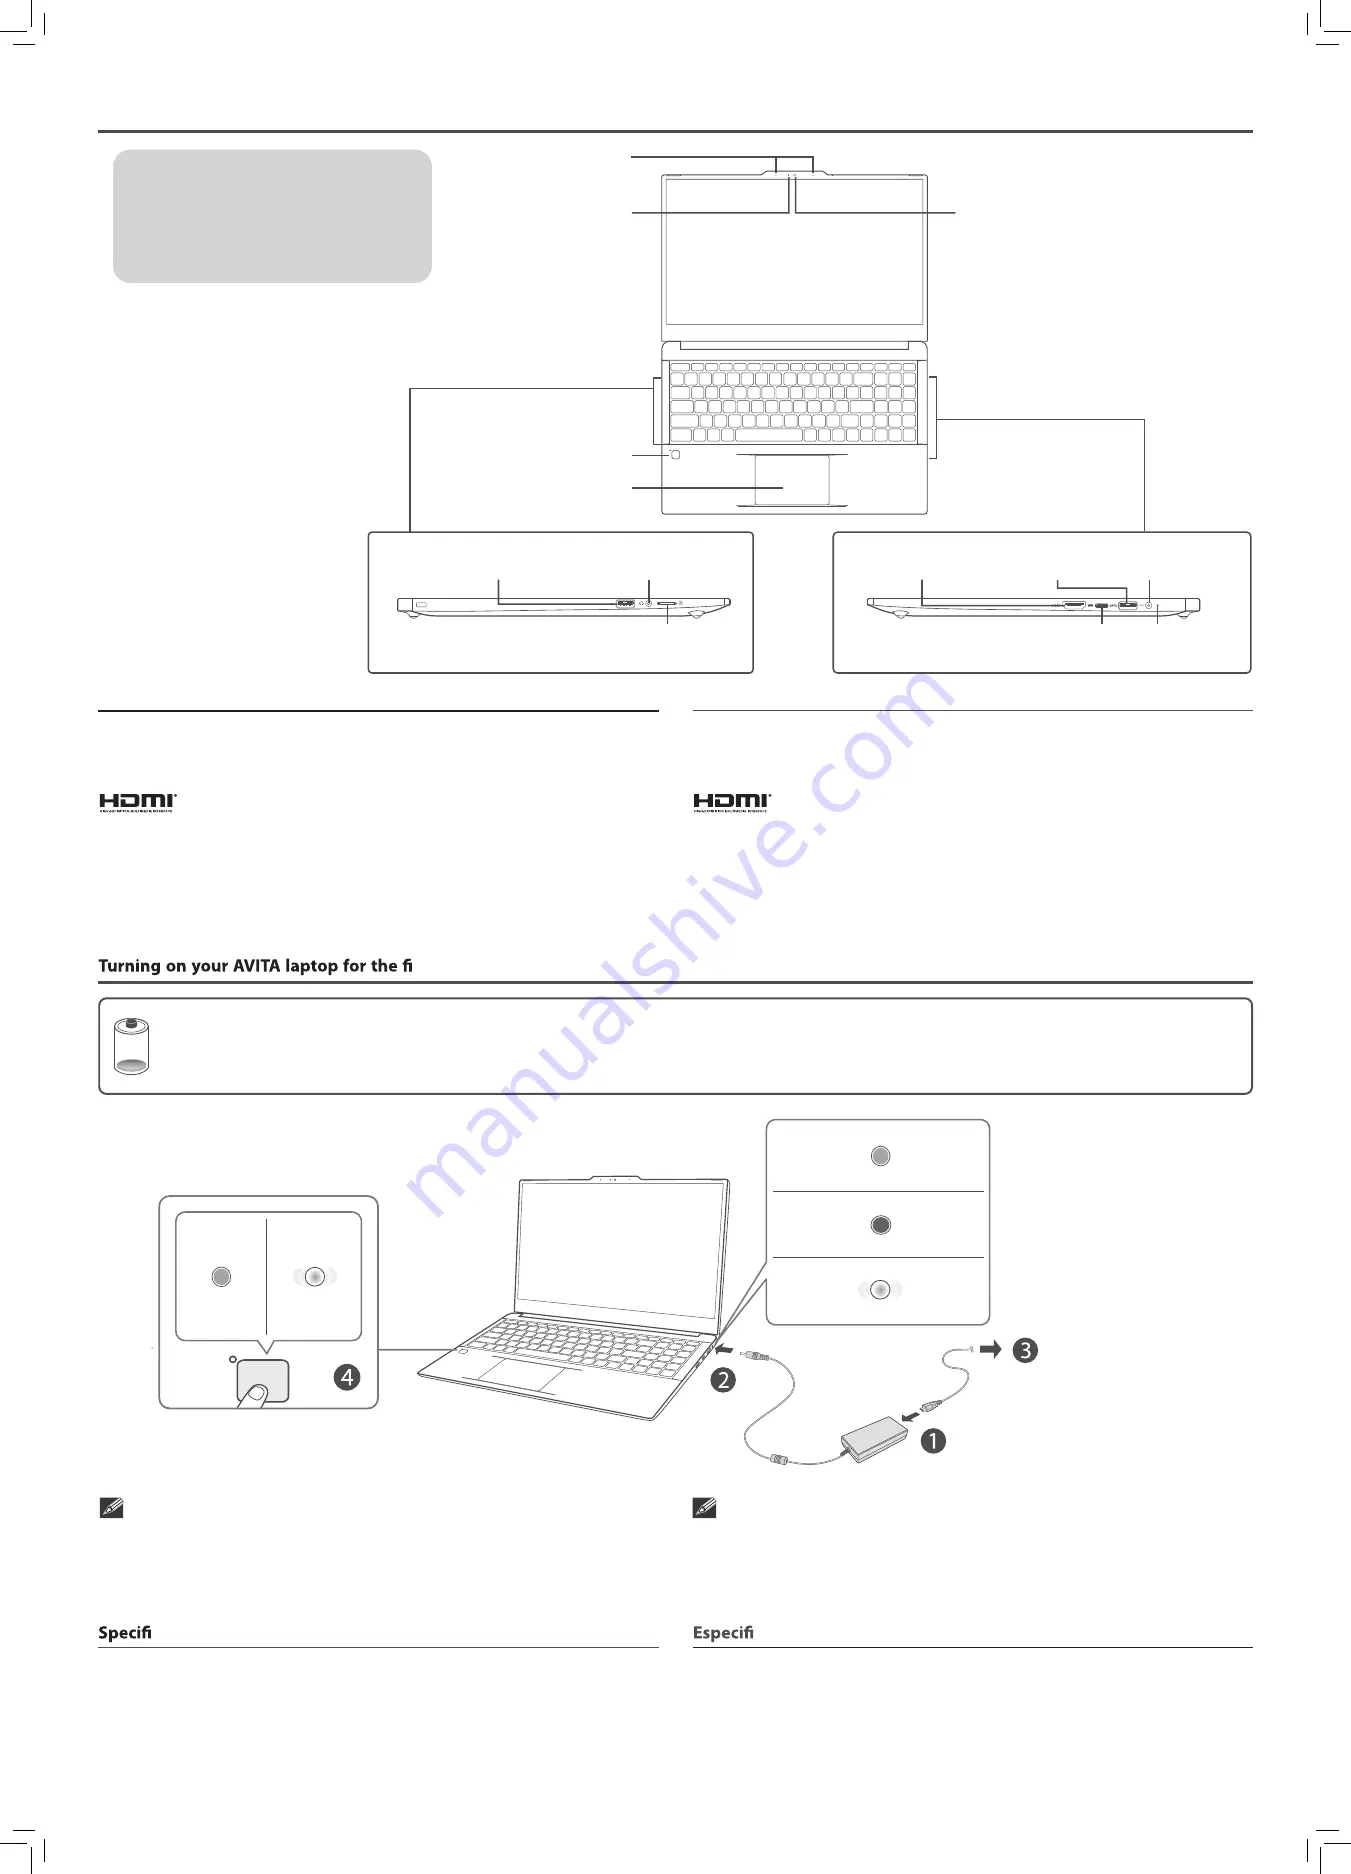
Camera

Cámara

Power indicator

Indicador de encendido

Touchpad

Touchpad

Camera indicator

Indicador de cámara

Microphones

Micrófono

Power button

Botón de encendido

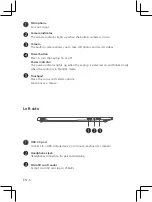
Headphones jack

Conector de Auriculares

USB 3.0 port

Puerto USB 3.0

MicroSD card reader

Lector de tarjetas MicroSD

HDMI OUT jack

Conector HDMI OUT

USB Type C port (5V DC, 1.5A)

Puerto USB Tipo C (5V DC, 1.5A)

Charging indicator

Indicador de carga

USB 3.0 port

Puerto USB 3.0

DC 12V jack

Conector DC 12V

To wall outlet

A connector de pared

Charging

 / Cargando

Fully charged

 / Completamente Cargado

Low battery

 / Bateríabaja

(Orange

 / Naranja)

(Green

 / Verde)

(Orange-blinking

 / Naranja-parpadeando)

Summary of Contents for CN6Q15

Page 1: ...stados Unidos o Canadá 3 Las garantías sólo se extienden en caso de materiales o de fabricación defectuosa y no se extiende a productos o piezas que se hayan perdido o tirado a la basura ni a productos o piezas dañadas a causa del mal uso de la unidad de accidentes del funcionamiento o mantenimiento inapropiados del equipo así como tampoco en caso de no haber seguido las instrucciones que acompaña...

Page 2: ...as del inglés High Deinition Multimedia Interface HDMI permite transmitir vídeo de alta deinición y audio multicanal sin comprimir Proporciona imágenes y sonido de alta calidad La tecnología HDMI es totalmente compatible con DVI Como requiere el estándar HDMI si se conectan productos HDMI o DVI sin HDCP protección de contenido digital de banda ancha no habrá salida de vídeo ni de audio Todas las d...

Page 3: ...EN 1 EN User manual avita americas com CN6Q15 Laptop ...

Page 4: ...ervicing to qualified service personnel Servicing is required when the apparatus has been damaged in any way such as power supply cord or plug is damaged liquid has been spilled or objects have fallen into the apparatus the apparatus has been exposed to rain or moisture does not operate normally or has been dropped ADDITIONAL SAFETY INFORMATION The AC adapter and apparatus shall not be exposed to d...

Page 5: ...rencereceived includinginterferencethatmaycauseundesiredoperation This equipment has been tested and found to comply with the limits for a Class B digital device pursuant to Part 15 of FCC Rules These limits are designed to provide reasonable protection against harmful interference in a residential installation This equipment generates uses and can radiate radio frequency energy and if not install...

Page 6: ... Windows and windows logo are trademarks or registered trademarks of Microsoft Corporation in the United States and or other countries The Wi Fi CERTIFIED Logo is a certification mark of the Wi Fi Alliance The Wi Fi Protected Setup Mark is a mark of the Wi Fi Alliance The Bluetooth word mark and logos are registered trademarks owned by the Bluetooth SIG Inc Other trademarks and trade names are tho...

Page 7: ...top off 10 Power Management 12 Basics 13 Start menu 13 Action center 15 Task view 17 Fingerprint recognition 18 Using the touchpad 19 Using the keyboard 21 Connections and Setup 23 Inserting a microSD card 23 External display 24 Connecting to a Wi Fi network 26 Airplane mode 27 Bluetooth 28 Brightness 28 Volume 29 Troubleshooting 30 Specifications 31 Contents ...

Page 8: ...EN 5 EN Getting Started Getting to know your AVITA laptop Top view ...

Page 9: ...uchpad Move the cursor and selects options Functions as a mouse Microphone For voice input Power indicator The power indicator lights up when the Laptop is powered on and blinks slowly when the Laptop is in Standby mode Left side MicroSD card reader Accept microSD card up to 256GB Headphones jack Headphones connection for personal listening USB 3 0 port Connect to a USB storage device or a mouse k...

Page 10: ...B storage device or a mouse keyboard or camera Supports DisplayPort audio video output DC jack Connect with 19V DC charger Charging indicator Show the battery s charge status Orange Charging Green Fully charged Orange blinking Low battery USB 3 0 port Connect to a USB storage device or a mouse keyboard or camera ...

Page 11: ...it only Do not use it with other equipment Please do not charge the battery in high temperatures Do not wait for the battery to be fully depleted before charging again Keep the battery charged as needed If your Laptop has not been used for a long period of time the battery might be in over discharge protection mode and may take longer to charge Charging your AVITA laptop IMPORTANT Please Read We r...

Page 12: ...w the onscreen instructions to configure your Laptop Power on Standby White White breathing Putting your AVITA laptop to Sleep You can put your Laptop to Sleep mode by doing either of the following Go to the Start menu and click the Power icon in the lower left corner of the screen select and click Sleep Briefly press the Power button to put the laptop in sleep mode If the laptop has not been oper...

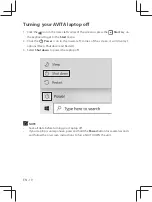
Page 13: ... 2 Click the Power icon in the lower left corner of the screen it will display 3 options Sleep Shut down and Restart 3 Select Shut down to power the Laptop off NOTE Save all data before turning your Laptop off If your Laptop is unresponsive press and hold the Power button for several seconds and follow the on screen instructions to force SHUT DOWN the unit ...

Page 14: ...nct sleep mode within 10 minutes of user inactivity In the same scenario when the apparatus is connected to power adaptor will activate display sleep mode within 15 minutes of user inactivity and activate a distinct sleep mode within 25 minutes of user inactivity When in sleep mode the system becomes fully usable within 5 seconds via network connections or user interface devices The power manageme...

Page 15: ...rt key on the keyboard Live titles Taskbar Basics Live Tiles on the screen change and update in real time so you can get real time updates about news or sports check what your friends are up to and get the latest weather forecast Account options Click on your account name to change account settings lock your device or sign out of your account Expand Click this icon in the upper left corner of the ...

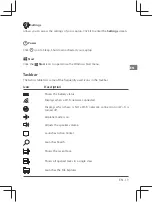
Page 16: ...art menu Taskbar The below table lists some of the frequently used icons in the Taskbar Shows the battery status Displays when there is NO a Wi Fi network connection or Wi Fi is turned off Displays when a Wi Fi network connected Airplane mode is on Adjusts the speaker volume Shows the recent task Launches Search Shows all opened tasks in a single view Launches the File Explorer Launches Action Cen...

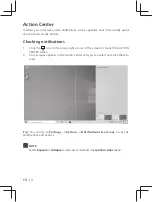
Page 17: ...cations 1 Click the icon in the lower right corner of the screen to launch the ACTION CENTER screen 2 All messages appears in the Action Center and you can select and click them to read Tip You can go to Settings System Notifications actions to set the Notifications and Actions NOTE Select Expand or Collapse to expand or minimize the Quick Actions menu ...

Page 18: ...ess communication Location Enables or disables Location If this setting is on each person who signs in to this device can change their own location settings Focus assist Choose which notification you d like to see and hear so you stay focused off Priority only or Alarms only Mobile hotspot Actives the Mobile hotspot Night light Enables or disables Night light Bluetooth Enables or disables Bluetooth...

Page 19: ...rams You can select and click any item to open it Select and click New desktop a new desktop will be added Then you can open your desired apps and programs on the new desktop Creating a new desktop Move the cursor over the desktop you want to delete then select in the upper right corner of the desktop Deleting a desktop Desktop list ...

Page 20: ...se the fingerprint feature Fingerprint recognition Setting up your fingerprint account 1 Go to Settings Accounts Sign in options 2 Select Add under Password to create a password 3 Select Set up under Fingerprint to start the fingerprint registration 4 Follow the onscreen instructions to set up your Fingerprint account ...

Page 21: ...lick an app to launch it On the File Explorer desktop double click an application to launch it Tap the touchpad or press the left touchpad button Left click or Tap Press Right click To right click an item press the right touchpad button In the Start menu select an app and press the right touchpad button to launch the Setting bar On the File Explorer desktop select one folder or file and press the r...

Page 22: ...to scroll up or down Dragging and dropping Two finger scroll up down Slide two fingers to scroll left or right Two finger scroll left right Pinch two fingers while viewing a website map or image Zoom out Zoom in Spread two fingers apart while viewing a website map or image NOTE Please keep your fingers dry and clean when using the Touchpad ...

Page 23: ...ghtness Launches Windows Settings Turns the speakers on and off Decreases the sound volume Increases the sound volume Adjusts the keyboard backlight s brightness or turn it off Plays or pauses a selected media file Prints the current screen Turns the Airplane mode on and off Switches between the display screen and an external monitor if connected Enables or disables the Touchpad ...

Page 24: ... closes the Start menu You can also use the following shortcuts to help you to launch the applications and navigate the Windows 10 Launches Windows Settings Activates the Lock screen Launches the CONNECT screen Minimizes all currently active windows Launches the PROJECT screen Launches Search window Opens the Run window ...

Page 25: ...e microSD card sold separately into the Laptop s microSD slot until it clicks NOTE You can use microSDTM card and microSDHCTM card up to 256GB SD card not included To check the storage of the microSD card go to Settings System Storage Remove the microSD card by pushing in on the card s edge The card will pop out and can be removed Connections and Setup ...

Page 26: ...ly Connecting to a display 1 Connect the Laptop to a TV or other display device using an HDMI cable not included through the mini HDMI port 2 Turn on your TV or other display device and select its input mode 3 Go to Action Center menu select and click Project TV HDMI cable not included Tip You can also use the following shortcuts to launch the Project ...

Page 27: ...e Shows the screen on both the Laptop and the external display Second screen only Shows the screen on the external display only Extend Extends the screen to the external display Tip You can also select the dual view extend mode Go to Settings System Display and select Detect on the Multiple displays option ...

Page 28: ...atically Connect 3 Enter the Access Point s password if necessary and select Next Connecting to a Wi Fi network Connect the Laptop to a wireless network to use the Internet Access Point AP list Tip You can also go to Settings Network Internet Wi Fi click it to On 1 On the Taskbar select and click ...

Page 29: ...ith password for a connection If you see icon displayed in the lower right corner of the screen the Airplane mode is on You should turn off the Airplane mode to enable the wireless network The Airplane mode disables the wireless connection allowing you to use your Laptop safely while in flight Airplane mode Tip You can also go to Settings Network Internet Airplane mode click it to On 1 On the Task...

Page 30: ...turn it on 2 Then the Laptop will be a discoverable bluetooth device and you can scan it on your other bluetooth device You can adjust the brightness level of the screen accroding to your requirements Press and hold the Fn key then press the F2 key to decrease the brightness of the computer screen Press and hold the Fn key then press the F3 key to increase the brightness of the computer screen Usi...

Page 31: ... sound volume when playing music or video Press and hold the Fn key then press the F7 key to decrease the sound volume Press and hold the Fn key then press the F8 key to increase the sound volume Select and click on the Taskbar then drag the adjustment bar to your desired volume Using the keyboard to control volume Volume Using the taskbar to control volume Volume adjustment bar Brightness adjustm...

Page 32: ... applications will be removed You can go to Settings Update security Recovery to recover your Laptop When a problem occurs with the Laptop it is easy to restore the Laptop to the factory default settings Back up important data regularly before a problem occurs with the Laptop Troubleshooting Reset this PC Advanced startup Laptop displays network or service error message When you are located in pla...

Page 33: ...instructions to force SHUT DOWN the unit then press the power button to turn on your Laptop again Specifications and external appearance are subject to change without notice Specifications Processor AMD R3 Display 1920 x 1080 FHD Camera 1M Card Reader MicroSD Card Slot support max 256GB USB port USB Type C x 1 USB 3 0 Type A x 2 WiFi Connection IEEE 802 11 b g n ac Bluetooth Bluetooth 4 2 Power DC...

Reviews: