

3
`
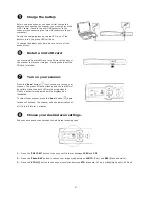
Scan your documents.
1.
Place your document on a flat surface. If you are scanning a book, hold the
book firmly with one hand.
2.
Place the scanner horizontally on the start-scanning position marked by white
lines on four sides of the scanner.
3.
Press the “
Scan
” button ( ) on the scanner. “SP0” will be displayed on the
screen.
4.
Hold the scanner and glide the scanner gently over the surface of the page as
illustrated.
5.
During scanning, the scan speed (SP0~SP2) will be displayed on he screen.
“SP0” indicates the lowest speed while “SP2” is warning you the scan speed is
too fast. To obtain the best image quality, please keep your speed at the
lowest level (SP0).
6.
To end your scan, press the “
Scan
” button ( ) on the scanner again.
7.
If a page is scanned successfully, “001” will be displayed on the screen. This
number indicates your scan count.
Note:
If you place the scanner vertically on the page, please select “
”, and then the “
STD HQ
”
button for about 5 seconds, the “
Rotate 90° right
” icon (
) will be shown in the screen.
Finally, scan the page from the right to the left. Your scanned image will be rotated and displayed
correctly. (Note only PDF file supports the rotation feature.)
a
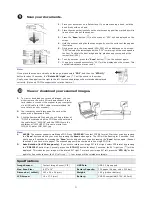
View or download your scanned images.
1.
To view or download your scanned images, you can
either remove the micro SD card and connect it to a
card reader, or connect the scanner to your computer
via a USB cable (a USB Y cable is recommended, be
sure to turn on your scanner).
2.
Your computer should recognize the card or the
scanner as a Removable Disk.
3.
Click the Removable Disk and you will find a folder of
“DCIM” is created and all the PDF files will be stored in
the subfolder of “200DOC” and the JPEG files in the
subfolder of “100PHOTO”. File name starts from
IMG_0001.pdf or IMG_0001.jpg.
Note:
1.
M-PDF
: The scanner supports multi-page PDF. Press “
PDF JPEG
”
to select PDF file format. Start your scan by pressing
the “
Scan
” button and end your scan by pressing the
Scan
button again. The LED will be flashing for 5 seconds. Scan
next page in 5 seconds by pressing the “
Scan
” button and end your scan by pressing the
“
Scan
” button again. (Repeat
the steps if you have more pages) The scanned pages will be combined in one single PDF file.
2.
Auto Rotation (for PDF image only)
: If you wish to rotate your image 90° left or right, select PDF format by pressing
the
“
PDF JPEG
” button first. Secondly, press the “
STD HQ
” button for about 5 seconds, the 90° right icon (
) will be
displayed. This indicates your image will be rotated 90° right. To rotate your image 90° left, press the “
STD HQ
” button
again for 5 seconds to show the 90° left icon (
). Your image will be rotated accordingly.
Specifications
Image Sensor:
Contact Image Sensor (CIS)
USB Port:
USB 2.0 high speed
Max. Scan Size:
8.27”x 14”
Battery Capacity:
700 pages (A4 size, color, 300 dpi)
Dimension: (LxWxH)
263 x 39 x 36 (mm)
Weight:
195 g (without battery)
LCD Screen:
16 x 27.3 (mm)
Battery:
CNP-50 compatible(3.75V, 800mA)