background image

9

Charging Instructions

ONLY AN ADULT SHOULD HANDLE THE BATTERY AND CHARGER.

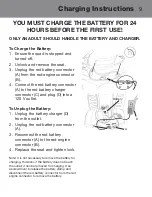
To Charge the Battery:

1.  Ensure the quad is stopped and 

turned off. 

2.  Unlock and remove the seat.
3.  Unplug the red battery connector 

(A) from the red engine connector 
(B).

4.  Connect the red battery connector 

(A) to the red battery charger 
connector (C) and plug (D) into a 
120 V outlet. 

To Unplug the Battery: 

1.  Unplug the battery charger (D) 

from the outlet. 

2.  Unplug the red battery connector 

(A).

3.  Reconnect the red battery 

connector (A) to the red engine 
connector (B). 

4.  Replace the seat and tighten lock. 

Note: It is not necessary to remove the battery for 
charging. However, if the battery does not reach 
the outlet, it can be removed for charging. Use 
a screwdriver to release the battery clamp and 
disconnect the red battery connector from the red 
engine connector to remove the battery. 

Battery

C

A

D

YOU MUST CHARGE THE BATTERY FOR 24 

HOURS BEFORE THE FIRST USE!

A

B

Summary of Contents for AVQUAD-B-F

Page 1: ...ire manual before assembly and operation The vehicle must be assembled by an adult who has read and understands the instructions Made in China Styles and colors may vary Do not return to store Visit u...

Page 2: ...rs 9 AM 5 PM CST Monday Friday Web www ariachild com Email customerservice ariachild com Phone 1 888 982 9309 Specifications BATTERY MOTOR AGE MAX WEIGHT PRODUCT SIZE SPEED RECHARGE TIME TYPICAL RUN T...

Page 3: ...STORE Call Customer Service if you need assistance or replacement parts Please have your model number and serial number ready before calling Please have proof of purchase Keep your sales receipt or r...

Page 4: ...This page is intentionally left blank...

Page 5: ...9 Assemble the Wheels 10 Attach the Handlebar 11 Assemble the Front Bumper 12 Attach the Seat 13 Operating Instructions 14 Maintenance 15 General Care 16 Troubleshooting Guide 17 FCC Information 19 S...

Page 6: ...hicle r Do not allow more than one rider r Do not overload the vehicle Do not remove the weight restriction decals r Do not pull the vehicle with another vehicle or similar device r Keep body parts su...

Page 7: ...ng or has decreased alertness Do not induce vomiting r Tampering with or modifying the electric circuit system may cause shock fire or explosion It could permanently damage the system Keep the charger...

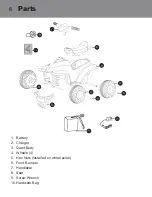
Page 8: ...8 Parts 1 Battery 2 Charger 3 Quad Body 4 Wheels 4 5 Hex Nuts Installed on wheel axles 6 Front Bumper 7 Handlebar 8 Seat 9 Screw Wrench 10 Hardware Bag 1 2 3 4 4 4 5 5 6 7 8 9 10...

Page 9: ...e Battery 1 Unplug the battery charger D from the outlet 2 Unplug the red battery connector A 3 Reconnect the red battery connector A to the red engine connector B 4 Replace the seat and tighten lock...

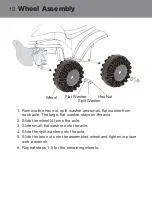
Page 10: ...t washer stays on the axle 2 Slide the wheel 4 onto the axle 3 Slide small flat washer onto the axle 4 Slide the split washer onto the axle 5 Slide the hex nut onto the assembled wheel and tighten in...

Page 11: ...ly 7 before attaching 2 Plug the handlebar connector A into the dashboard connector B 3 Slide the handle bar 7 onto the steering rod and align the screw holes on the handlebar with the holes on the st...

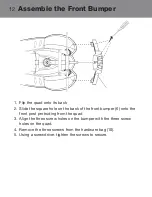
Page 12: ...uare hole on the back of the front bumper 6 onto the front post protruding from the quad 3 Align the three screw holes on the bumper with the three screw holes on the quad 4 Remove the three screws fr...

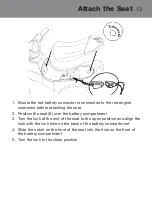
Page 13: ...Position the seat 8 over the battery compartment 3 Turn the lock at the end of the seat to the open position and align the lock with the lock hole on the back of the battery compartment 4 Slide the n...

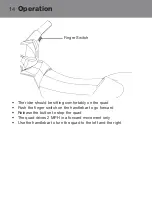
Page 14: ...omfortably on the quad r Push the finger switch on the handlebar to go forward r Release the button to stop the quad r The quad drives 2 MPH in a forward movement only r Use the handlebar to turn the...

Page 15: ...tomer Service for assistance r Keep the charger away from water or excessive moisture to prevent short circuiting r Only use the charger specified with the original item Do not charge the battery with...

Page 16: ...contact Customer Service for replacement parts See Service and Repairs on Page 24 for more information r DO NOT operate the vehicle if there are any damaged parts r Carefully clean the vehicle with a...

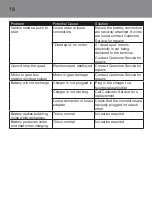
Page 17: ...tomer Service for repairs Vehicle only runs for a short time Undercharged battery Ensure a secure connection when the battery is recharging Recharge for at least 8 12 hours Overcharged battery Never c...

Page 18: ...destroyed Contact Customer Service for repairs Motor or gear box making grinding noises Motor or gear damage Contact Customer Service for repairs Battery will not recharge Charger is not plugged in P...

Page 19: ...ul interference to radio communications However there is no guarantee that interference will not occur in a particular installation If this equipment does cause harmful interference to radio or televi...

Page 20: ...replacement parts please visit us online at www ariachild com Or contact us at Phone 1 888 982 9309 Email customerservice ariachild com Web www ariachild com Hours 9 AM 5 PM CST Monday Friday For a l...

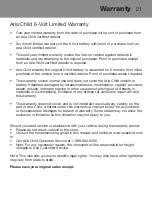
Page 21: ...abuse misuse improper service or other causes not arising out of defects in materials or workmanship Evidence of any attempt at consumer repair will void this warranty r This warranty does not cover...

Page 22: ...22 This page is intentionally left blank...

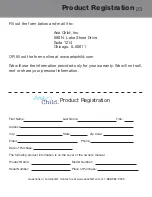
Page 23: ...tion provided only for your warranty We will not sell rent or share your personal information First Name Last Name Title Address City State Zip Code Email Phone Date of Purchase The following product...

Page 24: ...24 This page is intentionally left blank...

Page 25: ...24 Cette page a t laiss e vierge intentionnellement...

Page 26: ...achat Enregistrement du produit Questions ou commentaires Contactez nous au www ariachild com ou au 1 888 982 9309 Enregistrement du produit Remplir le formulaire ci dessous et le poster Aria Child In...

Page 27: ...22 Cette page a t laiss e vierge intentionnellement...

Page 28: ...uvais entretien ni par toute autre cause que des d fauts de mat riaux et de fabrication La garantie est annul e si vous tentez de r parer le v hicule vous m me de quelque fa on que ce soit r Aria Chil...

Page 29: ...ria Child Heures d ouverture 9 h 17 h HC du lundi au vendredi T l phone 1 888 982 9309 Courriel customerservice ariachild com Site Web www ariachild com Pour voir la liste des pi ces de rechange offer...

Page 30: ...ation et d utilisation non conformes aux instructions peut causer des interf rences nuisibles aux communications radio Il n est toutefois aucunement garanti qu il n y aura pas d interf rences dans tou...

Page 31: ...vant de changer de vitesse Le moteur ou la bo te de vitesse produit des bruits de grincement Moteur ou bo te de vitesse endommag Communiquez avec le service la client le pour les faire r parer La batt...

Page 32: ...iquez avec le service la client le Le v hicule ne fonctionne que pendant une br ve p riode de temps Batterie d charg e Assurez vous que la batterie soit bien branch e durant la recharge Rechargez la p...

Page 33: ...e pi ce de rechange Pour de plus amples renseignements consultez la section Service de r paration de la page 24 r N UTILISEZ PAS LE V HICULE s il pr sente des pi ces endommag es r Nettoyez le v hicule...

Page 34: ...er le chargeur et appeler le service la client le r Garder le chargeur loign de l eau ou de l humidit excessive afin d emp cher un court circuit r Utiliser seulement le chargeur con u pour l article o...

Page 35: ...ppuyer sur le bouton de commande pour faire avancer le v hicule r L enfant doit rel cher le bouton de commande pour arr ter le v hicule r Le v hicule se d place 3 2 km h en marche avant seulement r Le...

Page 36: ...au fil rouge du moteur 2 Placez le si ge 8 par dessus le compartiment de la batterie 3 R glez le verrou du si ge en position ouverte puis ins rez le verrou dans le trou correspondant du compartiment d...

Page 37: ...Installez le pare chocs de fa on que la tige qui saillit de l arri re du v hicule s engage dans le trou carr du pare chocs 3 Alignez les trois trous du pare chocs avec ceux du v hicule 4 Retirez troi...

Page 38: ...t l crou du guidon 7 2 Branchez le connecteur du guidon A au connecteur du tableau de bord B 3 Glissez le guidon 7 sur la tige de direction en vous assurant que les trous sont bien align s 4 Ins rez l...

Page 39: ...it demeurer sur l essieu 2 Installez la roue 4 sur l essieu 3 Glissez la petite rondelle plate sur l essieu 4 Glissez la rondelle frein sur l essieu 5 Posez l crou au bout de l essieu et serrez le bie...

Page 40: ...e de 120 V Une fois la batterie charg e 5 D branchez l adaptateur du chargeur D de la prise de courant 6 D branchez le fil rouge de la batterie A du fil rouge du chargeur C 7 Rebranchez le fil rouge d...

Page 41: ...8 clat des pi ces 1 Batterie 2 Chargeur 3 Cadre 4 Roues 4 5 crous hexagonaux install s sur les essieux 6 Pare chocs avant 7 Guidon 8 Si ge 9 Tournevis 10 Sac de fixations 2 3 4 4 4 5 1 5 6 7 8 9 10...

Page 42: ...semble pas pleinement consciente r Toute modification du syst me lectrique peut causer une lectrocution un incendie ou une explosion et pourrait endommager le syst me de fa on permanente Tenez le couv...

Page 43: ...nts portant sur les limites de poids r Ne tentez jamais de tirer le v hicule avec un autre v hicule ni aucun autre dispositif r Tenez les mains les pieds les cheveux et les v tements loign s des pi ce...

Page 44: ...recharge 9 Installation des roues 10 Installation du guidon 11 Installation du pare chocs avant 12 Installation du si ge 13 Utilisation 14 Entretien 15 Entretien g n ral 16 Guide de d pannage 17 Inter...

Page 45: ...Cette page a t laiss e vierge intentionnellement...
Page 46: ...GASIN Si vous avez besoin d aide ou de pi ces de rechange communiquez avec le service la client le Assurez vous d avoir le num ro de mod le et le num ro de s rie du v hicule avant d appeler ainsi que...

Page 47: ...estions Heures d ouverture 9 h 17 h HC du lundi au vendredi Site Web www ariachild com Courriel customerservice ariachild com T l phone 1 888 982 9309 FICHE TECHNIQUE BATTERIE MOTEUR GE POIDS MAXIMUM...

Page 48: ...lire et de bien comprendre le guide au complet Fabriqu en Chine Le style et la couleur de l article peuvent tre diff rents de ce qui est illustr Si vous avez besoin d aide ou de pi ces de rechange ne...

Reviews: