background image

Fast Track C400 User Guide

14

3  

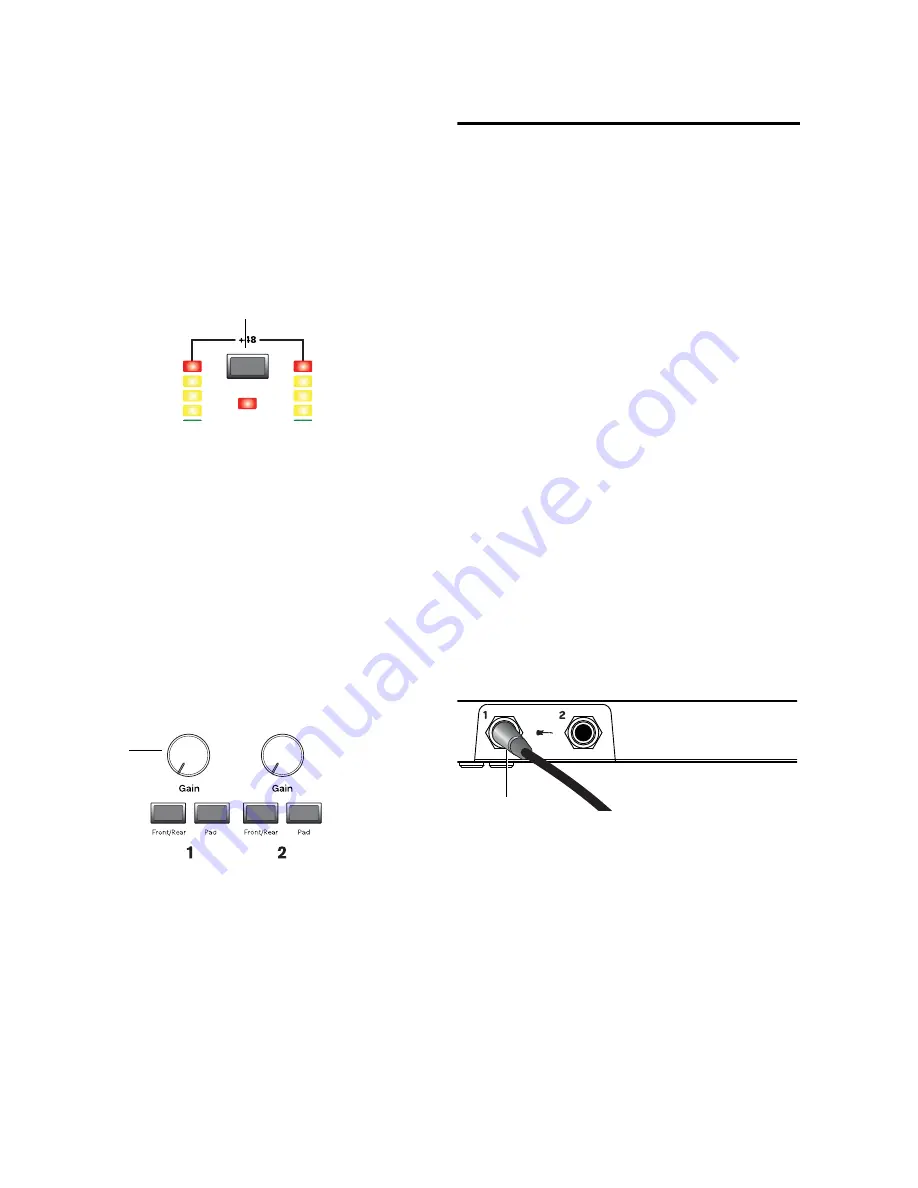
If your microphone requires phantom power, 

make sure the microphone is connected, then 
press the Phantom Power switch (labeled 

48V

on the front of the Fast Track C400. This switch 
sends 48V to 

both

 mic inputs. The 48V LED on 

the front of the Fast Track C400 will light when 
phantom power is being supplied.

4  

On the top panel of the Fast Track C400, begin 

by turning the Gain knob fully counter-clock-
wise. As your sound source (instrument, voice, 
etc.) is performing at its loudest levels, turn the 
gain knob clockwise until the input level meters 
are peaking within the yellow band of LEDs. The 
red “Clip” LED (at the top of the meters) should 
not illuminate as that means your signals have 
overloaded the converters.

At this point, you have set optimum gain levels 
and can begin recording.

5  

If you are working with very loud sources and 

the incoming signal is too loud even at mini-
mum gain levels (for example, when the Gain 
knob is turned fully counter-clockwise), engage 
the Pad switch. This will further reduce incom-
ing levels by approximately 20 dB to prevent 
any distortion.

Connecting Instruments to 
the Fast Track C400

Fast Track C400 provides two input types (DI 
and Line) that correspond to the different signal 
strengths output by different types of instru-
ments. 

DI Inputs 

These front-panel inputs are specifi-

cally designed for instruments such as electric 
guitar or electric bass, which usually have a 
lower output level and different impedance 
than line-level devices.

Line Inputs 

Line level devices, including elec-

tronic audio sources such as mixers, samplers, 
keyboards, and synthesizers should be con-
nected to the Line inputs on the rear of the in-
terface.

Connecting Electric Guitar or Bass

To use a guitar with Fast Track C400:

1  

On the front of the Fast Track C400, plug your 

guitar cable into one of the Instrument inputs. 

Phantom Power switch

Gain knob for Input 1

Phantom Power

switch

Gain

Connecting a guitar to the 1/4-inch connector

 Input 1

Summary of Contents for Fast Track C400

Page 1: ...Fast Track C400 User Guide ...

Page 2: ... or registered trademarks of Avid Technology Inc All other trademarks contained herein are the property of their respective owners Product features specifications system requirements and availability are subject to change without notice Guide Part Number 9329 65108 00 REV A 05 11 Documentation Feedback At Avid we are always looking for ways to improve our documentation If you have comments correct...

Page 3: ...00 Back Panel Features 6 Fast Track C400 Front Panel Features 8 Chapter 3 Fast Track C400 Installation 9 Installing Fast Track C400 Drivers 9 Chapter 4 Hardware Connections 11 Connecting Headphones 11 Connecting a Sound System 11 Connecting Audio Inputs 12 Connecting a Microphone 13 Connecting Instruments to the Fast Track C400 14 MIDI Connections 16 Chapter 5 The Driver Control Panel 18 Presets 1...

Page 4: ...Recording Audio Tracks 34 Recording Instrument Tracks 36 Appendix A Troubleshooting 37 Check Your Connections 37 Check the Fast Track C400 Drivers 38 Music Software Configuration 38 Before Updating Your System 39 Before You Call Avid Support 39 Appendix B Compliance Information 40 Environmental Compliance 40 EMC Electromagnetic Compliance 41 Safety Compliance 41 Appendix C Warranty 43 ...

Page 5: ...gital input and out put S PDIF inputs and outputs can be config ured to mirror any of the analog output pairs or used as their own independent in puts and outputs Up to a total of four channels of input using analog and digital inputs simultaneously Independent gain controls and level meters for each analog input channel One MIDI In and one MIDI Out port provid ing 16 MIDI input channels and 16 MI...

Page 6: ...our best online source for information to help you get the most out of your Fast Track C400 The fol lowing are just a few of the services and features available Product Registration Register your purchase online at www avid com support Support and Downloads Contact Avid Customer Success technical support download software updates and the latest online manuals browse the Compatibility documents for...

Page 7: ...ctors These buttons select either the front panel In strument Inputs TS or rear panel Mic Line In puts XLR TRS combo for each channel When these buttons are set to the In position the corresponding front panel Instrument Input is active When they are set to the Out posi tion the corresponding rear panel Mic Line In put will be active Figure 1 Fast Track C400 top panel Gain Input Selector Multi But...

Page 8: ...LR Mic inputs About Phantom Power Dynamic microphones such as a Shure SM57 do not require phantom power to operate but are not harmed by it Most condenser micro phones such as M Audio Solaris do require phantom power to operate If you are not sure about the phantom power re quirements for your microphone consult your microphone s documentation or contact the manufacturer Power LED The blue Power L...

Page 9: ... as described in Chapter 6 The Multi Button Depending on your software these can include keyboard shortcuts used for functions such as Start Stop Record Toggle Marker Loca tions and Save as well as any custom keyboard shortcuts you may have set up Headphone Volume This knob adjusts the output level of the head phone output The headphone output always mirrors line outputs 1 2 Refer to Master Volume...

Page 10: ...DI input or output S PDIF Digital I O S PDIF is a connection protocol that lets you digitally connect Fast Track C400 to external de vices that also have S PDIF ports such as CD players DAT recorders or external AD DA con verters S PDIF sends and receives signals over unbal anced phono RCA cables at up to 24 bit 96kHz resolution when used with Fast Track C400 The S PDIF input and output channels a...

Page 11: ...des combina tion XLR TRS on the back panel These bal anced unbalanced analog audio inputs support the following input levels Mic microphone for XLR inputs Line TRS for line level signals on TRS or TS inputs On the top panel the input signal is adjusted by the Gain control for each channel The input source back panel Mic Line or front panel Instrument is chosen using the corre sponding Front Rear I...

Page 12: ...are for connecting an electric guitar bass or other instrument level signal The levels for these inputs is controlled by the corresponding Input Gain knobs on the top panel Headphone Output Use the Headphone Output to connect stereo headphones with a 1 4 inch stereo connector The level for this output is controlled by the Headphone Volume knob on the top panel Figure 3 Fast Track C400 front panel ...

Page 13: ...installer icon and follow the on screen instructions When the installation is complete restart your computer and connect your Fast Track C400 to an available USB port on your computer A Note for Mac OS 10 6 7 Users The Keyboard Setup Assistant will appear first time you connect Fast Track C400 to you com puter Please close the window and do not click Continue Windows To install the Fast Track C400...

Page 14: ... and follow the on screen instructions When the installation is complete restart your computer and connect your Fast Track C400 to an available USB port on your computer 4 Once the installation is complete and your computer has been restarted connect your Fast Track C400 to an available USB port on your computer You may be notified that the driver being in stalled has not passed Windows Logo Test ...

Page 15: ...n your Fast Track C400 are grouped in pairs that correspond to the top panel Output Selector buttons A and B These connections support 1 4 inch balanced TRS Tip Ring Sleeve or unbalanced unbal anced TS Tip Sleeve connectors These outputs can be connected to any amplification system powered speakers a home stereo system or an audio mixer Please refer to your audio application s doc umentation to le...

Page 16: ... the hardware input jacks line up directly behind their corresponding input controls on the front panel This makes it easier to locate channel in put connections from the front Furthermore this layout results in the shortest most direct signal path to ensure the best possible sound quality Each Input section has three analog input jacks the Mic and Line are on a single combo jack Mic For XLR micro...

Page 17: ...rack C400 that can supply power through the microphone ca ble Most condenser microphones such as an M Audio Solaris require phantom power to op erate Dynamic microphones such as a Shure SM57 do not require phantom power to oper ate but are not harmed by it Using a Mic with an XLR Connector To use a microphone that has an XLR connector 1 Plug your microphone cable into one of the Mic Line inputs on...

Page 18: ... even at mini mum gain levels for example when the Gain knob is turned fully counter clockwise engage the Pad switch This will further reduce incom ing levels by approximately 20 dB to prevent any distortion Connecting Instruments to the Fast Track C400 Fast Track C400 provides two input types DI and Line that correspond to the different signal strengths output by different types of instru ments D...

Page 19: ...t channel often the white plug to Input 1 and right channel often the red plug to Input 2 2 Ensure that the Input Selector switch on the top panel is in the Out position 3 Set your instrument s volume to its optimal level For example the optimal level for most keyboards is between 80 and 100 of maxi mum volume 4 On the top panel of the Fast Track C400 begin by turning the Gain knob fully counter c...

Page 20: ...tup button in the upper right section of the window 2 When the Setup dialog opens select S PDIF from the Clock Source pop up menu on the General Setting page and then click the Close button in the lower right of the Setup window 3 On the recording track in your software select the appropriate stereo or mono S PDIF source from the track Input selector The S PDIF inputs are now active and will pass ...

Page 21: ...alog outputs you can connect it to Fast Track C400 to monitor or record its output To connect your MIDI instrument for monitoring in your recording software Connect the MIDI instrument s audio outputs to the Line TRS inputs on your Fast Track C400 Fast Track C400 connections for line level stereo input source Input 2 Input 1 ...

Page 22: ...ut gain phantom power and output levels But there are many additional pa rameters that cannot be accessed from the top panel These additional features are available to you using the included Driver Control Panel ap plication To open the Driver Control Panel On Mac launch System Preferences Apple menu System Preferences then click Fast Track C400 You can also open the Driver Control Panel from the ...

Page 23: ...l to show and how you would like that information to be displayed There are four layouts to select from Horizontal The Horizontal layout is the default layout It shows all knobs faders meters and buttons in a layout similar to that of a mixing console The Horizontal layout is used for all the screen cap tures in this chapter Horizontal Meters Only The Meters Only layout emphasizes pre fader hardwa...

Page 24: ... of the Control Panel Setup Flow About Setup Setup is where you define the hardware settings of the Fast Track C400 Think of Setup as a quick way to customize Fast Track C400 behavior For example you can set buffer size sample rate and clock source Clicking the Multi Button Set tings button lets you configure the Multi Button as described in Chapter 6 The Multi Button In the Setup window the optio...

Page 25: ...checked If you are leaving any output unchecked please be sure to heed the warning below Finally some users with external mixing con soles or dedicated speaker management systems may wish to have the outputs always play at full volume regardless of how the master volume is set In this case both Output 1 2 and Output 3 4 should be left unchecked Again if you are leaving these outputs unchecked plea...

Page 26: ...urce the Sample Rate drop down menu will be greyed out while displaying the incom ing sample rate Buffer Size Windows only This menu sets the size of the input and output buffers on Fast Track C400 Buffers are used to help keep audio hardware and software running smoothly by processing audio in groups of samples rather than one sam ple at a time Due to variations between com puter hardware and sof...

Page 27: ...without inadvertently changing the buffer size or clock source settings of the device Post Fader Meters When this option is selected fader positions will affect the meters Post Fader Meters mean the meter indicate post fader levels Pre Fader Meters When this option is selected the meters display the level of a signal before it passes the fader This allows signal levels to be displayed regard less ...

Page 28: ...uct documentation updates support FAQ and registration Viewing Firmware and Installer Information In this section you can view the firmware ver sion of the Fast Track C400 hardware and the package version of the Fast Track C400 driver in staller Accessing the Web Links Along the bottom right of the Driver Control Panel you can easily access helpful online re sources on our website www m audio com ...

Page 29: ...There are 4 input channels each with its own volume fader pan and aux send knobs solo and mute buttons as well as a mas ter output section with its own fader A pair of channels can be linked together by clicking the link icon between the two channels Linking channels allows you to adjust mute solo and fader settings simultaneously by mod ifying parameters on either one of the linked channels Howev...

Page 30: ...ne and Instrument inputs are monitored as well as the S PDIF input of Fast Track C400 Hardware Inputs 1 2 are the analog inputs and Hardware Inputs 3 4 are the S PDIF input L R Software Returns The Software Returns section is where the audio coming back from your audio application is monitored Software Returns 1 and 2 will be the default stereo output from the software Signal Meter Effects Channel...

Page 31: ...h as guitar vocals etc The Channel Labels also display the signal level in dB while a fader is being adjusted Link The Link buttons connect stereo pairs of knobs or faders and also links the corresponding FX Send knobs so that adjusting either channel left right adjusts the other side identically Effects The Effects section is where you set up send and return configurations and select the ef fects...

Page 32: ...nob controls the effects output level being sent to the FX Returns Master The Master section is for monitoring the main mixer output MasterFaderAdjusts the overall level of the monitor mix MasterMetersProvides a visual representation of the audio signal being fed to the associated hardware output pair Status Indicators Along the bottom left of the Driver Control Panel are the following status indi...

Page 33: ...ng a track rewinding the song and playing back what you ve recorded The Driver Control Panel lets you assign the Multi button to a corresponding key command for each step of the task such that each step is performed as the Multi button is repeatedly pressed For example the first time the button is pressed it could start the recording Step 1 The second time could stop the recording while the third ...

Page 34: ...arty recording ap plications visit www m audio com Function Pro Tools Logic Cubase Start Record Command Spacebar Mac Ctrl Spacebar Windows Asterisk Key Numeric Keypad Asterisk Key Numeric Keypad Stop or Stop Record Spacebar 0 Numeric Keypad 0 Numeric Keypad Save Command S Mac Ctrl S Windows Command S Command S Mac Ctrl S Windows Go to Beginning or Return to Zero Return Mac Enter Windows Return Num...

Page 35: ...s There are 8 drop down menus corresponding to each step These contain options for any modi fier keys which maybe required when executing a key command or keyboard shortcut For Mac these are Control Command Option Shift For Windows these are Control Shift Alt Win Windows Logo key Keys These drop down menus contain options for the alpha numeric and symbol keys required when executing a key command ...

Page 36: ...ton to perform the Stop or Stop Record Save Go to Beginning Return to Zero and Play functions respec tively within your software 5 Save the newly configured Multi button as signment by clicking the Save As button at the top of the main control panel window If you have only set up one Multi button assign ment or Step the button will perform that func tion each time it is pressed In the case of this...

Page 37: ... Go to Beginning or Return to Zero 5 Play If you have configured the Multi button as described above make sure you disengage the track Record Enable button once you have finished recording Once the Multi button has performed Step 5 of the Macro it will jump back to Step 1 and perform the Record command ...

Page 38: ...ording an electric guitar or bass make sure the front input is selected the Input Selector switch should be set to the In position for the input channel you want to use either Input 1 or Input 2 If you are going to record a stereo keyboard use the Input selector buttons to select the rear inputs the Input Selector switch should be set to the Out position for both Input 1 and Input 2 When recording...

Page 39: ...optimum gain levels and can begin recording 5 Choose or create an audio track in your re cording software 6 Select the appropriate input from the Input se lection options for the track If you are using Input 1 on your Fast Track C400 then you should select Input 1 for the track in your software 7 Press the record enable button for that chan nel 8 Press the Multi button on the top panel of your Fas...

Page 40: ...a software instrument onto the track 4 Press the record enable button for that track 5 Press the Multi button on the top panel of your Fast Track C400 to begin recording 6 When you have finished press the Multi but ton to stop recording 7 Press the Multi button a third time to save your work 8 Press the Multi button twice more to go back to bar 1 and play back what you ve recorded USB based produc...

Page 41: ...ing trouble getting audio in or out of your Fast Track C400 check the following Make sure the device is connected via USB at both ends and that the computer s USB port is providing sufficient bus power the blue Power LED on Fast Track C400 should be illu minated Make sure your music software is receiving au dio signal If you find that your recording ap plication is not receiving a signal Check you...

Page 42: ...drivers Music Software Configuration Make sure your music software has been con figured for use with Fast Track C400 Windows Open the Sound Control Panel Windows Vista and Windows 7 and make sure Fast Track C400 is set as the Default Playback device Check the audio preferences page in your music software to see if the correct ASIO or WDM drivers are selected Mac OS X Go to System Preferences Sound...

Page 43: ...drivers and program updates as well as useful links to news stories FAQs and technical support We recommend checking this site regularly to ensure you have the latest drivers and most up to date information about this product Before You Call Avid Support Register Your System Register your Fast Track C400 online at www m audio com support By registering you become eligible to receive the following ...

Page 44: ...l help conserve natural resources and ensure that it is recycled in a manner that protects human health and the environment For more information about where you can drop off your waste equipment for recycling please contact your local city recycling office or the dealer from whom you purchased the product Proposition 65 Warning Perchlorate Notice This product may contain a lithium coin battery The...

Page 45: ...hnology Inc has been authorized to apply the appropriate TUV cTUV mark on its compliant equipment Warning Communication Statement NOTE This equipment has been tested and found to comply with the limits for a Class B digital device pursuant to Part 15 of the FCC Rules These limits are designed to provide reasonable protection against harmful interference in a residential installation This equipment...

Page 46: ...attachments accessories specified by the manufacturer 12 For products that are not rack mountable Use only with a cart stand tripod bracket or table specified by the manufacturer or sold with the equipment When a cart is used use caution when moving the cart equipment combination to avoid injury from tip over 13 Unplug this equipment during lightning storms or when unused for long periods of time ...

Page 47: ...warrants products to be free from defects in materials and workmanship under normal use and provided that the product is owned by the original registered user Visit www m audio com warranty for terms and limitations applying to your specific product ...

Page 48: ......

Page 49: ...95 Martin Rd Irwindale CA 91706 USA Technical Support USA Visit the Online Support Center at www m audio com support Product Information For company and product information visit us on the web at www avid com ...

Reviews: