background image

Pro Tools | PRE Guide

18

Configuring MIDI Studio in 

AMS for Pro Tools | PRE

(Mac Only)

The following are basic instructions for configur-
ing PRE in the Apple Audio MIDI Setup applica-
tion (AMS).

To configure your PRE with AMS:

1

Do one of the following:

• Launch the Apple Audio MIDI Setup (Appli-

cations/Utilities).

• In Pro Tools, choose

Setup > MIDI > Studio

Setup

.

2

If the MIDI Studio window is not shown in Au-
dio MIDI Setup, choose

Window > MIDI Studio

.

3

Do one of the following:

• Double-click the PRE icon.

• If there is no icon for the PRE, click

Add Device

in the toolbar at the top of the window and do the
following:

• Double-click the New External Device icon.

• Select

Digidesign

as the Manufacturer.

• Select

PRE

as the Model.

4

Click Properties.

5

Enable the appropriate Channels for the

Trans-

mits

and

Receives

options.

6

Click

Apply

and close the Properties window.

7

Connect the PRE icon to the correct port on the
MIDI interface icon:

• Click the arrow for the output port of the PRE

and drag a connection to the input arrow of
the corresponding port of the MIDI interface.

• Click the arrow for the input port of the PRE

and drag a connection to the output arrow of
the corresponding port of the MIDI interface.

8

Pro Tools supports the use of up to nine PREs at
the same time. If you use multiple PREs, make
sure that none of the PREs are assigned to the
same MIDI channel, and that all PREs are
daisy-chained together (as noted in “MIDI Con-
nections” on page 16).

9

Quit Audio MIDI Setup (

Audio MIDI Setup >

Quit Audio MIDI Setup

).

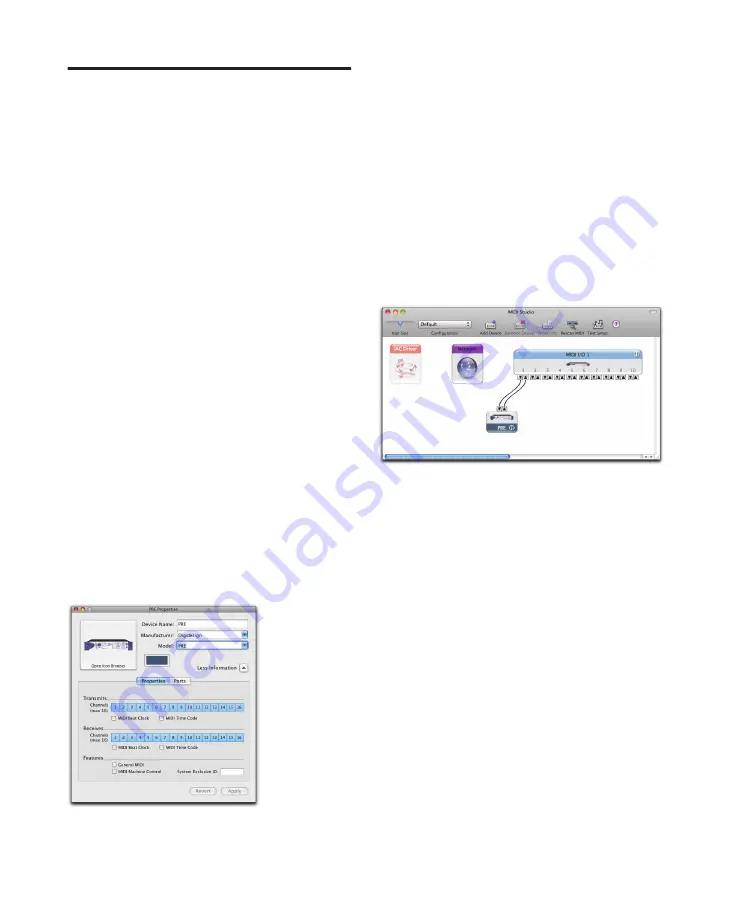
MIDI Device Properties for PRE

Connecting the PRE to the MIDI interface in the AMS
MIDI Studio window

Summary of Contents for DigiDesign PRE

Page 1: ...Pro Tools PRE Guide...

Page 2: ...0 Lo Fi MachineControl Magic Mask Make Anything Hollywood make manage move media Marquee MassivePack MassivePack Pro Maxim Mbox Media Composer MediaFlow MediaLog MediaMix Media Reader Media Recorder M...

Page 3: ...vices 13 Adjusting Channel Controls 13 Adjusting Input Gain 14 Muting Channels 14 Chapter 3 Remote Operation 15 Connecting Pro Tools PRE to a Pro Tools System 16 Configuring MIDI Studio in AMS for Pro...

Page 4: ...I Controller Numbers 33 PRE MIDI Data 33 Chapter 7 1 Pro Tools PRE 1 1 2 2 2 www avid com 3 Chapter 8 5 Pro Tools PRE 5 Pro Tools PRE 11 Pro Tools PRE 13 Pro Tools PRE 15 15 16 17 Chapter 9 19 Pro Too...

Page 5: ...v Chapter 10 33 Chapter 11 Pro Tools PRE DB 25 35 DB 25 35 Chapter 12 MIDI 37 PRE MIDI 37 Appendix A Compliance Information 41 Environmental Compliance 41 EMC Electromagnetic Compliance 42 Safety Comp...

Page 6: ...Pro Tools PRE Guide vi...

Page 7: ...sys tems and control surfaces such as D Control D Command C 24 and Command 8 Industry standard DB 25 output connectors for easy connection to Pro Tools audio interfaces or any other recording or mixi...

Page 8: ...upport information Software update and upgrade notices Hardware warranty information Conventions Used in This Guide All of our guides use the following conventions to indicate menu choices and key com...

Page 9: ...d the latest online manuals browse the Compatibility documents for system requirements search the online Knowledge Base or join the worldwide Pro Tools community on the User Con ference Training and E...

Page 10: ...Pro Tools PRE Guide 4...

Page 11: ...wer switch in dicates that the unit is switched on By default PRE powers up in Stand alone mode In this mode controls can be adjusted from the front panel or remotely The Remote Lock Out LED is unlit...

Page 12: ...xed tone of approxi mately 1k Hz at 4 dBu 1 228 Vrms The PRE oscillator signal can be routed through the OSC output on the back of the unit or through individual channels on the DB 25 connector To rou...

Page 13: ...ed from the clip point of the amplifier for example 22 dB is 22 dB below the clip point of the amplifier Clear Clips Switch This switch clears Clip indicators on the Peak me ter and Signal indicators...

Page 14: ...nal is below 45 dB the LED is off When clipping occurs the LED remains lit or clears depending on the Peak Hold setting Clips can also be manually cleared with the Clear Clip switch 48V Switch and LED...

Page 15: ...nput signal The respective Mute LED lights when muting is enabled Channel Select Switches and LEDs These switches are used to focus one or more chan nels to adjust their controls When lit green the Ch...

Page 16: ...or line out puts 1 8 For pinouts see Chapter 5 Pinout Dia gram for the PRE DB 25 Connector This connector can also output a fixed oscillator signal on each channel For more information see OSC Oscilla...

Page 17: ...e next PRE and so on You will also need to set each unit to a unique MIDI channel number re fer to MIDI Connections on page 16 The MIDI Thru connector is not used for Pro Tools remote control Oscillat...

Page 18: ...If your microphone requires phantom power press 48V 7 Turn the Gain Param control to raise the gain Use the Peak Meter to determine the proper level If the output trim has been calibrated to the input...

Page 19: ...you do not intend to use an HD I O or 192 I O you should turn the trims all the way up clockwise to allow for maximum signal output 28 dBu and maximum performance Adjusting Channel Controls Most PRE p...

Page 20: ...nnels Gain Param and Input Gain If an offset exists between selected channels the offset will be maintained while moving the Gain Param control until you reach 69 dB gain or 0 dB at which point the se...

Page 21: ...ls can be displayed in Pro Tools Mix and Edit windows and you can do one of the follow ing Control PRE remotely from the Pro Tools Mix or Edit window Use PRE front panel controls to adjust Mic Pre amp...

Page 22: ...interface according to the manufacturer s instructions To connect a PRE to a MIDI interface 1 Connect a MIDI cable between the MIDI Out port on your PRE and the MIDI In port on your MIDI interface 2...

Page 23: ...of the MIDI interface to the MIDI In port of the first PRE then connect the MIDI Out port of the first PRE to the MIDI In port of the second PRE and so on Make sure to connect the MIDI Out port of the...

Page 24: ...del 4 Click Properties 5 Enable the appropriate Channels for the Trans mits and Receives options 6 Click Apply and close the Properties window 7 Connect the PRE icon to the correct port on the MIDI in...

Page 25: ...ime If you use multiple PREs make sure that none of the PREs are assigned to the same MIDI channel and that all PREs are daisy chained together as noted in MIDI Con nections on page 16 Configuring Pro...

Page 26: ...ion whereas the number of PREs declared their lockout and re tain current settings status as well as their on line offline status and output assignments are stored as global system preferences Remote...

Page 27: ...in order for audio and remote control to be available in Pro Tools To map channels 1 Choose Setup I O and click the Mic Preamps tab 1 In the row for the selected path the high lighted PRE name click...

Page 28: ...els on all the currently selected PREs To reset path names 1 Do one of the following Select a PRE path by clicking on its name Select multiple PRE paths by Shift clicking the desired path names 2 Clic...

Page 29: ...s format determines the Mic Preamp be havior Mono tracks control a single channel ste reo tracks control two channels and multichannel tracks control multiple channels Using multi channel input paths...

Page 30: ...ses two sets of controls The top half of this pop up menu sets the input source for the PRE channel to Mic Line or DI instrument The bottom half of this pop up menu sets the input im pedance for a PRE...

Page 31: ...range for each input Mic Line and Instrument is 0 dB to 69 dB adjustable in increments of approxi mately 3 dB Phantom Power This button toggles 48V phantom power to Mic in puts For more information s...

Page 32: ...an be changed by clicking on the fader and moving the mouse or by typing a valid gain value in the field and clicking Enter You can enter values that correspond to the gain values in Table 8 on page 3...

Page 33: ...tracks whose PRE con trols you want to adjust 2 Hold Shift Option Mac or Shift Alt Win dows and adjust PRE parameters on any se lected track Adjustments made to any control on a selected track are ma...

Page 34: ...Pro Tools PRE Guide 28...

Page 35: ...se 0 0005 1 kHz 0 dB gain 20 dB signal 0 001 20 Hz to 20 kHz 0 dB gain 0 dB signal Equivalent Input Noise 128 dB 66 dB gain 20 Hz to 20 kHz unweighted 150 ohm Phase Response 2 5 degrees 20 Hz to 20 kH...

Page 36: ...Pro Tools PRE Guide 30...

Page 37: ...Chapter 5 Pinout Diagram for the PRE DB 25 Connector 31 Chapter 5 Pinout Diagram for the PRE DB 25 Connector DB 25 Connector Figure 1 DB 25 Connector pinouts...

Page 38: ...Pro Tools PRE Guide 32...

Page 39: ...ller number and vv means value All values are in hexadecimal format and may need to be converted to decimal for some MIDI devices X indicates the PRE s MIDI channel minus one for example for PRE MIDI...

Page 40: ...nce 4 00h 1 5k 01h 15k 02h 1 5M 32h Pad 4 00h out 7Fh in Table 7 PRE MIDI Implementation cc Name PRE Channel vv 33h Insert 4 00h out 7Fh in 34h 48V 4 00h off 7Fh on 35h Phase 4 00h off 7Fh on 36h High...

Page 41: ...66h High Pass Filter 7 00h out 7Fh in 67h Mute 7 00h off 7Fh on 69h Input Gain 7 See Table 2 70h Input Source 8 00h mic 01h line 02h inst 71h Input Imped ance 8 00h 1 5k 01h 15k 02h 1 5M 72h Pad 8 00h...

Page 42: ...vv Level dB 1 00h 0 2 01h 3 3 02h 6 4 03h 9 5 04h 12 6 05h 15 7 06h 18 8 07h 21 9 08h 24 10 09h 27 11 0Ah 30 12 0Bh 33 13 0Ch 36 14 0Dh 39 15 0Eh 42 16 0Fh 45 17 10 48 18 11 51 19 12 54 20 13 57 21 14...

Page 43: ...E Pro Tools Pro Tools PRE Pro Tools PRE MIDI MIDI 6 MIDI Controller Numbers Pro Tools PRE 8 Pro Tools D Control D Command C 24 Command 8 Pro Tools DB 25 XLR 1 4 1 4 0 dB 69 dB 3 dB 18 dB 48V EQ 85 Hz...

Page 44: ...Pro Tools PRE 2 PRE Pro Tools Pro Tools Avid www avid com compatibility File Save Control N Control N Control Control Pro Tools...

Page 45: ...1 3 www avid com Avid Pro Tools Avid Pro Tools Pro Tools Avid Avid Pro Tools...

Page 46: ...Pro Tools PRE 4...

Page 47: ...2 5 2 Pro Tools PRE PRE Pro Tools PRE 3 Remote Operation Pro Tools PRE PRE P LED PRE LED PRE LED Pro Tools PRE LED LED Shift MIDI 1 2 LED 48V 48V...

Page 48: ...LED Remote PRE PRE Pro Tools Pro Tools PRE PRE PRE Pro Tools PRE PRE 3 Remote Operation Shift LED Shift L E D Shift LED OSC HD I O OSC LED 4 dBu 1k Hz 1 228 Vrms PRE OSC DB 25 OSC OSC DB 25 1 Send 2...

Page 49: ...I MIDI Chan LED PRE MIDI Gain Param MIDI Gain Param 3 7 LED PRE MIDI PRE PRE 1 Shift 2 OSC Gain Param Gain Param PRE 8 1 PRE MIDI Gain Param Gain Param 0 dB 69 dB 3 dB 36 8 Peak Meter 14 LED Select Se...

Page 50: ...LED Off LED 3 sec LED 3 Clear Clips LED Peak Hold 1 3 LED Source PRE Mic Line Inst 3 LED Z Input Z PRE 1 5 k 15 k 1 5 M 3 Input Z LED 1 5K Source Mic 15K Source Line 1 5M Source Inst Input Z 1 3 Line...

Page 51: ...2 9 PRE 48V 8 LED LED SIG LED 45 dB 45 dB LED LED Clear Clip 48V LED 48V 48V LED 48V 48V Line Inst XLR Shure SM57 AKG C414 LED Insert LED PRE 8 EQ 48V PRE PRE...

Page 52: ...dB LED LED Phase LED LED High Pass Filter LED P R E 85 Hz 18 dB LED Mute P R E LED LED Select 1 LED Shift Select 1 Shift Select 48V 9 48V LED 48V 10 LED Phase 10 LED Pad 9 LED Insert 10 LED High Pass...

Page 53: ...2 11 Line Inst1 2 2 1 4 TRS Tip Ring Sleeve Line Inst 1 2 Line Inst Line Inst Pro Tools PRE PRE 1 8 Mic Input XLR 1 2 3 XLR 1 8 Line Inst 1 4 TRS Tip Ring Sleeve 1 4 PRE 1 8 1 8 1 8 DB 25 1 8 1 8 MIDI...

Page 54: ...Return 1 4 TRS 1 4 TRS Tip Ring Sleeve 1 8 1 8 Trim PRE H D I O 192 I O PRE 28 dBu 6 dBu 22 dBu HD I O 192 I O 28 dBu MIDI MIDI In Out Thru PRE MIDI 5 MIDI MIDI In MIDI PRE Pro Tools MIDI MIDI MIDI O...

Page 55: ...2 13 OSC Output 1 4 TRS DB 25 1 kHz 4 dBu 6 LED OSC AC AC PRE 100V 240V AC PRE PRE Pro Tools PRE PRE Pro Tools PRE PRE PRE 1 PRE AC 2 PRE PRE LED OSC Shift...

Page 56: ...o Tools PRE 14 PRE PRE PRE P R E A D 1 Select 2 Source 1 Mic 3 4 48V 48V LED 5 PRE Mic XLR 6 48V 7 Gain Param HD I O P r o T o o l s PRE 8 1 Line Inst 2 Source 1 Line Inst 3 DI PRE Line Inst TRS PRE 4...

Page 57: ...PRE Send 2 PRE Return 3 Select 4 Insert Pro Tools PRE PRE PRE PRE HD I O 192 I O P R E 28 dBu 6 dBu 22 dBu HD I O 192 I O 28 dBu PRE 5 Pro Tools PRE Gain Param 16 PRE 1 1 Select 1 1 Shift Select Send...

Page 58: ...Pro Tools PRE 16 16 1 1 2 1 48V LED 48V 48V 48V DI 1 Shift Select 1 Gain Param 69 dB 0 dB 1 Gain Param MIDI MIDI 2 Select 1 Mic Input 1 3 Source Mic LED Source 1 Mic LED 4 Gain Param Pro Tools...

Page 59: ...2 17 Mute Mute Mute...

Page 60: ...Pro Tools PRE 18...

Page 61: ...20 Pro Tools PRE Pro Tools MIDI 22 Pro Tools PRE AMS MIDI 23 Pro Tools PRE Pro Tools Pro Tools 23 Pro Tools PRE Pro Tools PRE I O PRE P r o T o o l s P R E Pro Tools Pro Tools PRE PRE 32 Pro Tools PRE...

Page 62: ...RE MIDI MIDI M Audio MIDI Sport PRE PRE MIDI In MIDI Out MIDI PRE MIDI 1 PRE MIDI Out MIDI MIDI In MIDI 2 PRE MIDI In MIDI MIDI Out MIDI 3 PRE 1 PRE MIDI Out 2 PRE MIDI In PRE MIDI 21 PRE PRE MIDI MID...

Page 63: ...RE MIDI 1 MIDI MIDI PRE 1 MIDI MIDI 1 MIDI MIDI Out 1 PRE MIDI In 1 PRE MIDI Out 2 PRE MIDI In PRE MIDI Out MIDI MIDI In Pro Tools Pro Tools 1 Pro Tools 10 2 PRE 3 MIDI 4 Pro Tools 5 6 1 2 Pro Tools 3...

Page 64: ...Tools PRE AMS MIDI Mac Apple Audio MIDI AMS PRE AMS PRE 1 Apple Audio MIDI Pro Tools Setup MIDI Studio Setup 2 Audio MIDI MIDI MIDI 3 PRE PRE Digidesign PRE 4 5 6 7 MIDI PRE PRE MIDI PRE MIDI PRE MID...

Page 65: ...s MIDI MSS PRE MSS MIDI PRE 1 Pro Tools Setup MIDI MIDI MIDI Studio MIDI 2 3 PRE Enter 4 Digidesign PRE 5 Input PRE MIDI Out MIDI 6 Output PRE MIDI In MIDI 7 Send Channels Receive Channels MIDI MIDI 1...

Page 66: ...herals Mic Preamps 2 Type PRE 3 Receive From PRE MIDI PRE MIDI MIDI PRE 4 Send To PRE MIDI PRE MIDI 5 OK 6 Pro Tools 7 Setup MIDI Input Devices PRE PRE PRE 9 Pro Tools PRE MIDI MIDI PRE Pro Tools PRE...

Page 67: ...25 Reset PRE OK Retain Current Settings PRE Pro Tools PRE Remote Lock Out Mode PRE Pro Tools PRE Pro Tools PRE Pro Tools PRE PRE Pro Tools PRE PRE I O PRE MIC PRE PRE PRE I O PRE PRE 27 PRE PRE 1 I O...

Page 68: ...Pro Tools PRE 26 26 I O 27 PRE I O I O PRE PRE Pro Tools PRE PRE 1 Setup I O Mic Preamps 2 PRE PRE PRE 1 7 3 OK PRE PRE PRE Com mand PRE Shift Command...

Page 69: ...3 27 1 1 I O PRE 1 Setup I O 2 Mic Preamps 3 PRE Tab Enter 4 OK I O I O Setup I O I O PRE 1 PRE 2 PRE 8 1 PRE Shift PRE 2 Default I O PRE PRE MIDI...

Page 70: ...Pro Tools PRE 28 1 Setup I O 2 Mic Preamps 3 PRE Pro Tools Pro Tools Pro Tools PRE PRE MIC PRE 1 Track New AUX 1 2 I O I O Setup PRE Mic Preamps PRE 29 Pro Tools AUX 1 2 Pro Tools I O PRE PRE PRE...

Page 71: ...S PRE Pro Tools PRE View Mix Window View Edit Window Mic Pre amps View All Pro Tools None Pro Tools PRE 2 PRE mic line DI PRE 1 5 k 15 k 1 5 M 8 Input Imped ance Represented as Z 7 Source Switch and L...

Page 72: ...Pro Tools PRE 30 mic inst DI 30 P R E 85 Hz 18 dB LED 18 dB PRE 8 EQ PRE 0 dB 69 dB 3 dB 48V 8 48V Switch and LEDs PRE mic line DI mic line DI...

Page 73: ...3 31 Shift Pro Tools PRE 29 Enter 36 8 10 9 dB HPF...

Page 74: ...iew Mix Window Views Mic Preamps 2 PRE Pro Tools PRE Pro Tools PRE Pro Tools PRE 1 Shift PRE 2 Shift Option Mac Shift Alt Windows PRE Option Mac Alt Windows PRE PRE Pro Tools Pro Tools 1 D Control D C...

Page 75: ...to 20 kHz 48 dB gain 0 0005 1 kHz 0 dB gain 20 dB signal 0 001 20 Hz to 20 kHz 0 dB gain 0 dB signal 128 dB 66 dB gain 20 Hz to 20 kHz unweighted 150 ohm 2 5 degrees 20 Hz to 20 kHz 124 dB 0 dB gain 2...

Page 76: ...Pro Tools PRE 34...

Page 77: ...5 Pro Tools PRE DB 25 35 5 Pro Tools PRE DB 25 DB 25 2 DB 25...

Page 78: ...Pro Tools PRE 36...

Page 79: ...Reset to Default N A N A 00h Input Source 1 00h mic 01h line 02h inst 01h Input Imped ance 1 00h 1 5k 01h 15k 02h 1 5 M 02h Pad 1 00h out 7Fh in 03h Insert 1 00h out 7Fh in 04h 48V 1 00h off 7Fh on 05...

Page 80: ...Phase 3 00h off 7Fh on 26h High Pass Filter 3 00h out 7Fh in 27h Mute 3 00h off 7Fh on 1 PRE MIDI cc PRE vv 29h Input Gain 3 2 30h Input Source 4 00h mic 01h line 02h inst 31h Input Imped ance 4 00h...

Page 81: ...7 00h mic 01h line 02h inst 61h Input Imped ance 7 00h 1 5k 01h 15k 02h 1 5 M 62h Pad 7 00h out 7Fh in 63h Insert 7 00h ofut 7Fh in 1 PRE MIDI cc PRE vv 64h 48V 7 00h off 7Fh on 65h Phase 7 00h off 7F...

Page 82: ...1 00h 0 2 01h 3 3 02h 6 4 03h 9 5 04h 12 6 05h 15 7 06h 18 8 07h 21 9 08h 24 10 09h 27 11 0Ah 30 12 0Bh 33 13 0Ch 36 14 0Dh 39 15 0Eh 42 16 0Fh 45 17 10 48 18 11 51 19 12 54 20 13 57 21 14 60 22 15 6...

Page 83: ...help conserve natural resources and ensure that it is recycled in a manner that protects human health and the environment For more information about where you can drop off your waste equipment for re...

Page 84: ...e 2006 95 EEC DECLARATION OF CONFORMITY We Avid 75 Network Drive Burlington MA 01803 USA 650 731 6300 declare under our sole responsibility that the product PRE complies with Part 15 of FCC Rules Oper...

Page 85: ...d the point where they exit from the equipment 11 Only use attachments accessories specified by the manufacturer 12 For products that are not rack mountable Use only with a cart stand tripod bracket o...

Page 86: ...Pro Tools PRE Guide 44...

Page 87: ......

Page 88: ...ernardo Avenue Mountain View CA 94043 USA Technical Support USA Visit the Online Support Center at www avid com support Product Information For company and product information visit us on the web at w...

Reviews: