Chapter 3 Playing WMA, MP3 and JPEG discs
20
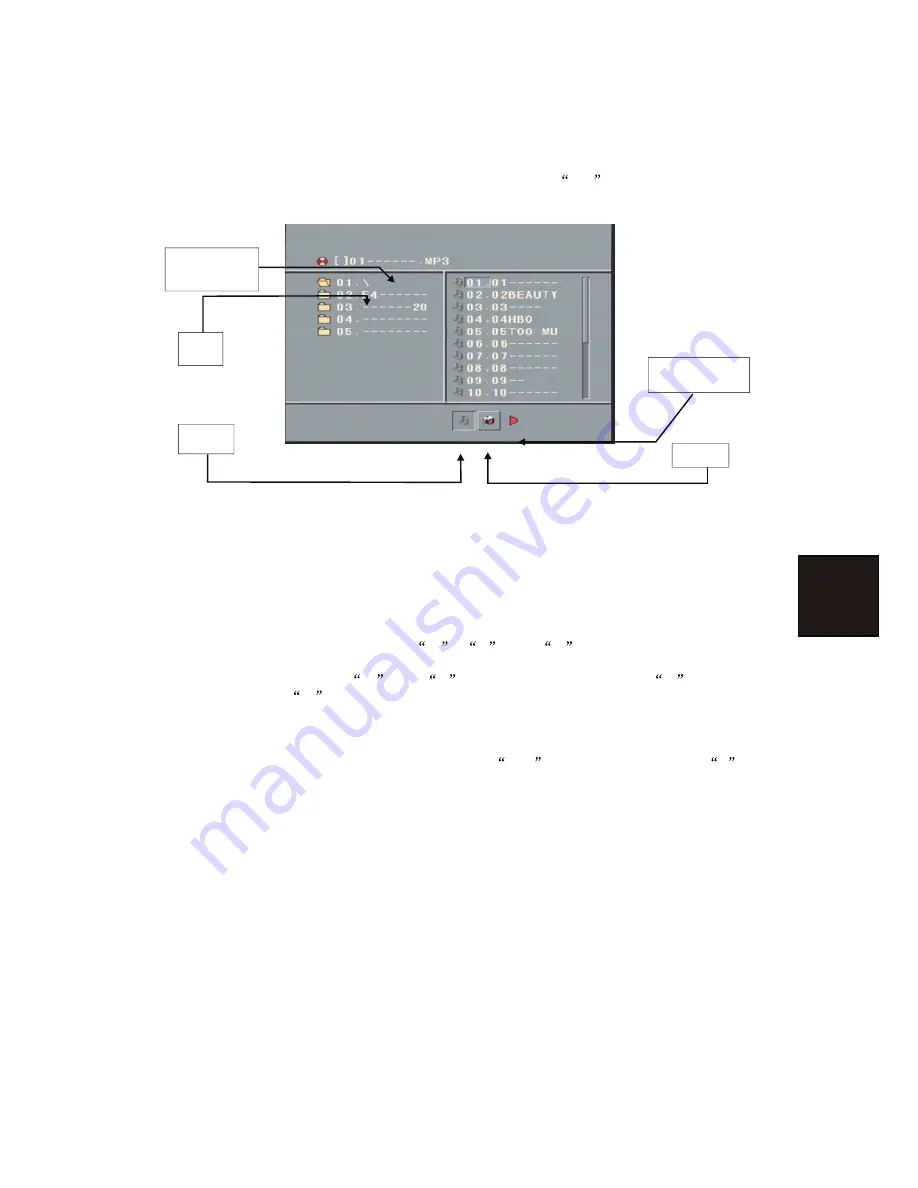
Place a MP3 / JPEG disc into the tray, and the player will auto search the directories saved MP3 /
JPEG files. After searching, it will auto go to the first directory saved MP3 files (to the disc
containing both mp3 and jpeg files; To the disc containing single type of files, it will auto go to
the first directory) and play the first song in the directory (
01:
is highlighted).The screen
displays as the picture below:
Current
directory
name
Current MP3/JPEG file
name. If a JPEG file
playing, the name should be
*.jpg.
The playing file
is a MP3 music.
The playing file is
a JPEG picture.
File Switch Region: Displays the
file type of the p laying and the
switching.
Use the Arrow buttons to enter the Directory Region and highlight the desired directory, then
the first track under it starts playback; Also you can use the Arrow buttons to enter the File Region
and select the file you want to play.
Notes:
I. Press the Left and Right arrow buttons, you can activate Directory Region, File Region and
File Switch Region separately.
II.
The highlight in Directory Region and File Region is shown as the picture above; While it
appears a transparent rectangle in File Switch Region.
III. In File Switch Region, you can press the Left and Right arrow buttons to switch the
highlight, then press Enter; the
M
,
P
, and
G
button is illustrated in the above
picture. For example, if a disc with MP3 and JPEG files but without any NES files is loaded,
the color of the letter
M
and
P
will appear to be white and
G
black. If a MP3
file playing,
M
turns darker.
IV. To the disc with WMA, MP3 and JPEG files, when playing a JPEG picture, press the Return
button to return to JPEG list.
V.
You can press the Numeric buttons to select the file you want to play. For example, if you
th
th
desire the 15 track in current list, press the
10+
button once, then press
5
, the 15
starts playback.
Notes: When playing a disc with MP3 files, video cannot be output while only digital audio
can.
VI.
When playing JPEG pictures, press the Program button to choose the pictures
switched mode. There are 17 switch modes; Press Program repeatedly to activate the
function and choose the required switch mode: Spread from Up to Down, Spread from
Down to Left, Spread from Left to Right, Spread from Right to Left, Spread from Left Up to
Right Down, Spread from Right Up to Left Down, Spread Left Down to Right Up, Spread
from Right Down to Left Up, Spread from Center to Up / Down, Fold from Up / Down to
Center, Fold from Left / Right to Center, Horizontal Shutter, Vertical Shutter, Fold from the
Corners to the Center, Random Play, Off.
VII. When a picture playing or pausing, press the Arrow buttons to change the display angle:
Up: flip vertical
Down: flip horizontal
Left: rotate 90 counter-clockwise
Right: rotate 90 clockwise
VIII.When a picture playing or pausing, press the Menu button, the screen displays small
pictures. Up to 12 small pictures are displayed per screen. To view the next 12 pictures,
press the Next button to go forward and the Prev button to go to the previous page. You can
also select and play a picture in full screen by press that number on the remote control.


