Avery Weigh-Tronix ZM205 User Instructions Download Page 17

ZM205 Baggage Scale Indicators User Instructions

17

5.1    Accessing the menus

5 Menus

Menus provide a method for auditing the indicator or supervisor configurations.

5.1 Accessing the menus

Follow these steps to access the menus in the ZM205.

1.

With the indicator powered up and in normal operating mode, press and hold 

F1

Pass

 is displayed, prompting you to enter the password.

2.

Key in the password for the menu you want and press the 

ZERO

 key …

The first item in the top level of the menu you accessed is displayed.
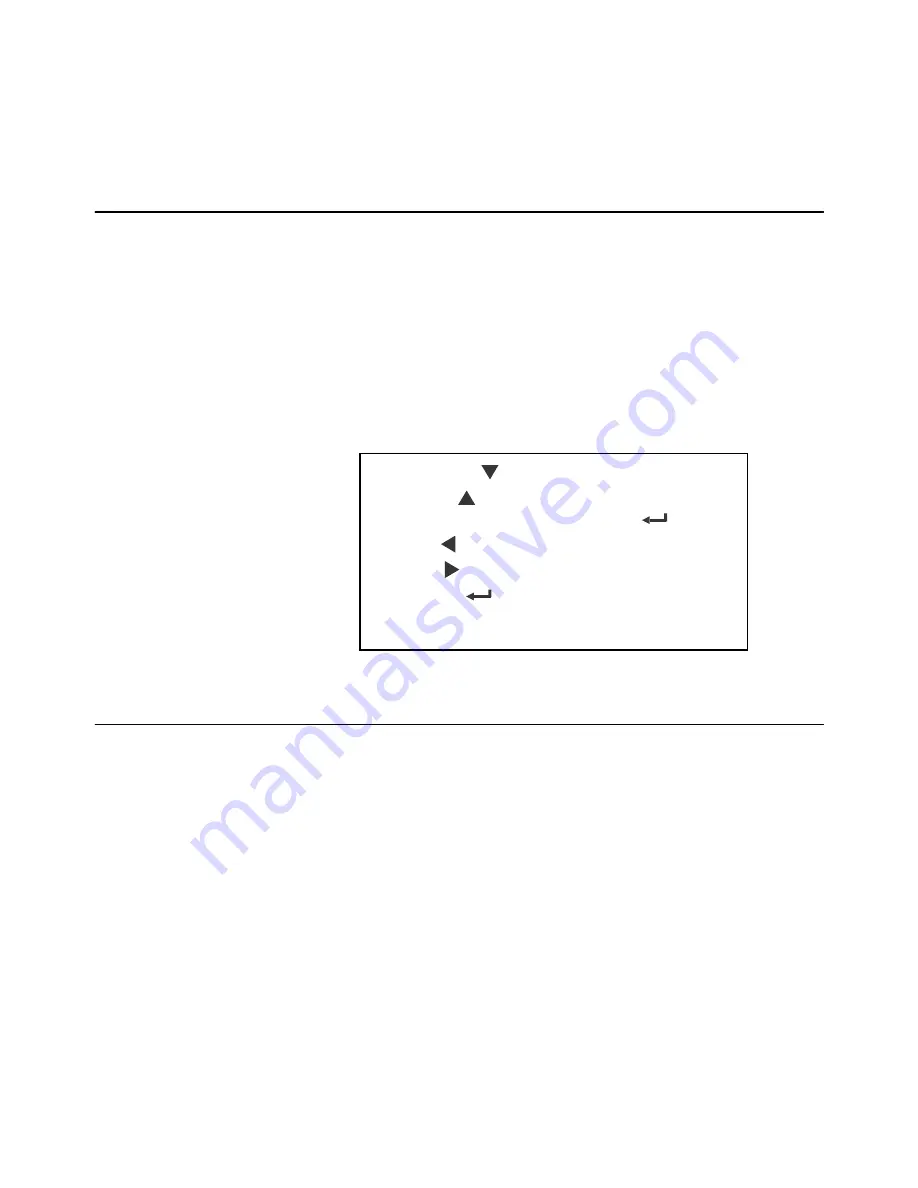
3.

Use the navigation keys, shown below, to navigate through the menu 
structure. The symbols in the chart appear on the bottom of the keys.

5.2 Menu annunciators

The menu structure is made up of menu items, parameters, value entry screens and 
lists from which you choose one item. To help you know where you are in the menu, 
the bargraph at the top of the display is on while the indicator is in the menus and will 
change appearance according to the following rules:

All segments flashing

This means you are in the menu structure but not 
in any of the following screens.

Center flashing / others solid

This means you are in a parameter prompt 
screen.

Center flashing / others off

This means you are in a numeric entry screen. 
Enter a number and press 

ZERO

 to accept.

Right flashing / others off

This means you are in a list. Scroll through the 
choices with the 

M-

 and 

M+

 keys and press 

ZERO

 to accept.

Press 

SELECT

  to move down in a menu

Press 

CE/C

  to move up in a menu, except at the 

bottom item in a menu, then use 

ZERO

   or 

F1

Press 

M-

  to move left in a menu

Press 

M+

  to move right in a menu

Press 

ZERO

   to accept a value or choice and 

move up in the menu.
Press 

F1

 to escape and move up in the menu

Summary of Contents for ZM205

Page 1: ...ZM205 Baggage Scale Indicators User Instructions AWT35 501093 Issue AD...

Page 2: ...wo dimensional work and the making of a copy in two dimensions of a three dimensional work stored in any medium by electronic means or transmitted in any form or by any means including electronic mech...

Page 3: ...eclaration of Conformity 9 Chapter 2 Introduction 10 Front panel 11 Annunciators 12 Powering up the ZM205 12 Numeric entry procedure 13 Chapter 3 Indicator Operation 14 Gross Weighing 14 Accumulator W...

Page 4: ...4 ZM205 Baggage Indicator Service Manual...

Page 5: ...e function Displayed messages appear in bold italic type and reflect the case of the displayed message Annunciator names appear as italic text 1 1 2 Special messages Examples of special messages you w...

Page 6: ...e disposed of as unsorted municipal waste in the European Union For proper recycling return this product to your local supplier upon the purchase of equivalent new equipment or dispose of it at design...

Page 7: ...atisfactory to the user Take frequent breaks during prolonged usage 1 6 Sharp objects Do not use sharp objects such as screwdrivers or long fingernails to operate the keys Table 1 1 Cleaning DOs and D...

Page 8: ...to radio communications Operation of this equipment in a residential area is likely to cause harmful interference in which case the user will be required to correct the interference at his own expens...

Page 9: ...nom de Avery Weigh Tronix 1000 Armstrong Drive Fairmont MN 56031 1439 USA le 2018 01 23 K Detert Innovations Directeur Marketing NL EU Conformiteitsverklar ing ZM205 Naam en adres van de fabrikant Av...

Page 10: ...dicator has two serial COM ports and an Ethernet port The indicator also has three logic level inputs with configurable functions and three setpoint outputs See the Specification literature for a full...

Page 11: ...r the previous accumulator or hold the key to clear all accumulators Also acts as an up arrow key when in the User menu Press the SELECT key to scroll through Gross Gross Total and Transaction Count d...

Page 12: ...ors 2 2 Powering up the ZM205 The indicator is always active as long as power is received Power can be supplied by an AC to DC power converter 12 to 36 VDC The remote display is powered via the ethern...

Page 13: ...ursor one space to the right Repeatedly press the CE C or SELECT key until 0 appears on the display Press the M key once to move cursor one space to the right Repeatedly press the CE C or SELECT key u...

Page 14: ...CE C key all information can be cleared To use the accumulator power up the unit and follow these steps 1 Empty the scale and press ZERO key to zero the display 0 is displayed and gross and center of...

Page 15: ...press and hold the CE C key for three seconds Press the M key to remove the last accumulated weight from the total if necessary The annunciator shown below lights momentarily when the key is pressed...

Page 16: ...may be displayed during use of the indicator Message Display Overload Can t fit on display Underload Can t Entry not in valid range Password entry failed Remote display not receiving data from the mas...

Page 17: ...and lists from which you choose one item To help you know where you are in the menu the bargraph at the top of the display is on while the indicator is in the menus and will change appearance accordi...

Page 18: ...Press ZERO to accept the displayed choice If you choose SAVE no or SAVEYES the indicator exits the menu and returns to normal weighing mode OR If you choose CAnCEL the indicator remains in the menu 5...

Page 19: ...17 and press SELECT tiME is displayed Use this to set the time and clock style 2 Press SELECT SEt is displayed 3 Press SELECT h x is displayed with the x flashing This is a numeric entry screen for t...

Page 20: ...r 12hr AP AM PM and 24hr military time 8 Press SELECT 12hr is displayed 9 Press M to scroll through the choices Press ZERO to accept the displayed choice StYLE is displayed 10 Press CE C tiME is displ...

Page 21: ...dAtE press M SitE id is displayed 2 Press SELECT A numeric entry screen is displayed 3 Key in a site ID number and press ZERO to accept SitE id is displayed 5 5 4 Seal User Time Date Site ID Seal 1 F...

Page 22: ...CT The 1st half of the bootloader PN is displayed Press M to view the 2nd half 4 Press ZERO to return to the PArtno display 5 Press M VErSion is displayed Serial About App Enet Firm Boot Version Partn...

Page 23: ...With APP displayed press M SEriAL is displayed 2 Press SELECT The first four digits of the indicator serial number are displayed Press M to view the last five digits 3 Press CE C to return to the SEr...

Page 24: ...four part IP address 3 Press SELECT 1 XXX is displayed This is first octet of the IP address 4 Press ZERO 2 XXX is displayed This is second octet of the IP address 5 Press ZERO 3 XXX is displayed This...

Page 25: ...on file This is used for security and licensing purposes 2 Press SELECT SSEriAL is displayed 3 Press SELECT The 1st half of the serial number of the creating application of the configuration file is d...

Page 26: ...as been configured and calibrated 2 Press SELECT conFig is displayed 3 Press SELECT again A number appears showing how many times the indicator has been configured 4 Press ZERO conFig is displayed 5 P...

Page 27: ...through the ethernet cable If the indicator has the PROFIBUS option there is no operator involvement required to transmit weight If the indicator has the Relay output option this is tied to setpoint 3...

Page 28: ...he any of the supervisor s menus the information will print out of Port 1 or Port 2 whichever is chosen The menu is explained in a sequential manner to cover all information in a logical fashion You w...

Page 29: ...int value or OFF above the setpoint value If you select on the annunciator works in the opposite fashion OFF when below ON when above 4 Press SELECT The current setting is displayed oFF or on The and...

Page 30: ...teps 7 through 9 for out2 and out3 Inputs Setpoint Edit Annun Out x In1 11 Press M when finished in1 is displayed This stands for input 1 Use this to assign a function to input 1 when an external swit...

Page 31: ...ess M Print is displayed Use this to print the settings under SEtPnt 17 Press SELECT Port 1 is displayed 18 Press F1 to abort the print process or press M to scroll to the desired port and press ZERO...

Page 32: ...32 ZM205 Baggage Scale Indicators User Instructions Supervisor menu...

Page 33: ......

Page 34: ...A Tel 507 238 4461 Fax 507 238 4195 Email usinfo awtxglobal com www averyweigh tronix com Avery Weigh Tronix UK Foundry Lane Smethwick West Midlands England B66 2LP Tel 44 0 8453 66 77 88 Fax 44 0 121...

Reviews: