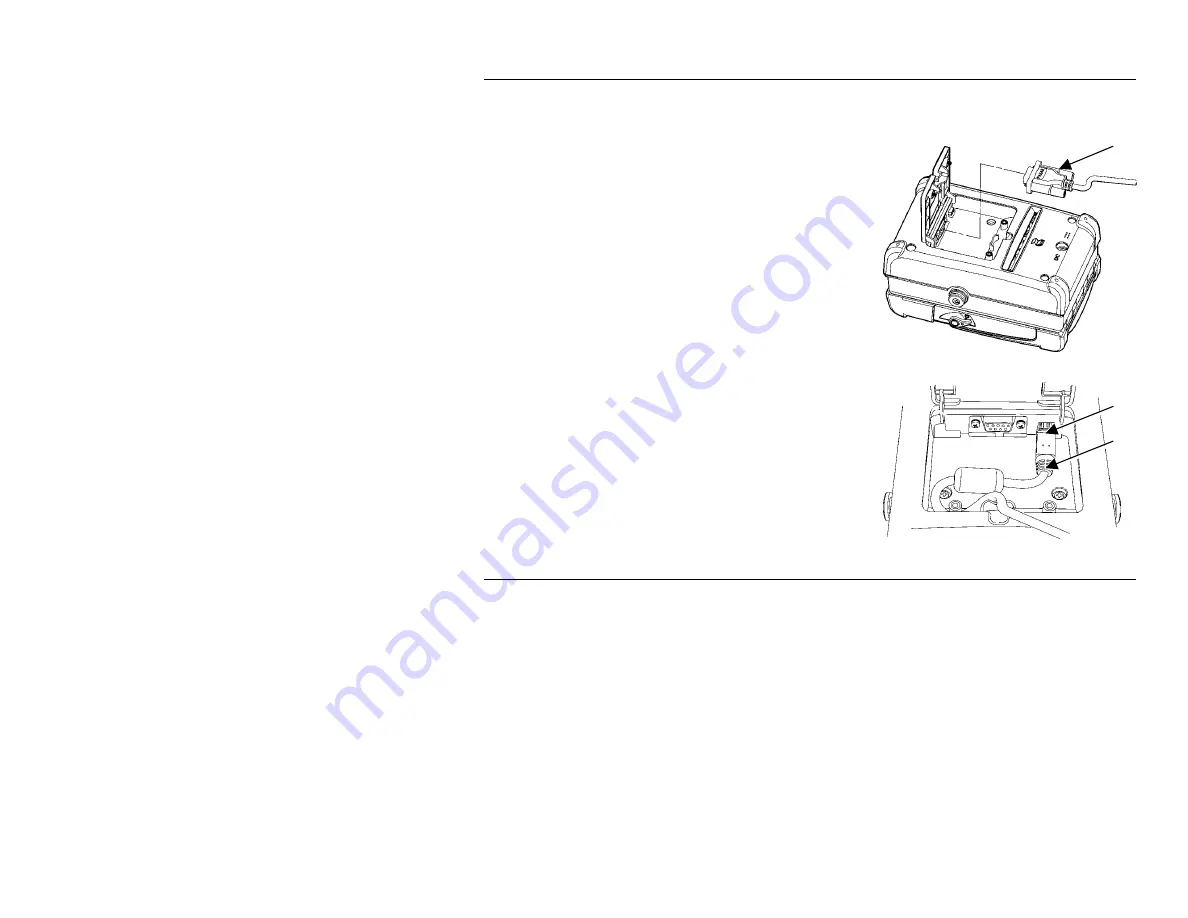
background image

2


DB9 Connector 

USB 
Port 

USB 
Cable 

C o n n e c t i n g   t h e   C o m m u n i c a t i o n s   C a b l e s  


The printer uses either 9-pin serial communications or USB communications.  
For best results, use only Monarch® cables.  

Open the hinged cable door by loosening the 
two Phillips screws and lifting up on the 
door. 

Serial Cable 

1. 

Plug the DB9 connector into the DB9 
port. 

2. 

Place the cable in the cable cavity.  

3. 

Close the hinged cable door and tighten 
the screws. 

USB Cable 

1. 

Plug the USB cable into the USB port. 

2. 

Lock the cable in place by placing it 
behind the left screw post and into the 
cable cavity as shown. 

3. 

Closed the hinged cable door and tighten 
the screws. 

I n s t a l l i n g   t h e   M o u n t  

Following is a list of the mounting hardware. This hardware is not provided 
for vertical mounting. 

♦ 

four screws (¼-20 x 2¼ socket head cap) 

♦ 

four ¼-inch flat washers 

♦ 

four dampening washers 

♦ 

one clamping plate 

♦ 

four M5x0.8 screws (not included) 

Summary of Contents for Monarch 9433

Page 1: ...other vehicle This document describes how to install and use the vehicle mount with the printer Note The information in this document supersedes information in previous versions Check our Web site ww...

Page 2: ...e the cable in the cable cavity 3 Close the hinged cable door and tighten the screws USB Cable 1 Plug the USB cable into the USB port 2 Lock the cable in place by placing it behind the left screw post...

Page 3: ...cle mount with the corresponding holes in your vehicle 3 Place the four dampening washers between the vehicle and the bottom of the vehicle mount The washers should be aligned with the nuts on the veh...

Page 4: ...hicle 2 Center the clamping plate on two of your vehicle s overhead rails 3 Align the four inside nuts in the vehicle mount with the holes in the clamping plate 4 Use the four 20x2 screws and flat was...

Page 5: ...al installation 1 Select a suitable location for the mount on your vehicle 2 Align the nuts in the vehicle mount with the corresponding holes in your vehicle 3 Use appropriate screws to attach the veh...

Page 6: ...le mount 1 Make sure the printer s battery and communication cable are installed 2 Insert the printer into the brackets of the vehicle mount using the knobs as a guide 3 Push down firmly on the bracke...

Page 7: ...mount to secure any cables 1 Attach the printer to the vehicle mount 2 Thread the cable through the first opening and out the second opening of the cable guide on the inside of the mount then through...

Page 8: ...hook end of the supply holder and turn it to the left to release the supply bracket Pull the bracket up Note The supply holder cannot be removed 4 Load the supply so it unrolls from the bottom 5 Lowe...

Page 9: ...in between the supply holder tabs to open them to their widest position 8 Slide the supply guides located inside the printer on each side of the external supply slot out to their widest position 9 Fee...

Page 10: ...supply 11 Pull out enough supply to lay across the exit chute 12 Close the supply door until the release levers click into place 13 Turn on the printer 14 Press F to advance the supply Refer to your...

Reviews: