background image

Operators Manual 

ALS 341 

Release 4/04 

Page 39 

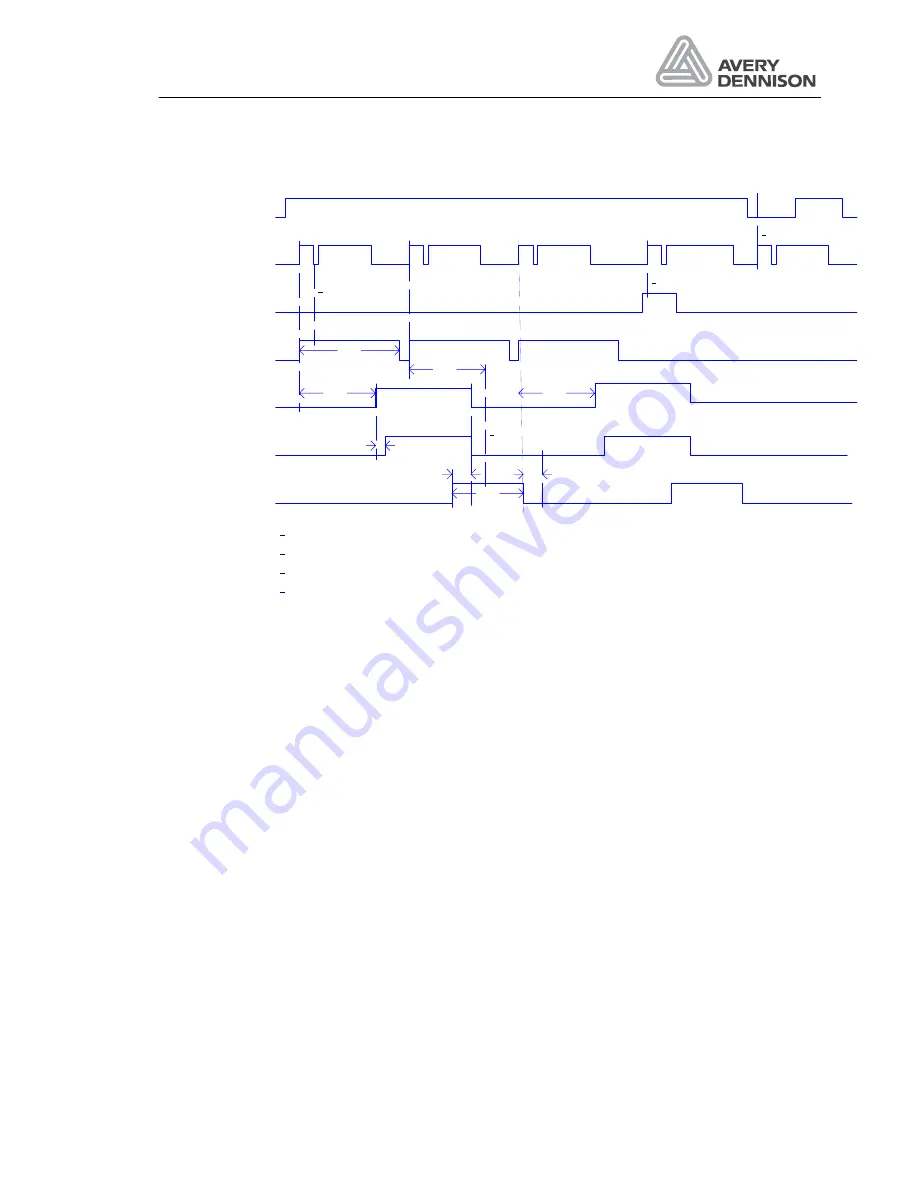
Electrical connections 


Productstart

Dispense

Dispensing edge
Output CN10 / 8

POS

Product Output

PRDL

APOS

CN10 / 6

CN6 / 19

Printer Output
CN10 / 10

PDT

Ready

Inhibit

PDWT

POS

POS

1

2

4

1

2

3

Missing Label: New start of dispense during printer activ

Inhibit activ

Machine not ready. Errorcondition or not online

3

4

Productstart disabled. PRDL activ

PHT


Figure 19 Timing diagram 

6.7


EMI


To protect the machines against electrical noise and to protect production of electrical noise 
you have to follow these rules: 

Rule 1 

All metallic parts must have a good and plane contact (no lacquer, aluminium oxide is an 
isolator). Use scratch washers. 

Rule 2 

A signal line (Data-, communication- and control cable) has to separate to power cables. The 
minimum distance is 50 cm (20 cm inside a cabinet). 

Rule 3 

All signal lines should be lead in the machine or cabinet only on one side. 

Rule 4 

Unshielded cables must be twisted (both poles). 

Summary of Contents for ALS 341

Page 1: ...ALS 341 User Manual Covering the World Part number 0089999 10 Release 4 04...

Page 2: ......

Page 3: ...6 2 Short form instruction 9 2 1 Operator panel 9 2 2 Service menu 10 2 2 1 Handling the service menu 10 3 Starting the labeller 12 3 1 Installation 12 3 1 1 Unpacking of the unit 12 3 1 2 Connection...

Page 4: ...tions 31 6 1 Power supply 31 6 2 Location of the electronic control boards 32 6 3 Stepper motor control 33 6 4 CPU board 34 6 5 Display 35 6 6 Description of I O signals 36 6 7 EMI 39 7 Maintenance 41...

Page 5: ...rights reserved No part of this work covered by Avery s copyright may be reproduced or copied in any form or by any means graphic electronic or mechanical including photocopying recording recording ta...

Page 6: ...of injury for the user Ignoring the warning can lead to injuries or material damages Example CAUTION The machine is connected to mains Only authorised personnel may open the cover Operation without t...

Page 7: ...e cf the section Use in accordance with the purpose in the chapter Specification the machine is only operated in faultless serviceable condition and that especially the safety devices are regularly ch...

Page 8: ...ury This symbol indicates that especially danger to the machine material and the environment has to be expected The most important aim of the security regulations is to avoid injuries to a person When...

Page 9: ...ed from the operating area of the machine Before every production start up it must be checked and made sure that all safety devices function in a correct manner 1 2 4 Security measures during maintena...

Page 10: ...even if there is no damage to be detected Observe the manufacturers instructions Before setting into operation after maintenance or repair works check if loosened screwed connections are tight make s...

Page 11: ...Operators Manual ALS 341 Release 4 04 Page 7...

Page 12: ......

Page 13: ...n the keys on the panel has the following functions Figure 1 Operating panel Feed Dispense one label Used to position the labels correct after threading new material or fixing an error situation Speed...

Page 14: ...In these menu settings can be done to configure the machine In addition some test functions are available The access to this menu is protected by a password y The sequence to enter the password will b...

Page 15: ...Operators Manual ALS 341 Release 4 04 Page 11 Short form instruction Leave service menu Press Contrast key until QUIT is displayed then press Contrast key again...

Page 16: ...otating parts on the machine Do the necessary actions to prevent that anybody can be caught from these parts 3 1 2 Connection of the machine Before connecting the machine to the mains check the correc...

Page 17: ...reading diagram is also affixed to the machine s front plate for easy reference Figure 2 Threading diagram Type 341 Figure 3 Threading diagram Type 441 Before threading the new material any waste back...

Page 18: ...the new label roll onto the unwind mandrel Swing the retainer arm back onto the unwind mandrel Figure 5 Unwind ALS 341 After threading the backing paper around the roller and shaft of the dancer arm n...

Page 19: ...label web in position 3 3 Setting the applicator roller For some applications it may be necessary to move the applicator roller relative to the dispensing edge To do this loosen the two screws indica...

Page 20: ...gain 3 5 Adjustment of the contrast Remove a label from the backing paper and slide it inside the sensor Increase the value with the Contrast key until the LED switched on Press the contrast key until...

Page 21: ...sensor is carried out as follows Set sensitivity to maximum by turning the Potentiometer clockwise Then rotate turn anticlockwise 1 Remove label material out of sensor 2 Perform base adjustment that b...

Page 22: ...iding way adjust the rot by loosing two screws at the dispensing edge 3 7 Adjust dispense function For an operation without any trouble and high label accuracy tree adjustments are required Label posi...

Page 23: ...Now try to dispense one product If the label has wrinkles reduce the speed with the Speed down key If the product peels out the label so the stop position of the next label is different to the last p...

Page 24: ...as one individual function Feed Single start for one label Display OKAY Speed up Higher dispensing speed Speed down Lower dispensing speed Display S020 until S550 The last digit is blinking to indicat...

Page 25: ...d is entered by pressing these keys 1 x Speed up key 2 x Speed down key 3 x Contrast key If all is correct P_S_ is shown in the display 4 2 2 Working with the service menu Select a function By pressin...

Page 26: ...lays will be inverted if the product sensor does not supply a positive going signal as it detects the leading edge of a product Polarity label sensor ______________________________________________ S_S...

Page 27: ...r disabled NO The error message will be generated if the dancer arm of the rewinder is more than 3 seconds in the home position web brake Adjust loop control __________________________________________...

Page 28: ...otor will cycle Test of the labeller inputs __________________________________________ I_CH This parameter is used to check the labeller inputs Product sensor test Press the FEED key to check the prod...

Page 29: ...OLT indicates that the supply voltage is too high Each digit of the display toggles the representative output when you press the corresponding panel key CN10 pin 9 10 Printer FEED for toggle CN10 pin...

Page 30: ...The number of labels dispensed is displayed in the format Mnnn Knnn nnn where M represents millions K represents thousands represents units On entering the LABC parameter the units are displayed By u...

Page 31: ...is not in order however the labeller continuous to work a warning message is displayed e g WA_2 WA 1 Hardware fault The data are set to the default value All settings have to be entered again Use the...

Page 32: ...t the start of a new label Normal message at End of label material More than 3 missing label on the web else check pressure roller not closed label web is not correctly threaded through the label sens...

Page 33: ...sn t work call your Service Technician The following trouble shooting table is only for experienced user Problem How to find it How to solve it No machine function Lamp in main switch doesn t light Re...

Page 34: ......

Page 35: ...epperm otor control CN 1 CN 1 8578 02 RE WIND SEN SOR 1 2 1 2 3 4 5 6 1 2 3 4 1 2 3 4 5 6 1 2 3 4 5 6 M aindrive Steppermotor Rewind AC M otor M P Capacitor 4uF 450V 1 2 3 4 5 6 1 2 3 4 5 6 Loop Stepp...

Page 36: ...no 1 Operator Panel 0008576 01 2 Mains screw terminal 0009305 01 3 AC motor control board for rewind motor 0008566 01 20 Main switch 0001510 05 22 Rewind sensor 0008257 01 23 24 V rectifier board 0008...

Page 37: ...ent for the loop motor could be set to 4A for small labels and low production rate The jumper for the stepper resolution is open For connection with an old 6 pole cable plug in the connector that the...

Page 38: ...t CPU board Plug connector in and output ports CN 1 24 V supply voltage CN 5 Opto coupler inputs CN 6 Opto coupler outputs CN 10 PNP output driver CN 14 15 22 Opto coupler sensor inputs CN 19 or 21 La...

Page 39: ...Release 4 04 Page 35 Electrical connections IN 1 IN 2 NC 3 NC 4 VCC 8 GND 7 OUT 6 VH 5 PC921 1k VCC VCC GND JP3 12V 1 2 3 4 5 5 20mA CN19 12V GND Figure 16 Label sensor 6 5 Display All jumpers have to...

Page 40: ...Sensor connection There are two type of output Opto coupler driving up to 50mA High side driver PNP type outputs supplying up to 1A Ready This output is on if the labeller is powered on the condition...

Page 41: ...Release 4 04 Page 37 Electrical connections Pneumatic Edge This signal is active if a label is dispensed Motor run The signal is active if the dispense motor is running OD output The output is active...

Page 42: ...teroutput Druckerausgang GND GND GND GND 24V 24V 24V 24V Fehler l schen Clear error Materialende Material end Printeroutput Druckerausgang OD control in Eingang OD Kontrolle inhibit Startunterdr ckung...

Page 43: ...PRDL activ PHT Figure 19 Timing diagram 6 7 EMI To protect the machines against electrical noise and to protect production of electrical noise you have to follow these rules Rule 1 All metallic parts...

Page 44: ...this connection In case of different earth potential on both cable sides install parallel a cable of at minimum 10 mm2 Rule 7 The shield of analogue cable Video etc should be shielded only on one side...

Page 45: ...riven coder disk with light and dark segments moves through the rewind sensor Depending on the amount of light the rewind sensor receives a proportional signal is supplied to the CPU board 1 Move the...

Page 46: ...Operators Manual ALS 341 Release 4 04 Page 42 Maintenance Figure 20 Rewind adjustment...

Page 47: ...es minute see charts Drive system IP41 2 stepper and 1 AC motors IP54 3 stepper motors Labelling speed up to 55 m min Electronics integrated Label sensor IR fork sensor Minimum distance between label...

Page 48: ...order to avoid any risk of injury due to squeezing between the fixed dispensing edge and the passing product it may be necessary to add a protection cover in front of the dispensing edge The necessity...

Page 49: ...D DTST 23 L LABC 25 Label length 27 label sensor 14 21 32 39 41 Labelling speed 41 M MDIR See Motor direction Motor direction 23 P P_S_ See Product sensor polarity PRDL See Product length Printer 15...

Page 50: ...10 CE Declarations...

Page 51: ...kung f r diese Erkl rung Diese Konformit tserkl rung gilt nur f r diese Etikettiermaschine und nicht f r Maschinen im Umfeld oder in Kombination mit dem Etikettierer Ist die Etikettiermaschine Bestand...

Page 52: ...unity standard Comments and restriction for this declaration This declaration of conformity is valid only for this labelling machine and not for the machines used or installed in combination with or a...

Page 53: ...S curit y EN 50081 1 et EN 50082 2 Directive g n rale Immunit Remarques et restrictions cette d claration Cette d claration de conformit est valide seulement pour la machine mentionn e ci dessous et...

Page 54: ...standard Opmerkingen en beperkingen Deze conformiteitsverklaring geldt uitsluitend voor de ALS330 en niet voor machines die in combinatie met de ALS 341 worden gebruikt of geinstalleerd of eraan word...

Reviews: