background image


1.4.3 Install a Removable Hard Drive Case in a PC (Optional) 

For users who purchase an optional hard drive case, please follow the steps to install 
the case in a PC. 

1.  Power off your PC and remove the cover of your PC. 

2.  Remove a front cover and free a 5 1/4” drive bay. Insert the hard disk holder. 

Mount the hard disk holder, screw up the holder, and connect the IDE slot and 
power connector from PC’s motherboard. 

3.  Remove the drawer of the removable hard disk case. Please refer to 

1.4.2


Install 

the Hard Drive in a Removable Case 

to install the hard drive. 

4.  Slide the drawer into the removable hard disk case, power on the PC and check 

the LED indicators. If the LED indicators light up, it is ok to use the hard drive in 
the removable case. 

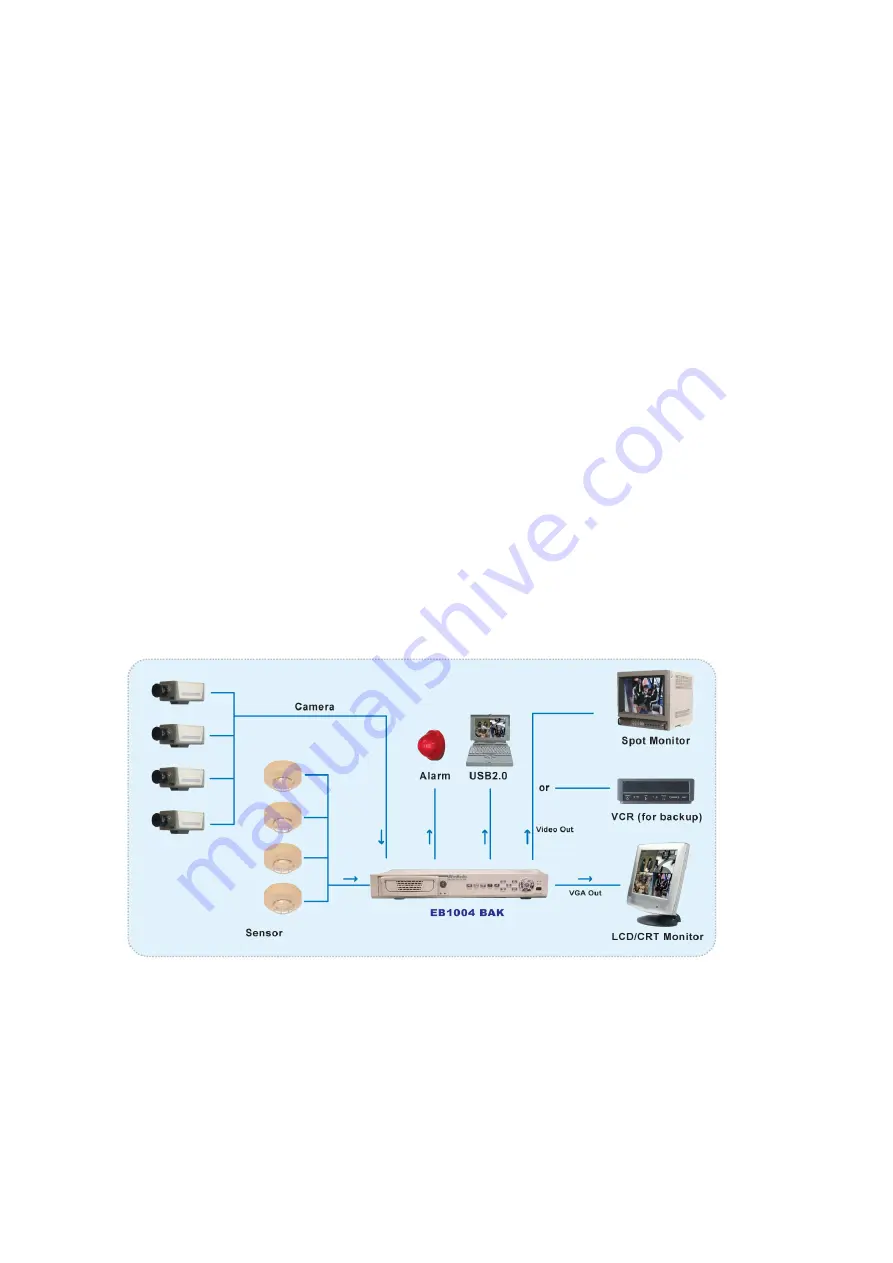
1.4.4 Connecting Devices 

At the back panel of the DVR unit, you can connect up to four video cameras, four 
sensor devices, and one alarm device. You can connect a VGA monitor or a television 
monitor as a display device. Use a USB cable to connect to a PC if it is necessary. 


Connecting cameras, sensors, alarm, and display device 


Summary of Contents for EB1004

Page 1: ...AVerMedia EB1004 BAK Real time Security DVR Operation Manual ...

Page 2: ...be installed in computer equipment certified to comply with the Class A limits All cables used to connect the computer and peripherals must be shielded and grounded Operation with non certified computers or non shielded cables may result in interference to radio or television reception Any changes or modifications not expressly approved by the grantee of this device could void the user s authority...

Page 3: ...WARNING TO REDUCE RISK OF FIRE OR ELECTRIC SHOCK DO NOT EXPOSE THIS APPLIANCE TO RAIN OR MOISTURE CAUTION DO NOT DISASSEMBLE THIS PRODUCT PLEASE REFER TO YOUR LOCAL DEALER IF THERE IS A PROBLEM ...

Page 4: ... Use 12 2 2 Surveillance Screen 13 2 3 Video Recording and Playback 14 2 3 1 To record surveillance video 14 2 3 2 To play back the recorded video 15 Chapter 3 Setup Menu 16 3 1 CAMERA SELECT 17 3 2 RECORD SELECT 18 3 3 RECORD MODE 18 3 4 RECORD FRAME RATE 19 3 5 VIDEO QUALITY 19 3 6 RECORD SCHEDULE 20 3 7 SUB MENU 20 3 7 1 PASSWORD CHANGE 21 3 7 2 TIME SET 22 3 7 3 VGA SETUP 22 3 7 4 MOTION SETUP...

Page 5: ...EL 1 CHANNEL 4 26 Chapter 4 Connect to a PC 27 4 1 First Time Use 27 4 2 Operating EB DVR Playback Application 30 4 2 1 Channel Selection 34 4 2 2 Video Playback List 34 4 2 3 Catch Images and Video 36 4 2 3 1 Snapshot 36 4 2 3 2 Print 36 4 2 3 3 Save as AVI Files 36 Warranty Notice 37 ...

Page 6: ...rding settings sensor and alarm settings password protection hard drive recycling and more Surveillance video is recorded in high quality Motion JPEG format Two recording modes are available EACH mode records video from each video camera in 640 x 224 resolution at 7 5 fps QUAD mode records video in 320 x 112 resolution and up to 30 fps 25 fps NTSC PAL EB1004 BAK provides a removable hard disk bay ...

Page 7: ... frame rate Quad mode 30 25 fps NTSC PAL per channel total of 120 100 fps NTSC PAL Scheduled recording 00 00 23 00 set by hour Search for recorded videos by date time event Input Output 4 sensor inputs and 1 relay output control Motion detection recording Removable HDD bay 1 USB 2 0 Port Application CD for Windows 2000 XP ...

Page 8: ...ering the number 1 when in the OSD menu 7 a Display Channel 2 in full screen b Pressing this button is equivalent to entering the number 2 when in the OSD menu 8 a Display Channel 3 in full screen b Pressing this button is equivalent to entering the number 3 when in the OSD menu 9 a Display Channel 4 in full screen b Pressing this button is equivalent to entering the number 4 when in the OSD menu ...

Page 9: ... 3 1 2 5 4 6 7 1 VGA OUT 15 pin D Sub VGA output for connection to a VGA monitor 2 VIDEO OUT BNC Composite video output for connection to a television monitor 3 CH1 CH4 BNC Composite video input for connection of up to four video cameras Video input V 1 Vp p 4 Sensor Inputs and Relay Output For connection of up to 4 sensor devices and 1 alarm device Relay 1A 125V AC 30V DC 5 Power Socket For conne...

Page 10: ... other hard disk inside DVR unit as HDD B Fix the hard disks as the right picture shows The minimum hard disks capacity should be 40GB 7200RPM When you only install ONE hard disk in your DVR Western Digital WD Hitachi and Seagate hard disks are recommended When you install 2 hard disks please use 2 WD or 2 Hitachi hard disks inside the DVR A hard disk compatibility issue may occur due to different...

Page 11: ...r 3 Connect the power connector to the hard drive as the right picture shows 4 Connect the hard disk connector into the inner tray s slot 5 Close the upper cover Slide the drawer into the removable hard drive case and lock the drawer 6 Power on the unit to see the LED indicators on the front side of the removable hard disk holder If the LED indicators light up you may use the hard disk ...

Page 12: ...r of the removable hard disk case Please refer to 1 4 2 Install the Hard Drive in a Removable Case to install the hard drive 4 Slide the drawer into the removable hard disk case power on the PC and check the LED indicators If the LED indicators light up it is ok to use the hard drive in the removable case 1 4 4 Connecting Devices At the back panel of the DVR unit you can connect up to four video c...

Page 13: ...elevision monitor Use a BNC to RCA adapter to connect a regular TV monitor to the DVR unit s VIDEO OUT connector Sensors and alarm device Connect up to four sensor devices to the terminals that are numbered 1 to 8 at the back panel Each pair of terminals is for the ground and positive input voltage For instance Terminal 1 Connect to the ground wire of Sensor 1 Terminal 2 Connect to the positive wi...

Page 14: ...nnect to the positive wire of the alarm device Terminal 10 Connect to the ground wire of the alarm device Desktop Laptop computer Connect EB1004 BAK to a PC with a USB cable Insert the USB connector to PC s USB socket ...

Page 15: ...U SURE PLAY FORMAT STOP NOT FORMAT to confirm again Press to format hard disks and you will see HDD FORMATTING on the DVR screen When the DVR screen shows NEW HDD Format completed the formatting is completed V1 0 07 HDD Checking MASTER 123593 MB SLAVE 123593 MB HDD FORMAT SELECT YES MENU NO V1 0 07 HDD Checking MASTER 123593 MB SLAVE 123593 MB HDD FORMATTING NEW HDD Format completed V1 0 07 HDD Ch...

Page 16: ...n The default PASSWORD SETUP setting is NO 2 2 Surveillance Screen Surveillance video can be viewed and recorded in two screen modes EACH mode and QUAD mode Under the EACH mode video from the video cameras is recorded in full screen resolution but each video takes turns in being recorded from one camera to the next Each of the surveillance videos is recorded only at a maximum frame rate of 7 5fps ...

Page 17: ... start to record the video automatically when it detects a 10 second idleness When PASSWORD SETUP is enabled you need to enter the password after clicking the STOP button Please enter your password The system stops recording when the authentication is confirmed 2 3 1 To record surveillance video 1 To customize recording settings press and choose the desired recording settings Refer to the section ...

Page 18: ...te and time entries 5 Press or to move through each item in the recording date and time entries While on an item such as the month press button repeatedly to cycle through the numbers and stop pressing the button when you have reached the desired number 6 Press to move the cursor back to the Playlist 7 Press or to move up or down in the Playlist 8 When you have selected the desired video recording...

Page 19: ...SWORD CONFIRM PASSWORD HARD DRIVE SETUP OVERWRITE ENABLED YES MASTER HDD SIZE 80072MB MASTER HDD USED 16014MB 20 MASTER HDD FORMAT SLAVE HDD SIZE N A SLAVE HDD USED N A SLAVE HDD FORMAT PRESS THEN SELECT PRESS MENU TO EXIT SENSOR SETUP SENSOR RECORD TIME 15 ALARM OUT TIME 05 CHANNEL 1 TYPE NORMAL CLOSE CHANNEL 2 TYPE NORMAL OPEN CHANNEL 3 NOT INSTALLED CHANNEL 4 NOT INSTALLED PRESS THEN SELECT PRE...

Page 20: ...our items in the menu are second level menus Press to display the corresponding menu 5 When you are in a second level menu press to return to the main menu 6 To close the main menu and return to the surveillance screen press again When you are back to the preview mode the system will start to record the video automatically when it detects a 10 second idleness If you already adjust the PASSWORD SET...

Page 21: ...ays in the CAMERA SELECT item can be selected for recording 3 3 RECORD MODE There are two recording modes to choose from EACH and QUAD When you choose the EACH recording mode you can view each camera display in full screen during the recording process by using the following front panel buttons CH1 Camera 1 CH2 Camera 2 CH3 Camera 3 CH4 Camera 4 Likewise when you finish recording you can also play ...

Page 22: ...hard drive are approximately as follows Video Signal Display Format Video Quality 30 fps 15 fps 7 fps 1 fps BEST 41 hrs 83 hrs 178 hrs 1248 hrs GOOD 53 hrs 106hrs 227hrs 1589hrs QUAD mode NORMAL 65hrs 129hrs 277hrs 1942hrs BEST 71 hrs 141hrs 302hrs 2118hrs GOOD 93 hrs 186 hrs 399 hrs 2796hrs NTSC EACH mode NORMAL 116hrs 233hrs 499hrs 3513hrs BEST 44 hrs 87hrs 187hrs 1311hrs GOOD 55 hrs 110hrs 236h...

Page 23: ...g schedule 1 Each number in the RECORD SCHEDULE menu represents the time schedule in hours for recording and the v cursor indicates the time that is selected Press or to move through the time schedules 2 Press repeatedly to cycle through these settings T For automatic non stop video recording S For sensor recording The DVR unit initiates recording only when the attached sensor devices detect motio...

Page 24: ...D NEW PASSWORD CONFIRM PASSWORD The factory default password is 111111 Use the following front panel buttons to input a numeric password For 1 For 2 For 3 For 4 2 The Password changed message is then displayed This message flashes three times and then you will be returned to the SUB MENU Note You will be prompted to enter the password when you attempt to format the hard drive s in the HARD DRIVE S...

Page 25: ...pressing the button when you reach the desired number 3 7 3 VGA SETUP VGA SETUP RESOLUTION 1024 768 REFRESH RATE 60HZ PRESS THEN SELECT PRESS MENU TO EXIT Set RESOLUTION and REFRESH RATE based on the supported display mode and refresh rate of the VGA monitor that is connected to the DVR unit Different monitors support different refresh rates Resolution Refresh Rate Frequency Hz 640 x 480 60 72 75 ...

Page 26: ...l the setting To setup channel 2 and 3 only press You will see the screen shows MOTION CAMERA 2 3 Press the same buttons again to cancel the setting To adjust MOTION SENSIVITY 1 Press or to move the arrowhead cursor to MOTION SENSITIVITY in the menu 2 Press repeatedly to cycle through the numbers The sensitivity level ranges from 1 to 10 Level 10 is the least sensitive one and Level 1 is the most ...

Page 27: ...e recording or change the settings The default setting for the PASSWORD SETUP is NO Please move the arrow cursor to PASSWORD SETUP and press to adjust the setting to YES and press to return to MAIN MENU After the function is enabled the system will request for the password before you enter MAIN MENU or stop the recording After the password confirmation you are able to stop the recording or enter t...

Page 28: ...e video recordings 3 8 3 MASTER HDD FORMAT Press on this menu item to reformat the MASTER hard drive You will then be prompted to enter the password If an invalid password is entered you will not be allowed to format the hard drive Note All recordings on the MASTER hard drive will be deleted when you reformat the hard drive 3 8 4 SLAVE HDD SIZE and SLAVE HDD USED These items show the SLAVE hard dr...

Page 29: ...rm device is triggered 3 9 3 CHANNEL 1 CHANNEL 4 These correspond to the four sets of sensor inputs on the DVR unit Customize these according to the initial state of the attached sensor devices There are three states to choose from NOT INSTALLED Indicates that the channel does not have a sensor device connected NORMAL OPEN Indicates that the initial state of the sensor device is Normal Open When t...

Page 30: ...a please follow the steps to connect your PC and DVR unit with an USB cable after installing the playback application 1 Press Stop button if DVR is recording 2 Press on the DVR front panel to enter MAIN MENU 3 Connect the USB cable to your PC and DVR unit 4 Execute EB DVR Playback Application to play or backup the recording data of HDD A To play the data of HDD B please place HDD B in a removable ...

Page 31: ... You will see the screen on the right side Note The application supports Windows 2000 XP only 3 Click Next Follow the steps to finish the installation 4 Please click Browser to change the directory if it is necessary Click Next to continue the installation Note You can see the DVR Playback Application version on the top of this screen when you install this application ...

Page 32: ...29 5 Click Finish to complete the installation ...

Page 33: ...em When backup data via a USB cable please ensure the jumpers settings of hard disks to follow the table below Jumpers Adjustments HDD A HDD B Backup HDD data via a USB Cable WD Master HDD A WD Slave Hitachi Master HDD A WD Master HDD A Hitachi Slave Hitachi Master HDD A WD Slave HDD A Hitachi Slave HDD A Seagate Slave HDD A Maxtor Master Maxtor Slave HDD A WD Master HDD A Maxtor Slave Hitachi Mas...

Page 34: ...r hard disk sequence according to the real situation when you run the playback application Case 1 The sequence of HDD A will be HDD2 Case 2 The sequence of HDD A will be HDD1 Case 3 The sequence of HDD A will be HDD2 Case 4 The sequence of HDD A will be HDD1 Case 5 Insert HDD A into the PC The sequence of Case 6 Insert HDD A into the PC The sequence of ...

Page 35: ...D A will be HDD2 HDD A will be HDD1 Case 7 Place HDD B in the removal hard disk drawer The sequence of HDD B will be HDD2 Case 8 Place HDD B in the removal hard disk drawer The sequence of HDD B will be HDD1 ...

Page 36: ...forward static frame 8 Back one frame Display a backward static frame 9 Forward Search Fast play the recorded video to search an appointed image 10 Stop Stop the playback 11 Snapshot Save the present screen as a BMP file 12 Print Print the current display 13 AVI file Record an appointed video and save it as an AVI file 14 Version Identification Press Ctrl Alt V buttons to see the product version i...

Page 37: ...Choose an appointed channel to display the surveillance screen by clicking the channel icon Click once to show a full screen display To show a quad screen click the same icon again 4 2 2 Video Playback List After selecting the appointed hard drive click to select an event and click OK to play back the appointed surveillance When you click the Event List icon it pops up an event table as the follow...

Page 38: ...ode fast play at 2X 4X or 8X speed Click once to fast play the video at 2X Click twice to fast play the video at 4X Click 3 times to fast play the video at 8X Click the same button to cycle through different fast play modes The following picture shows the video is played at 8X There are four fast play modes X0 X2 X4 and X8 2004 02 04 17 59 56 X8 means the record is played at X8 Click to see a forw...

Page 39: ...n snapshot This function allows to preserve static images 4 2 3 2 Print Click to print the screen Users can switch to a specific channel and print out the image during the surveillance Printing is allowed in a display of full screen mode or quad mode 4 2 3 3 Save as AVI Files Users can backup or catch the data in DVR unit s hard disks by saving the recorded video as AVI files and play the files by...

Page 40: ...roduct defect 3 Cartons cases batteries cabinets tapes or accessories used with product 4 AVerMedia does not warrant that this product will meet your requirements it is your responsibility to determine the suitability of this product for your purpose WHAT WE WILL AND WILL NOT PAY FOR We will pay labor and material expenses for covered items However we will not pay for the following 1 Removal or in...

Reviews: