


E-14
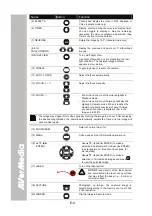
OSD Menu
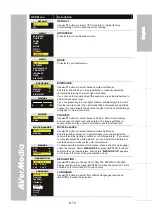
Description
TYPE
CF
SD
TYPE :
Use
▲
or
▼
buttons to select the source on where to store or view the
image.
FORMAT
NO
YES
FORMAT :
Use
▲
or
▼
to select NO to exit or YES to format and delete all the data
in the memory source then press (
►
ENTER).
USB SELECT
PC CAMERA
MASS STORAGE
USB SELECT :
Use
▲
or
▼
buttons to select the USB function between PC Camera
and Mass Storage.
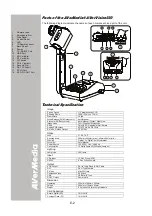
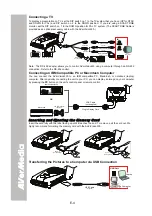
When AVerVision330 is connected to PC via USB connection,
AVerVision330 can function as PC Camera and Mass Storage device to
transfer the captured images to and from the memory source and
computer. With the bundled PC Camera application, you may use it to
record your presentation in AVI format or capture still image directly to
your PC’s hard disk.
T
T
r
r
o
o
u
u
b
b
l
l
e
e
s
s
h
h
o
o
o
o
t
t
i
i
n
n
g
g
This section provides useful tips describing how to solve common problems while using the
AVerVision330.
There is no picture on the presentation screen.
1. Check all the connectors again as shown in this manual.
2. Check your display output device remote control’s on/off switch.
3. Verify the setting of the display output device.
4. If you are to present using a notebook or computer, you may have to switch the source
to VGA.
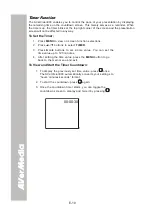
I have set up the AVerVision330 and checked all the connections as specified in the
manual, but I can not get a picture on the preferred presentation screen.
-
Once power is connected. You need to switch AVerVision330 "ON" from the unit to display the
picture on the presentation screen.
-
The default camera display resolution setting is on 1024x768. If your output device does not
support this resolution you will not be able to see an image on your display device. You can
simply press the MENU and RIGHT or LEFT button to the increase or decrease the resolution
setting.
The picture on the presentation screen is distorted or the image is blurry.
1.
Before doing any adjustments, reset all the picture attributes to the factory default
setting (Refer to the Menu Functions, for more details).
2.
Each display device is slightly different from another. Use the Positioning and
Adjustment Control of AVerVision330
to adjust the picture.
3.
Use the Brightness and Contrast menu functions to reduce the distortion.
There is no computer signal on presentation screen.
When you turn on the computer, it will auto-detect the type of monitor you have. During auto-detection,
there won't be any display on your presentation screen. To avoid this problem, connect your computer
and all the necessary cables to the AVerVision330
first before you power on your computer.
Summary of Contents for AVerVision330
Page 2: ...P N 3 0 0 A A C D A Made in Taiwan...
Page 6: ......


