E-10
Microscope Connection
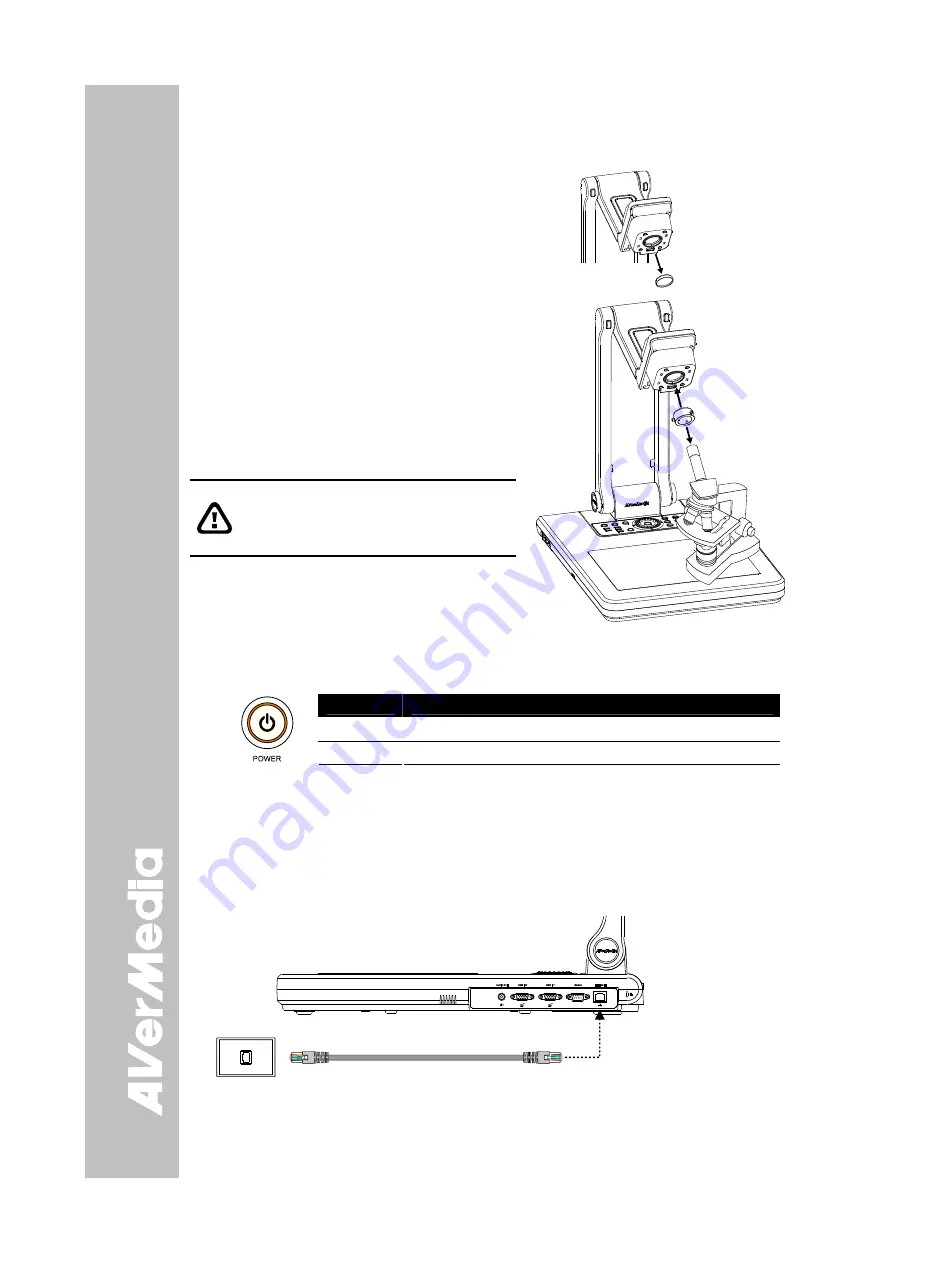
Connecting the SPB370 to a microscope enables you to examine microscopic objects on a
big screen without straining your eyes.
Close-up Lens
1. Change the image display mode to
Microscope. Press
MENU
> select
SETTING
>
MODE
>
MICROSCOPE
and
press
ENTER
.
2. Adjust the microscope focus to its best
clarity. Then, select the appropriate
adapter size that would fit the microscope
eyepiece.
3. Unscrew the close-up lens from the
camera head.
4. Remove the microscope eyepiece from
the microscope and connect it to the
microscope adapter. Then, fasten the 3
bolts until the adapter secures the
eyepiece.
We suggest using a microscope with
an eye relief of 15.5mm or higher for
better view.
5. Screw the microscope adapter to the
AVerVision camera head. Then, connect it
to the microscope.
Microscope
Adapter
(optional)
Microscope
Control Panel Light Color
The LED power button on the control panel of SPB370 indicates the status of the unit.
Color
Description
Blue
: The unit is in operating mode.
Orange
: The unit is in standby mode.
U
U
s
s
i
i
n
n
g
g
W
W
e
e
b
b
B
B
r
r
o
o
w
w
s
s
e
e
r
r
t
t
o
o
C
C
o
o
n
n
t
t
r
r
o
o
l
l
S
S
P
P
B
B
3
3
7
7
0
0
This enables you to remotely control SPB370 thru any web browser (i.e. Microsoft Internet
Explorer). Make sure SPB370 is connected to an IP-based network.
To use web browser to control SPB370:
1. Use an RJ-45 Ethernet cable and connect it from the Ethernet port of SPB370 to RJ-45
wall jack or Ethernet hub.
ETHERNET
RS-232
RGB IN 1
RGB IN 2
AUDIO OUT
IOIOI
RJ-45 wall jack
RJ-45 Cable
(not supplied)
2. Set the IP, NETMASK and GATEWAY address of SPB370.
To set the network address:
Press
MENU
> select
SETTING
>
ETHERNET
and press
ENTER
. In the ETHERNET
menu, select DHCP and press
►
to turn DHCP
ON
to automatically request for network
address or
OFF
to manually set the network address.
Summary of Contents for AVerVision SPB370
Page 4: ......


