

A
A
V
V
e
e
r
r
M
M
e
e
d
d
i
i
a
a
®
®
A
A
V
V
e
e
r
r
V
V
i
i
s
s
i
i
o
o
n
n
1
1
3
3
0
0
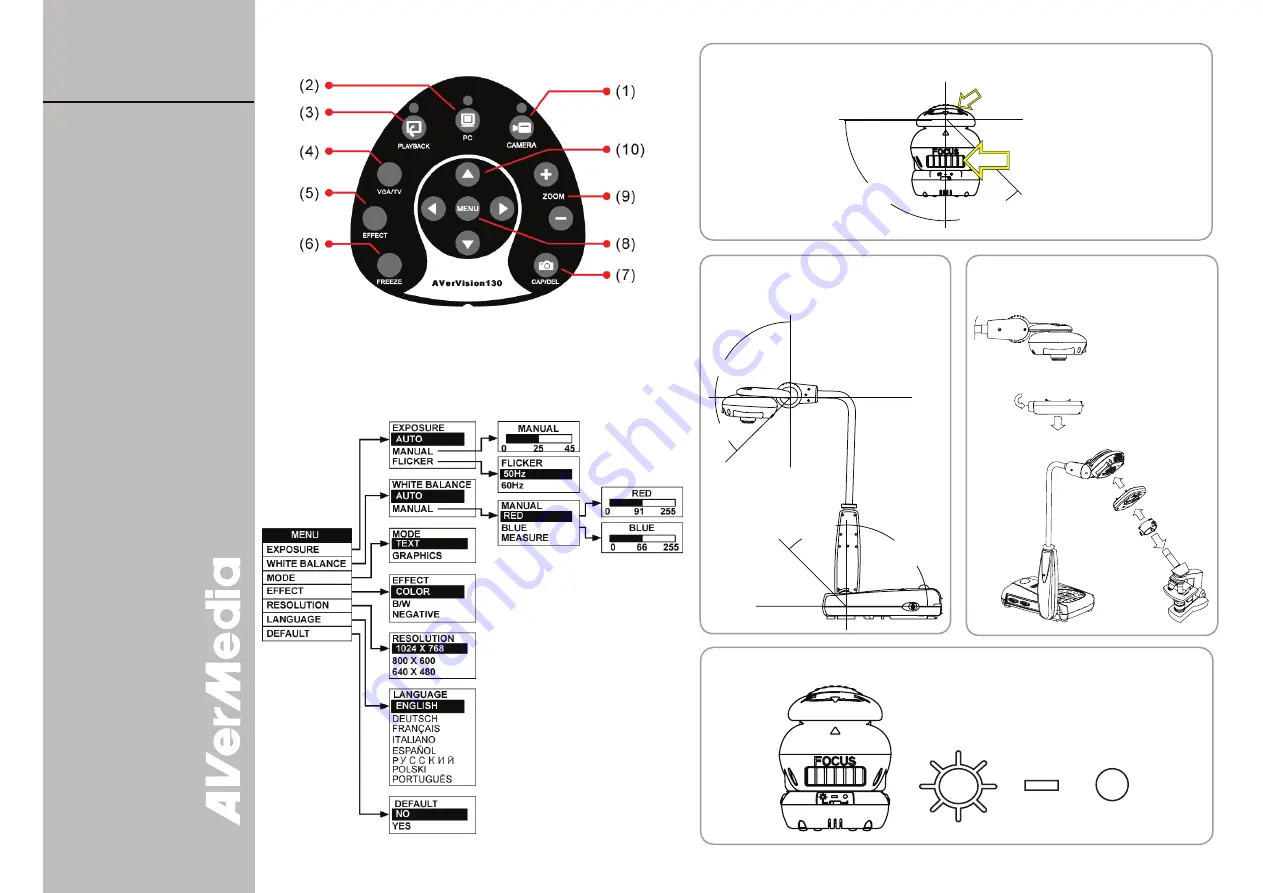
Adjust the Camera Head & Focus
Adjust the angle here
at the ridged side
Adjust the
focus here
45 degrees
90 degrees
Touch Button Control Panel
90
°
45
°
45
°
90
°
Gooseneck and
Mechanical Arm
Press the latch to detach
the light module from
the camera head
LED Light Module
Microscope
Coupler
Microscope
Adapter
Microscope
Connecting to a
Microscope
Q
Q
u
u
i
i
c
c
k
k
G
G
u
u
i
i
d
d
e
e
Button Functions :
1. Display live video from the
AVerVision130 document
camera.
2. Display video signals from a
computer.
3. Display
previously
captured
images.
4. Switch between VGA (VGA
Out) or TV (Composite
Video/S-Video) output.
5. Convert the displayed video
images to B&W, Negative or
Color.
6. Freeze/unfreeze
the
displayed images.
7. Capture an image and
temporarily save in dynamic
storage or delete an image.
AVerVision 130 saves up to
4 images only. When the
fifth image is captured, the
first image will be replaced
automatically. When the
AVerVision130’s power is
off, all the images will be
removed from the dynamic
storage.
8. MENU, refer to OSD tree.
9. Digitally zoom in and zoom
out the picture up to 400%.
10.
Use the up, down, left and
right arrows to pan the
zoom-in image or in MENU
mode. Right arrow is also
the “enter” button
.
OSD Tree
Press the
MENU
button to call up and exit from the main menu
or sub-menu display. Then use
▲
or
▼
buttons to select the items
in the menu list. Use
►
button to enter sub-menu. To adjust the
setting, press
◄
or
►
buttons.
Turn On
Turn On
Turn Off
Turn Off
Light Module


