background image

16

Chapter 2   

Getting Started

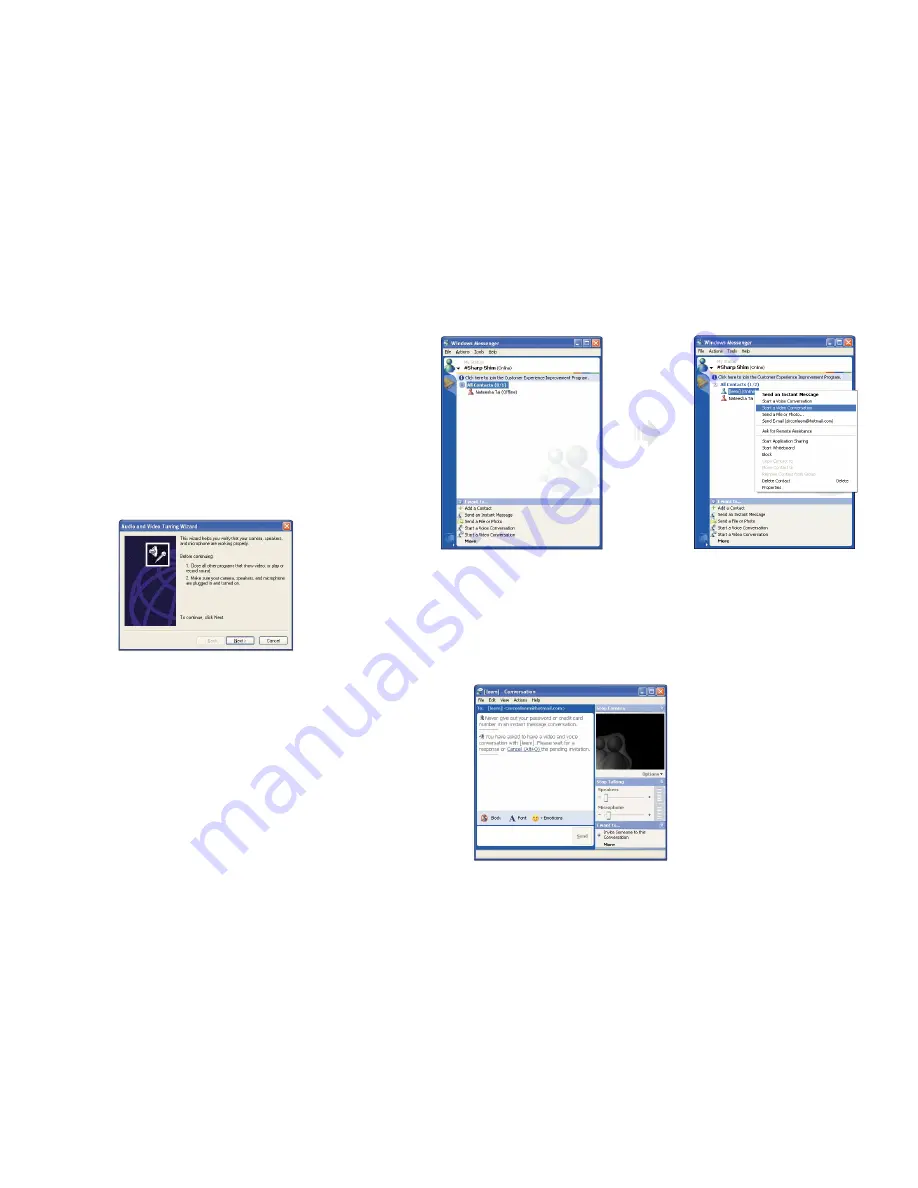
2. Right-click on your chat partner and then select

Start a Video Conversation, as illustrated below.

3. Now you’re ready to start chatting with the web camera.

Note

If the web-camera setting is not configured,

you will see the below screen. Run the wizard
for setting the web-camera by following the
message on the screen. 

Summary of Contents for All-In-One PC

Page 1: ......

Page 2: ...particular installation If this equipment does cause harmful interference to radio or television reception which can be determined by turning the equipment off and on the user is encouraged to try to correct the interference by one or more of the following measures Reorient or relocate the receiving antenna Increase the separation between the equipment and receiver Connect the equipment into an ou...

Page 3: ...omplies with part 15 of the FCC Rules Operation is subject to the following two conditions 1 This device may not cause harmful interference 2 This device must accept any interference received including interference that may cause undesired operation ...

Page 4: ...ified as a CLASS 1 LASER PRODUCT To use this model properly read the instruction manual carefully and keep this manual for your future reference In case of any trouble with this model please contact your nearest AUTHORIZED service station To prevent direct exposure to the laser beam do not try to open the enclosure CAUTION RISK OF EXPLOSION IF BATTERY IS REPLACED BY AN INCORRECT TYPE DISPOSE OF US...

Page 5: ...ide for possible use later 3 Keep this equipment away from humidity and high temperature 4 Lay this equipment on a stable surface before setting it up 5 The openings on the enclosure are used for air convection and to prevent the equipment from overheating Do not cover the openings 6 Make sure that the power voltage is within its safety range and has been adjusted properly to the value of 100 240V...

Page 6: ...ccording to Users Manual The equipment was dropped and damaged The equipment has obvious signs of breakage 11 Never pour any liquid into the opening that could damage the equipment or cause an electrical shock 12 Do not leave the equipment in an unconditioned environment with a storage temperature of 60 C 140 F or above which may damage the equipment 13 To prevent explosion caused by improper batt...

Page 7: ...vi Before You Start WEEE Statement ...

Page 8: ... consequential damages resulting from the furnishing performance or use of this material AVERATEC is a trademark or registered trademark of TriGem Computer Inc in the United States and or other countries All other product and brand names are trademarks of their respective owners 2008 TriGem Computer Inc All rights reserved Note Depending on the model your computer s components may vary and look sl...

Page 9: ...PC 02 Chapter 2 Getting Started Turning On and Off 05 Adjusting the Brightness of the Monitor 07 Adjusting the Speaker Volume 08 Connecting External Speakers 09 Using the Optical Drive 11 Connecting to the Internet 13 Using Your Webcam 14 Using the Wireless LAN 17 Using the Multi Card Reader 19 Using the Internal Microphone 20 Chapter 3 System BIOS SETUP Entering into the System BIOS Setup 22 BIOS...

Page 10: ...1 Chapter 1 Introduction Introduction Chapter 1 ...

Page 11: ... PC eliminates all those messy cables enhances system portability and results in less clutter Everything s included The Averatec All In One PC includes everything necessary to be immediately productive An industry leading 18 4 wide screen LCD monitor coupled with an advanced Intel Atom processor to handle all your entertainment and productivity applications Additionally the Averatec All In One PC ...

Page 12: ...ic computing needs and then some With this PC you can enjoy the most popular tasks such as word processing internet browsing and basic gaming Improved power management The Averatec All In One PC with it s Intel Atom based CPU and efficient design requires very low power consumption Internal microphone With the built in microphone you can fully enjoy chatting with your friends and family members vi...

Page 13: ...4 Chapter 2 Getting Started Getting Started Chapter 2 ...

Page 14: ...Getting Started Turning On and Off Turning on Press the power button on the front side of the PC Turning off Case 1 Click Start to turn off computer 1 Click Start and select Turn off computer Turn off computer screen displays 2 Click Turn Off ...

Page 15: ...l be turned off If the system is operating abnormally you can reboot the PC by holding down the power button until the PC turns off Then press the power button again to boot back up Case 3 Power saving mode Saves your session and puts the computer in a lower power state so that you can quickly resume working Click Stand By ...

Page 16: ... the brightness control button on the front side of the PC There are 5 levels of LCD brightness adjustment available Each press of the brightness control button will cycle through each level 100 full brightness level 60 of brightness level 70 of brightness level 90 of brightness level 80 of brightness level Using the brightness control button ...

Page 17: ...n located on the Front side of the PC Volume button Up Down To adjust the volume level press the left volume button to increase the volume level and the Right volume button to decrease the volume level Mute button To mute the speaker sound press it once to enable mute and press it again to disable mute Mute button Volume button Up Down ...

Page 18: ...ing External Speakers Connecting External Speakers Connect the speakers to headphone jacks Speakers optional Audio control panel To set the audio configurations refer to the follow steps 1 Double click the Controls IDT Audio Setting icon ...

Page 19: ... One PC has built in speakers on the base of the system You can adjust the volume by clicking the volume adjustment buttons located on the front side of the PC and or by using the volume control feature in Windows XP 3 Choose which jack Headphone or Microphone you have your external speakers connected to Default is the headphone jack When you finish the setting click ...

Page 20: ...BO or DVD Recorder Tray loading CD drive 1 Press the Eject button of the CD DVD drive 2 Insert CD DVD Insert CD DVD in the CD DVD drive and place CD DVD label upside front Press the CD DVD Drive 3 Eject CD DVD Press the Eject button of the CD DVD drive on the left side of the Averatec A1 PC You can then remove the CD DVD 1 2 ...

Page 21: ...D from the drive by pressing the eject button and choosing the Eject menu insert the paper clip into the emergency eject hole as far as it will go then the tray will be slightly open Pull out the tray and remove a CD DVD from the tray Make sure CD DVD is not inserted upside down CD label side facing toward upside of PC Labels on CD DVD may cause noise when CD DVD drive is working Remove labels on ...

Page 22: ...in the figure below Connecting to the Internet 2 Configure the communication settings for the system based on your communication environment When connecting to the Internet via an internet service provider contact the service provider for more information on required communication settings 3 Launch Internet Explorer or other communication software ...

Page 23: ...Cam icon on the desktop 3 Click the Snapshot button on the CyberLink YouCam screen 2 The CyberLink YouCam will be run and a green light on the webcam LED indicates your PC is ready to take photos Using Your Webcam Note For more information refer to the Help of the program You can see the Help by clicking the help button on the upper right side of the screen ...

Page 24: ...ou also need to download and install a messenger program The screen that you will see varies depending on the type of the messenger program you re using 1 Run the messenger program to register your user email address When the messenger is ready Click Start Windows Messenger Select Sign in Note This is an example using Microsoft s MSN Messenger Other messenger applications may vary ...

Page 25: ...n select Start a Video Conversation as illustrated below 3 Now you re ready to start chatting with the web camera Note If the web camera setting is not configured you will see the below screen Run the wizard for setting the web camera by following the message on the screen ...

Page 26: ...ows configuration features to configure the system You can also use the program that comes with the wireless LAN card to configure the network 1 Right click on the Wireless Network icon on the status bar and then select View Available Wireless Networks Using the Wireless LAN 2 If there is an AP enabled environment a list of available APs will appear Click the item you want to connect to and click ...

Page 27: ...r 2 Getting Started 3 When the connected window appears confirm the settings and then click Close 4 Once connection is successfully established the network icon on the status bar will indicate the status change ...

Page 28: ...To insert correctly refer to the pictures The cards are not inserted completely the tip of the cards will remain out of the slot Insert cards with label side facing toward upside of the PC Removing multi media card To remove the card 1 Press the end of the card The card will be slightly out 2 Grip the tip of the card and take it out from the slot Using the Multi Card Reader Insert cards with label...

Page 29: ... left of the computer Use the built in internal microphone to record sound for your webcam videos and to use instant messenger or chat software to have video chats online You can use the internal microphone from a distance of up to 1 5 feet one meter from the Computer Using the Internal Microphone Microphone ...

Page 30: ...21 Chapter 3 System BIOS SETUP System BIOS SETUP Chapter 3 ...

Page 31: ...o enter the System Setup screen BIOS Action Keys Leaves a sub menu to return to the previous menu OR exits the BIOS setup while saving changes Shows the Sub Menu Exit ESC Goto Sub Screen Enter Function Key Command Description Shows the Help Screen General Help F1 Saves changes and reboots the computer Save and Exit F10 Selects the next field Select a field Tab Selects the next item Select an item ...

Page 32: ...23 Chapter 3 System BIOS SETUP BIOS Setup Menu Main Menu Sets most standard specifications for the system such as the time date Advanced Menu Sets up key items related to the system s performance ...

Page 33: ...24 Chapter 3 System BIOS SETUP Boot Menu You can set the boot sequemce Security Menu Sets up a password to prevent any unauthorized user from accessing the system ...

Page 34: ...sor Password is at a higher level than the User Password This completes setting up a password Password installed OK Supervisor Password is Shows the setup status of the Supervisor Password Installed if a upervisor Password is set or Not Installed User Password is Shows the setup status of the User Password Installed if a User Password is set or Not Installed Change Supervisor Password Setting up a...

Page 35: ... the utility Discard Changes Exit the utility without saving the changes you have made Discard Changes Aban your changes and reload the previous configuration before running the utilityt Load Optima Defaults Select this item to load the default settings for optimal system performance Exit Menu ...

Page 36: ...27 Chapter 4 Expansion of the system Expansion of the system Chapter 4 ...

Page 37: ... The motherboard has one SO DIMM socket which can accommodate up to 2 0 GB of memory If new memory is installed its type size and speed are automatically checked by the system BIOS The SO DIMM socket supports the following memory specification 200 pin DDR2 SDRAM Socket 533 667 MHz DDR2 SDRAM Memory Interface The appearance of the SO DIMM memory in the figure may not reflect the actual memory depen...

Page 38: ...h as cloth over the flat surface and face down the LCD panel Be careful not to damage the LCD panel 3 To firm the system module insert the flat things such as the books between the LCD and system module 4 To remove the CD drive insert the flat driver into the hole and slide toward the CD drive and remove it 5 Flat things such as the books 1 1 2 3 2 ...

Page 39: ...30 Chapter 4 Expansion of the system Remove the screws and system cover as shown in the figure 6 3 Remove the screws and metal cover 1 2 3 ...

Page 40: ...away at the same time The memory wiill pop up about 30 degrees Remove it from the socket 1 Align the notches of the SO DIMM memory with the slot keys of the socket this allows the memory to be inserted Insert the memory into the socket at a slight angel about 30 degrees firmly and gently press down the memory until both latches snap into place 2 ...

Page 41: ...32 Chapter 4 Expansion of the system 5 Replace the metal cover and fix with the screws ...

Page 42: ...33 Chapter 4 Expansion of the system 6 Replacing the system cover and the CD drive Replace the system cover and fix with the screws 1 Replace the CD drive and fix with the screws 2 ...

Page 43: ...pacity Once memory installation is complete restart the system If an error message related to the memory capacity appears upon booting press the Del key to enter the system setup screen Save the setting and exit 7 Adjust the LCD panel for convenient using 1 2 ...

Page 44: ...Kit 1 Turn off your system and remove all cables Your system has four VESA Mount holes on the bottom surface for using the optional VESA Mount kit To use it follow the next steps 2 Place LCD in down position and insert the hinge lock clip as shown below Hinge lock clip ...

Page 45: ...te the mounting holes on the bottom of your system Be careful not to damage the LCD panel 5 To firm the system module insert the flat things such as the books between the LCD and system module 6 Attach the VESA Mount bracket to your system 7 Follow the instructions in the User s Guide that came with your VESA Mount kit ...

Page 46: ...0 mm To purchase the optional VESA Mount kit please refer to this size Removing the hinge lock clip To remove the hinge lock clip follow the next steps Unfold the LCD panel 1 Push down the hinge arm slightly and remove the hinge lock clip 2 You can adjust angel of the LCD panel 3 1 2 Hole Hinge arm ...

Page 47: ...38 Chapter 4 Expansion of the system ...

Reviews: