background image

II. 


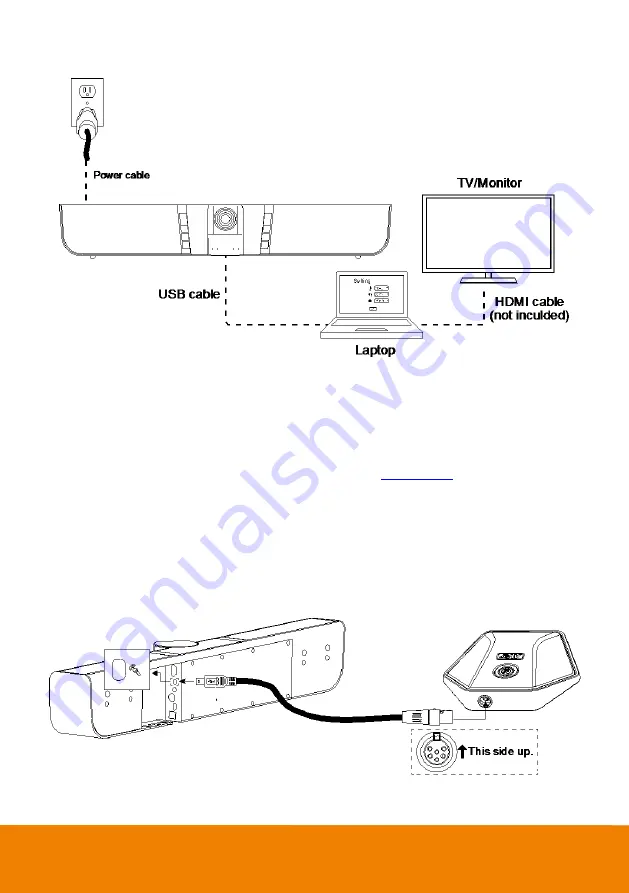
1.  Connect VB342+ to PC with provided USB cable. If you like to use type-C connector on newer PC, 

connect provided adapter to type-A end of cable, then connect type-C side of adapter to PC.   

2.  Connect the TV/Monitor to PC/laptop through the HDMI cable. 

3.  Connect the power to the VB342+ and camera head will move, and the power indictor will light up. 

4.  Install Aver PTZApp on laptop/PC that is connected with VB342+. The app can be used to adjust 

and setup the parameters of the camera (refer to section of 

AVer PTZApp

)

5.  To make a call, run your video application (

Skype

TM

, Skype for Business, Google Hangouts

TM

Zoom

TM

, WebEx

TM

, Adobe Connect

TM

,


WebRTC

, and etc.) select VB342+ as your video and audio 

device. 

Extended Microphone Installation 

[Note]

 There are two lengths of cables -- 10m and 20m. 


Summary of Contents for VB342+

Page 1: ...VB342 Conference Camera User Manual ...

Page 2: ...n a circuit different from that to which the receiver is connected Consult the dealer or an experienced radio TV technician for help FCC Caution Any changes or modifications not expressly approved by the party responsible for compliance could void the user s authority to operate this equipment Europe EU Declaration of Conformity This device complies with the essential requirements of the Radio Equ...

Page 3: ...usehold waste Instead you need to dispose of the waste equipment by handing it over to a designated collection point for the recycling of waste electrical and electronic equipment For more information about where to drop off your waste equipment for recycling please contact your household waste disposal service or the shop where you purchased the product WARNING To reduce risk of fire or electric ...

Page 4: ...e used batteries through specially approved disposal methods Remove the batteries if they are not in use for long periods of time Battery leakage and corrosion can damage the remote control Dispose of batteries safely and through approved disposal methods Do not use old batteries with new batteries Do not mix and use different types of batteries alkaline standard carbon zinc or rechargeable nickel...

Page 5: ... Remote Controller 4 Setup VB342 7 Device Connection 7 Extended Microphone Installation 8 Wall Mount Installation 9 Using VB342 11 Make a Video Call 11 LED Indicator 11 Install Displaylink Driver 12 Phone in Connection 14 AVer PTZApp 15 Install AVer PTZApp 15 Use AVer PTZApp 15 ...

Page 6: ...Set the Camera Number 24 Hotkey Control 25 Home Sleep Position 26 OpenGL 27 Full Screen Mode 28 Install EZLive 29 Use AVer EZLive 29 ...

Page 7: ... USB Cable USB type A to type C adapter Wall mount bracket Screws x4 for wall mount Screws x2 for TV mount Mount rubbers x 2 for TV Mount AAA Batteries Quick Guide Warranty card The power plug will vary depending on the standard power outlet of the country where it is sold ...

Page 8: ...Overview 1 2 2 3 4 7 5 8 6 9 1 Camera 6 Power 2 IR sensor 7 Preset 3 Mute 8 Phone in button 4 Volume 9 Reset 5 Volume 10 11 12 13 14 15 10 HDMI Out 13 RS232 11 MIC Input 14 USB port to PC 12 Phone In port 15 DC 12V Power Jack ...

Page 9: ...3 Pan and Tilt 35 15 ...

Page 10: ...ve one camera and don t need to do any setting the default is camera 1 If you press camera 2 or 3 on the remote control you will find your remote can t control your camera In this case please press camera 1 on your remote again 2 Camera direction control Use the direction button on the remote to control the direction of the camera Press the direction button to move the camera or press and hold for...

Page 11: ... preset preset position button 0 9 will move the camera to the saved position 7 Preset position Preset position button is used in conjunction with the Preset button to save positions There are a total of 0 to 9 saves Press preset button and then press 0 9 to go to the saved position Press button on remote controller for 1 second can turn on or off the WDR function Press button on remote controller...

Page 12: ...6 Name Function 14 Brightness Increase the brightness 15 Hang up End the call Function requires AVer PTZApp Not supported ...

Page 13: ...head will move and the power indictor will light up 4 Install Aver PTZApp on laptop PC that is connected with VB342 The app can be used to adjust and setup the parameters of the camera refer to section of AVer PTZApp 5 A Displaylink drive is required for the TV Monitor connection with VB342 To install Displaylink drive refer to section of Install Displaylink Driver 6 To make a call run your video ...

Page 14: ...d camera head will move and the power indictor will light up 4 Install Aver PTZApp on laptop PC that is connected with VB342 The app can be used to adjust and setup the parameters of the camera refer to section of AVer PTZApp 5 To make a call run your video application SkypeTM Skype for Business Google HangoutsTM ZoomTM WebExTM Adobe ConnectTM WebRTC and etc select VB342 as your video and audio de...

Page 15: ...ase refer to the following drilling dimension for drilling the wall mount holes 500 0mm 28 5mm 2 Drill 2 holes on the wall and screw the screws into the holes Leave some space between wall and screws for hanging the VB342 on the wall ...

Page 16: ...10 3 Install the wall mount bracket on the VB342 unit 4 Hang the VB342 on the wall ...

Page 17: ... 3 Set the VB342 camera as the primary camera and speakerphone for your video application refer to your video application user guide You can now make your call 4 We do recommend installing the AVer PTZApp for a better user experience For information on how to install and use the AVer PTZApp refer to the AVer PTZApp section in this user manual LED Indicator Button LED Status Power ON Blue OFF Red M...

Page 18: ... installed Displaylink drvie already then skip this step Following is how to install Displaylink driver on Windows and Mac Windows Win7 and Win8 1 Run the AVer PTZApp on your laptop PC 2 In AVer PTZApp select Diagnotics Utility Install Displaylink Note If your laptop PC is Win10 the Install Displaylink button will not show up Because bulit in support on Win10 Maximum output is1080p resolution ...

Page 19: ...e on screen instruction to complete the installation Mac OS 1 Run the AVer PTZApp on your laptop PC 2 In AVer PTZApp select Diagnotics Utility Install Displaylink 4 Scroll to the bottom and select Accept for license ...

Page 20: ... to complete the installation Note Maximum output is1080p resolution Phone in Connection 1 Power on VB342 2 Connect your device to VB342 through the phone in port 3 Press button 2 times to switch to Phone in mode 4 In Phone in mode press button 1 times to turn off Phone in mode ...

Page 21: ...installation After installing the AVer PTZApp double click on the AVer PTZApp icon to run the application Use AVer PTZApp 1 Run your video application and make a video call 2 During your video call you can use the AVer PTZApp to pan tilt and zoom the camera in out and enable disable the true WDR brightness and sharpness feature 3 For the first time use you can check the connection camera and speak...

Page 22: ... VC CAM or VB device controlled by PTZApp If you have more than one AVer VC CAM or VB devices connected to this PC Mac PTZApp is running you can click on the drop down list to select other AVer VC CAM or VB device Function icon Click it to switch to the function s page ...

Page 23: ... for face detection smart framing Settings To setup parameters of the camera and speakerphone Click the Save button to save all settings To change all the settings back to the default values click the Factory Default button WDR In back light environment enable WDR can improve the brightness of image To enable WDR function set WDR to On When press and hold the button 1 on the remote controller can ...

Page 24: ...ment around the room Not suitable for multiple speakers in the same room Hotkey Press button on remote controller for 1 second to enable Audio Tracking function Audio Frame Camera won t Pans tilts but shows the speaker in view and zoom in To use when Multiple participants in meeting Hotkey Press button on remote controller for 1 second to enable Audio frame function Audio Preset Tracking Pans to s...

Page 25: ...ersion and the devices connection status You can also test the camera and speakerphone status and update the firmware of the camera Minimize Minimize the app to system tray To quit the application right click the icon on the system tray and select Quit ...

Page 26: ...nnection to make sure all are correct and well connected Normal Un normal Connection diagnostic Display devices connection status If the AVer PTZApp has detected that some of the devices are not connected well the diagram will display a and on the device to indicate the connection has a problem If the camera is in use by another application it will display Can t start video warning ...

Page 27: ...se direction and zoom in out button to check camera view Click Advanced Control can setup camera parameters To leave the page click the Back button Test Speakerphone Click to check the speakerphone status It will require user to record a short message and play it back to ensure the speakerphone is working ...

Page 28: ...and update process will start The new firmware will be downloaded first then the new firmware will be uploaded to camera Note Before updating the new firmware to the camera please make sure camera and laptop PC are all well connected and stay connected during the entire process Download new firmware Update new firmware to camera 4 To update the firmware manually click Manual Update and locate the ...

Page 29: ... laptop PC doesn t have installed Displaylink drive click Install Displaylink and follow the on screen instruction to complete installation Note Maximum output is1080p resolution Troubleshooting collect more system information for troubleshooting before you contact AVer technical support ...

Page 30: ...ough the dropdown list 2 Next Click Change Binding button 3 Select which camera number of remote control it maps to 4 Click Save to save settings To un save the settings click Abort Note If you only have one camera and don t need to do any setting the default is camera 1 If you press camera 2 or 3 on the remote control you will find your remote can t control your camera In this case please press c...

Page 31: ...ontrol Enable hotkey control to use keyboard control camera s movement and backlight The default is off 1 In AVer PTZApp select Settings 2 Set Hotkey Control to On 3 A hotkey description as below figure shown 1 2 ...

Page 32: ...26 4 When hotkey control is enabled a hotkey tip will display when mouse is moved to the PTZ control button in PTZ mode ...

Page 33: ...ere are two options Factory sleep position Preset 9 If the camera idles for more than 3 minutes it will enter sleep mode OpenGL The default setting is off If your PC has installed OpenGL you can get better frame rate and smoother video quality by turn on it If your PC is without OpenGL it will cause video display problem after enable it ...

Page 34: ...se to the right corner bottom of the video screen and a icon is displayed on video screen Click icon and video screen will switch to full screen mode In full screen mode user can use direction panel to control camera direction Click icon can go back to normal screen view ...

Page 35: ...EZLive During a video call EZLive can help user to do 1 Camera ePTZ 2 Volume control for the speaker connected 3 Capture camera s still images 4 Record video 5 Live stream to Youtube Livehouse in USTREAM etc 6 Camera Zoom in out 7 Capture PC screen shot 8 Record PC screen video 9 Set up livestream 10 Open file management to retrieve photos and video files 11 Livestream setting 12 Drawing tool 3 2 ...

Reviews: