


English-4
Remote Control
The remote control requires two “AAA” size batteries. Make sure batteries are installed properly
before use.
Name
Function
(1) Power
Turn the unit on/standby/privacy:
Press once to turn on privacy
mode. Press again to turn off
privacy mode.
Long press for 3 seconds to turn on
standby mode. Short press again to
turn off standby mode.
(2) Remote Control LED It will be on when pressing other
buttons.
(3) Menu
Open and exit the OSD menu.
[Note]
DL10 does not support OSD
menu.
(4) Switch
Switch from presenter to another
presenter.
(5) Auto Tracking On
Turn on auto tracking.
(6) Auto Tracking Off
Turn off auto tracking.
(7) Number buttons
Use for setting the preset position 0~9.
(8) Preset
To set a preset position:
Press “
Preset
” and then press “
Number
button (0~9)
”.
Remote control LED and camera button
LED will not light when pressing
Preset button alone.
(9) Reset
To cancel a pre-configured preset position:
Press “
Reset
” and then press “
Number button (0~9)
”.
Remote control LED and camera button LED will not light when pressing
Reset button alone.
(10)
▲,▼,◄, & ►
Pan and tilt the camera. Pan/Tilt speed by remote control is fixed. You
may change pan/tilt speed by using web browser. For setting details of
web browser, please refer to user manual.
(11) Enter
Use the Enter button to send the camera to the Home position.
(12) Zoom In/Out
Zoom in/out. Zoom in/out speed by remote control is fixed. You may
change zoom in/out speed by using web browser. For setting details of
web browser, please refer to user manual.
(13) EV +/-
EV level adjustment.
*Press EV+ for three seconds to switch on RTMP.
*Press EV- for three seconds to switch off RTMP.
(14) Upper Body
Tracking mode switches to Presenter Mode when pressing Upper Body
button, and presenter's size on screen is upper body.
Summary of Contents for DL10
Page 2: ...English 1 繁體中文 8 日本語 15 Deutsch 22 Français 29 Español 36 Italiano 43 한국어 50 ...
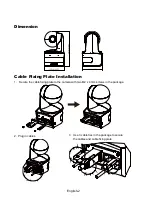
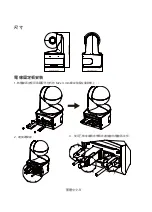
Page 11: ...繁體中文 9 尺寸 電線固定板安裝 1 將電線固定板用兩顆配件包內的 M2 x 4 mm 螺絲鎖緊在攝影機上 2 連接連接線 3 使用三條束線固定帶固定連接線和電線固定板 ...
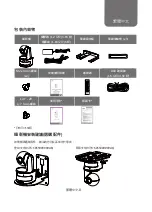
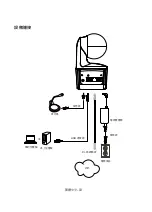
Page 12: ...繁體中文 10 設備連接 網路 麥克風 RJ 45網路線 USB 連接線 電源插座 電源變壓器 電源線 音源線 桌上型電腦 或 筆記型電腦 ...
Page 54: ...한국어 52 연결 RJ 45 케이블 USB 케이블 전원 콘센트 전원 어댑터 전원 코드 데스크탑 Microfono 오디오 케이블 노트북 또 네트워크 ...
Page 59: ...P N 300AS900 xxx ...


