background image


56 

Connect to DocCam 

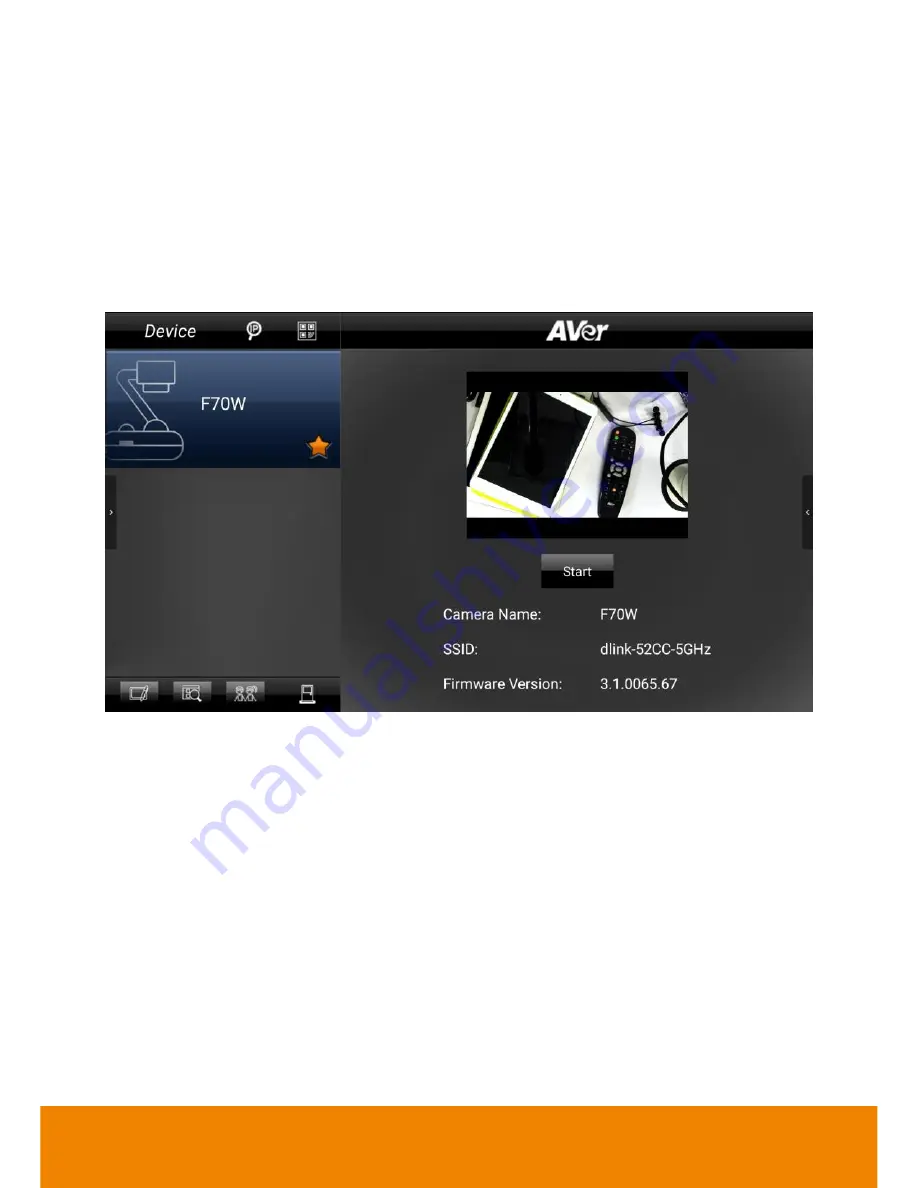
The AVer CP system can connect to DocCam device through the Sphere2 to use the class 

interactive function in Sphere2.


1.  Select 

All apps

 > 

Sphere2

2.  Please make sure the DocCam and the AVer CP system are at same local network. The 

Sphere2 will auto search the available DocCam on your local network and list on screen. 

3.  Select the DocCam device that wants to connect. 

4.  Enter the 

Password

” of DocCam and select 

OK

 to confirm. 

5.  And, select 

Start

” to connect. 


6.  How to use Sphere2 application; please refer to user manual of Sphere2.


Summary of Contents for CP654I

Page 1: ...AVer CP series CP654I CP754I CP864I User Manual ...

Page 2: ...er States relating to Electromagnetic Compatibility Directive 2014 30 EU Warning This is a Class A product In a domestic environment this product may cause radio interference in which case the user may be required to take adequate measures to correct this interference DISCLAIMER No warranty or representation either expressed or implied is made with respect to the contents of this documentation its...

Page 3: ...u need to dispose of the waste equipment by handing it over to a designated collection point for the recycling of waste electrical and electronic equipment For more information about where to drop off your waste equipment for recycling please contact your household waste disposal service or the shop where you purchased the product ...

Page 4: ... ei iv ve er r r ra an ng ge e 7 Wall Mounting Installation 8 V Ve en nt ti il la at ti io on n 13 Installation 14 Connect to PC 14 Connecting USB Peripherals 15 HDMI Connections 15 Install OPS 16 Using AVer CP System 17 Power on 17 Power Off 17 Main Screen 18 Toolbar 20 S Se et tt ti in ng gs s 22 A An nn no ot ta at ti io on n T To oo ol l 25 Whiteboard 26 T Tu ut to or ri ia al l 26 ...

Page 5: ... t th he e N No ot te e 29 U Us si in ng g W Wh hi it te eb bo oa ar rd d 30 Gallery 47 Snapshot 54 Using Browser 55 Connect to DocCam 56 Connect to WiFi 57 Adjust Date and Time 58 OSD Menu Operation 59 Specification 61 Multimedia Supported Formats 64 RS 233 Command Table 64 Troubleshooting 66 ...

Page 6: ...he product from power supply immediately if major failures occur The major failures include the following Smoke peculiar smell or abnormal sound is discharged from the product No image or sound is displayed or the image error occurs Where the mains plug or an appliance coupler is used as the disconnect device the disconnect device shall remain readily operable In the preceding scenarios do not con...

Page 7: ...electrodes positive and negative electrodes Do not install and use new battery together with the used one Take out the battery if the remote control is not used for a long period Do not expose the battery under overheated environments such as sunlight and firing Dump the used battery based on local regulations Do not open the cover or change the product by your own High voltage components are inst...

Page 8: ...tric shock Do not tread on the product or hang any items on the product Do not install the product in an improper place Do not install the product in humid places such as the bathroom the shower room the place near windows or outdoor environments where experience rain snow or other harsh weather The product installation is also required to avoid a place around by hot spring vapor The preceding env...

Page 9: ...ch may cause high temperature and subsequent faults in the product For transport Pack the product for mobility or maintenance by using the cartons and cushioning material provided with the product Vertically move the product during transport The screen or other components are easily broken if the product is moved by an improper way Keep away from the product when you use a radio The product design...

Page 10: ...s and prevent eyestrain Adjust the volume to an appropriate level especially at night Use amplifier equipment as the audio input source with caution If you must use amplifier equipment the input power should not exceed the maximum of speaker power Otherwise problems occur such as the speaker is overpowered and damaged Notice The technical specifications provided in this Manual and on the carton ar...

Page 11: ...s follows Run on Android 5 0 1 operating system with unique UI design offering you more convenient operations and better visual experience Support convenient operation through a mouse and keyboard with USB port just like a computer Built in large capacity memory and large capacity buffer running 4K movies High quality LCD screen featured by flicker free low radiation high brightness high contrast ...

Page 12: ... 2 3 4 5 6 7 8 9 10 1 AVer CP series 65 75 86 2 Wall mount 3 Remote Controller 4 Stylus pen x 2 5 Power cable 6 USB cable 7 WiFi dongle For US only 8 HDMI cable 9 AAA battery x 2 10 DP to HDMI port converter Optional Accessories Floor Stand OPS ...

Page 13: ...to show the OSD On Screen Display menu Non Android screen 3 VOL VOL button select or adjust menu options 4 Select or adjust menu options 5 Gesture control on off Long press 2s to activate inactivate 6 Indicator and remote receiver 7 AC power On Off switch ...

Page 14: ...4 Item Description 1 Headset port 2 MIC IN port 3 OPS USB port 4 Android USB port 5 TOUCH USB port 6 HDMI IN port ...

Page 15: ...ort 3 0 16 HDMI2 IN port 5 Android USB port 3 0 17 HDMI3 IN port 6 Android USB port 2 0 18 HDMI 1 2 3 OUT port 7 Headset port 19 LAN port 8 SPDIF OUT port 20 HDMI4 IN port 9 TOUCH USB1 port 21 VGA IN port 10 TOUCH USB2 port 22 VGA AUDIO IN port 11 TOUCH USB3 port 23 POWER port 12 TOUCH USB4 port The RS232 In Out ports are in different position on CP654I unit ...

Page 16: ...aracters view TV channel list No used currently HOME Jump back to Android Home MENU Display the on screen menu Select or adjust menu options OK Confirm the operation VOL Adjust volume Return to the previous setting interface SOURCE Display the source selection menu Valid only in TV mode CH Turn channel up down No used currently AUDIO Select the sound mode SLEEP Set the sleep time and auto standby ...

Page 17: ... an angle of 30 degrees from the vertical point to the left and the right Note To avoid probable faults please read the following instructions and use the remote controller properly Do not drop or beat the remote controller Do not spill water or other liquid on the remote controller Do not put the remote controller on wet items Do not expose the remote controller under sunlight or put it near over...

Page 18: ...r the best working performance these places should be avoided strong electric field strong magnetic field and potential leakage of inflammable gas 7 For the best panel viewing the bracket should be installed in the place where the direct intense light and reversed light situations should be avoided 8 In case of fire please avoid the places as described below heavy soot windy and dusty place intens...

Page 19: ...the corresponding VESA holes of IFP with 4 pieces of M8 M6 screws 2 As shown below Lock the connection bracket and wall mounting bracket together with 12 pieces of M4X6 B head screws C o n n e ct io n b r a c k e t Connection bracket Wall mounting bracket 4 M8 M6 screws ...

Page 20: ...t hole for expansion screws 12 holes 4 Picture shown as below Use churn impact drill to drill 12 holes on the wall according to the position marked by pencil in Step 3 The diameter and depth should be chosen according to the spec and the type of the expansion screws used in the wall Wall Wall Impact drill Pencil ...

Page 21: ...on screws into the wall The client should choose the right specification of the expansion screws you just need to prepare these screws in the whole process according to the wall type 6 Use the wrench to tighten the nuts of the expansion screws Wall Wall ...

Page 22: ...00 400 mm or 600 600 mm 2 types optional you need to verify 8 As pictured below push the anti theft bracket in the accessory bag into the corresponding hole which is at the bottom of the IFP Use the screws to lock the anti theft bracket in place A n t i t h e f t Anti theft bracket in the right position W a l l W a l l Wall Wall Anti theft bracket OPS PC ...

Page 23: ...ventilation holes or insert any object into the housing Do not place the product in a confined space such as bookcase or imbedded closet unless appropriate ventilation conditions are provided There should be adequate clearances around the product to ensure good ventilation Mounted on the wall Impede air circulation 30cm 10cm m 10cm m 10cm m Wall ...

Page 24: ... Connect to PC Note Disconnect the power plug before installing or removing the product Remark Either connects the HDMI cable or VGA Audio cable from the external computer Touch USB4 PC USB LAN HDMI CEC VGA VGA AUDIO ...

Page 25: ...15 Connecting USB Peripherals 1 WiFi Adapter other supported USB devices Plug into USB IN port 2 Networking and modem cables Plug the router cable into the LAN port HDMI Connections ...

Page 26: ... OPS slot Note The fan side of OPS is face outside Power on off OPS The OPS will not turn on when IFP system power on When IFP system switches to OPS source the OPS will automatically power on When IFP power off the OPS will be powered off ...

Page 27: ... unit Also user can press power button on the remote controller to power up too After power on the main screen is displayed Power Off While in power on status press power button on the AVer CP unit or on the remote controller and the power off message is displayed on screen press power button again to turn off the AVer CP system ...

Page 28: ...to extend the tool bar For more detail see Toolbar section 3 Browser Call out browser to explore the Internet if Internet connection is available 4 Whiteboard Call out the whiteboard interface to use whiteboard functions 5 All apps To enter the application program page All application programs in the system are displayed 6 File Manager Select to call out the file manager screen ...

Page 29: ...tch to one of running program and close the running programs 8 Input Switch Select the input source which devices are connected with the AVer CP system through HDMI VGA and USB interface Touch the blue frame and hold then swipe to the source that user wants to select ...

Page 30: ...e tool bar Name Descriptions Select the input source which devices are connected with the AVer CP system through HDMI VGA and USB interface Back to previous screen Return to main screen Call out setting function list Setting function includes volume snapshot file manager system setting and freeze For more detail please see Settings section ...

Page 31: ...21 Name Descriptions Call out the annotation tool The annotation tool can be used in any input source screen For more detail please see Annotation Tool section ...

Page 32: ...lume Select to call out volume adjust bar Touch and hold the blue dot and move to adjust the volume Snapshot Capture the current screen shot Select to take a screen shot User can view the screen shot in Gallery File manager Open the ES file explorer screen Select to open ES file explorer screen User can manage the files on IFP system ...

Page 33: ...apps on the IFP system Storage reset View the storage capacity on the IFP system and reset the IFP system back to factory default About View the version and related information of the IFP system Date Time Setup the date and time of the IFP system Language Select the language of the IFP system Keyboard Setup keyboard format Accessibility Setup parameters of caption speak passwords and text to speec...

Page 34: ...emporary freeze the current screen While freezing no functions can be operated Note Freeze function doesn t support on Android system Select to freeze the screen The left upper corner of screen will display Freeze On ...

Page 35: ...used in any input source screen Select to call out annotation tool Eraser Clear the annotation on the screen Red Blue Red and blue color pen User can draw and write on the screen Save Save the screen to local IFP or U Disk external USB pen drive Exit Close the annotation tool ...

Page 36: ... tutorial will guide the user how to use whiteboard select to go next step select to back previous step Select the tutorial will close select can continue the tutorial If user wants to view the tutorial again after tutorial select the VIEW TUTORIAL at main page of whiteboard Select DISMISS will close the tutorial selection ...

Page 37: ...d user can choose the proper format to use 1 Select and select Note Also user can select Default note The default note will be a blank page 2 The note formats are category in Standard Grid Math Engineering Music Sports and Planners Lists Choose the proper note format to use ...

Page 38: ...rt t P PD DF F User can import the PDF file from external USB pen drive or local IFP system into whiteboard 1 Select and select Import PDF 2 Locate the PDF file 3 The imported PDF file is displayed on whiteboard screen ...

Page 39: ...29 C Ch ha an ng ge e N Na am me e o of f t th he e N No ot te e User can rename the note 1 Select the note name is located at left upper corner 2 Enter the new name of the note and select OK to confirm ...

Page 40: ...includes pen eraser mark shape and text function Color selection User can select the color of pen text shape and background of note Add image Take a picture from camera that is connected with IFP or select an image to display on whiteboard Note page switch and add new note page Call out sub menu list view only export print page settings and help ...

Page 41: ...pe and text functions Pen Type Pen has three types pencil highlight pen and pen Multitouch Allows user to use more than 1 finger on screen Pressure To make writing more smooth Thickness Adjust the thickness of pen Move the dot to adjust the thickness ...

Page 42: ...32 Color Depth Highlight pen can adjust color depth Color The color of all pens can be changed Select the type of pen and go to Color selection and select the color ...

Page 43: ... to edit After selecting the screen will switch to edit mode In edit mode user can modify the selected object Select and use finger to select the object on the screen and the screen will switch to edit mode In edit mode select can switch to whiteboard screen ...

Page 44: ...dit mode user can perform the following actions Change the color of selected object Change thickness of strokes and shapes Cut the selected object The cut object can be passed on the note page Select to paste ...

Page 45: ...e note page Past the cut or copy of the selected object Duplicate the selected object The duplicate object will paste on note screen immediately Delete the selected object Eraser To clear the handwriting or drawing on screen as required Clear large area Clear part by part ...

Page 46: ...the shape object on the note page Shape objects are included line square and round Move the dot to adjust thickness of the shape object Text Type the text on the note page Move the dot to adjust the font of the text ...

Page 47: ...37 Select the and enter the text and select OK ...

Page 48: ...r Change the color of pens Shape and text Select the pen shape or text function first then select to select the color If the color user wants don t list in color pattern select to define the color on your own ...

Page 49: ...connected camera or select an image from local or external USB pen drive Take picture Take pictures from connected camera Please make sure the camera is well connected and power on 1 Select and select Take picture 2 Select to take picture ...

Page 50: ...scard the taken picture select Select can adjust the flash display grid and time if camera support those function 4 After accepting the picture the screen will switch to edit mode Touch the picture can move picture around Select can back to whiteboard screen ...

Page 51: ... can go back to edit mode Cut the picture The cute image can be passed Select to paste Make a copy of picture Select can past the picture Past the cut or copy of the picture Duplicate the picture The duplicate picture will paste on the screen immediately Delete the selected part 5 In edit mode select can switch to whiteboard screen ...

Page 52: ...pictures from connected camera Please make sure the camera is well connected and power on 1 Select and select Choose image 2 Select the image from local or external USB pen drive Select to locate the image from other drive ...

Page 53: ...ave Select or can go back to edit mode Cut the picture The cute image can be passed Select to paste Make a copy of picture Select can past the picture Past the cut or copy of the picture Duplicate the picture The duplicate picture will paste on the screen immediately Delete the selected part 4 In edit mode select can switch to whiteboard screen ...

Page 54: ...44 Sub menu View Only Change to view only mode No action can be operated Select can back to normal mode ...

Page 55: ...45 Export Export the note page or all note pages to PDF PNG JPE file and share to specify path Select SHARE and select the type to share ...

Page 56: ...age Setting Change background note format note page size and color of note page Paste In edit mode user does the cut copy or duplicate and select Paste from sub menu list can be pasted the object on note page Help View the tutorial and FAQ ...

Page 57: ...47 Gallery In gallery user can take pictures by connected camera view screenshots pictures and share screenshots pictures to whiteboard Open gallery Select All Apps from main screen then select Gallery ...

Page 58: ...screenshots and camera folder Screenshot folder is the screenshots taken by press snapshot button on remote or by selecting from tool bar to capture the screen shot Camera folder is the pictures are taken by connected camera To view the images select the folder and select the image to view ...

Page 59: ...49 Select to open Sort by dialog to select sorting order ...

Page 60: ...elect to display image s file name Select to call out sub menu list In sub men user can hide the image exclude image temporarily show hidden image increase reduce column count and setup more detail of image ...

Page 61: ...51 The functions of image view screen are Rotate the image to right left or 180 Delete the image ...

Page 62: ...hiteboard through Bluetooth email LAN to share save the image to ES explorer file The following example is sharing the image to AVer Whiteboard 1 Select and select AVer Whiteboard 2 The image will display on whiteboard screen ...

Page 63: ...ll out sub men User can copy and move the image to other folder on the IFP save the image as wallpaper open the image by other app hide the image rename the image file name view the detail information of image display the image on the map ...

Page 64: ...images to view and edit For more detail on using gallery refer to Gallery section Also user can view snapshot images in ES file explorer select from tool bar to open or select All Apps ES file explorer In ES file explorer the screenshot images are saved at folder called Picture If the external USB pen drive has installed on AVer CP system then the screenshot is saved to external USB pen drive a fo...

Page 65: ...55 Using Browser User can opeate the browser same as on PC beside use the finger instead of the mouse Select the Browser to launch the browser app ...

Page 66: ...ase make sure the DocCam and the AVer CP system are at same local network The Sphere2 will auto search the available DocCam on your local network and list on screen 3 Select the DocCam device that wants to connect 4 Enter the Password of DocCam and select OK to confirm 5 And select Start to connect 6 How to use Sphere2 application please refer to user manual of Sphere2 ...

Page 67: ... WiFi dongle to the IFP system 2 Select the and select Network 3 Next select WiFi and turn on WiFi The AVer CP system will search the available WiFi connection on your local network Then select the available WiFi connection to connect ...

Page 68: ... Time Select on the tool bar to call out settings page In settings page select the automatic date time to adjust date and time to local time area Note The internet connection is required for auto date and time adjustment ...

Page 69: ...ng or press or button on the front panel to switch Touch the item on the screen to change the settings Picture Mode Select the picture mode and adjust the parameters Picture mode has Standard User PC Soft and Lightness modes Each mode can be adjusted the some value for user want The gray out item means it s not available for adjusting The item values can be adjusted ...

Page 70: ... be adjusted the some value for user want The gray out item means it s not available for adjusting Setting In Setting user can setup Menu Time how long the OSD menu display on screen MHL Auto Switch Auto Brightness HDMI EDID Version and Restore to Default The item values can be adjusted ...

Page 71: ...n without packing 1510 5mm x 926 5mm x 106 1mm depth Net weight gross weight 52 95kg 66 45kg Wall mounting holes 400mm H x 400mm W Installation method Through the wall mounting holes screw size M6 Working conditions 0 C 40 C RH 20 80 atmospheric pressure 86kPa 104kPa Storage conditions 10 C 60 C RH 10 60 atmospheric pressure 86kPa 104kPa AV video input 1 0 3Vp p RCA terminal AV audio input 500mV R...

Page 72: ...ut packing 1736 8mm x 1055 3mm x 109 5mm depth Net weight gross weight 61 95kg 79 1kg Wall mounting holes 400mm H x 600mm W Installation method Through the wall mounting holes screw size M8 Working conditions 0 C 40 C RH 20 80 atmospheric pressure 86kPa 104kPa Storage conditions 10 C 60 C RH 10 60 atmospheric pressure 86kPa 104kPa AV video input 1 0 3Vp p RCA terminal AV audio input 500mV RMS HDMI...

Page 73: ... Installation method Through the wall mounting holes screw size M8 Housing material Aluminum profile plastic Working conditions 0 C 40 C RH 20 80 atmospheric pressure 86kPa 104kPa Storage conditions 10 C 60 C RH 10 60 atmospheric pressure 86kPa 104kPa AV video input 1 0 3Vp p RCA terminal AV audio input 500mV RMS HDMI video input 480i 480P 576i 576P 720P 1080i 1080P 4K Intelligent operating system...

Page 74: ...p3 m4a RS 233 Command Table Baud Rate 38400 bps Data bits 8 bits Parity None Stop bits 1 bits Press menu button on remote controller 8 2 0 to enter factory menu Function Command Power off 69 76 20 Power on 69 53 43 Enter 69 07 8F MUTE 69 37 5F VOL 69 82 14 VOL 69 85 11 SOURCE 69 19 7D MENU 69 80 16 LEFT 69 63 33 RIGHT 69 66 30 DOWN 69 43 53 UP 69 46 50 LAN 69 34 62 AV1 89 55 0D 14 YCbCr 89 55 04 1...

Page 75: ...65 Function Command HDMI2 89 65 07 0A FREEZE 89 55 06 1B HDMI3 89 65 09 08 HDMI4 89 65 0B 06 OPS 89 65 0D 04 HDMI 89 65 0E 03 ...

Page 76: ... come off of the signal connection cable Check if the signal connection cable is loosened or comes off if so reconnect it Pictures shown on the PC are offset do not cover the entire screen go beyond the screen or are blurred 1 Improper adjustment 2 Wrong display mode 1 Use the auto adjustment function 2 Enter PC Screen Adjustment to adjust the horizontal or vertical position 3 Use the recommended ...

Page 77: ... share the same network 1 Upgrade your network bandwidth to a higher one 2 Try replacement with other VOD addresses to obtain better resources The product gets stuck crashes or cannot be operated 1 Too many programs are running 2 Normal operation of the product is disturbed by external environment e g lightning static electricity Disconnect the product from power supply wait for 1 2min and reconne...

Reviews: