background image


29 

A

A

n

n

n

n

o

o

t

t

a

a

t

t

i

i

o

o

n

n


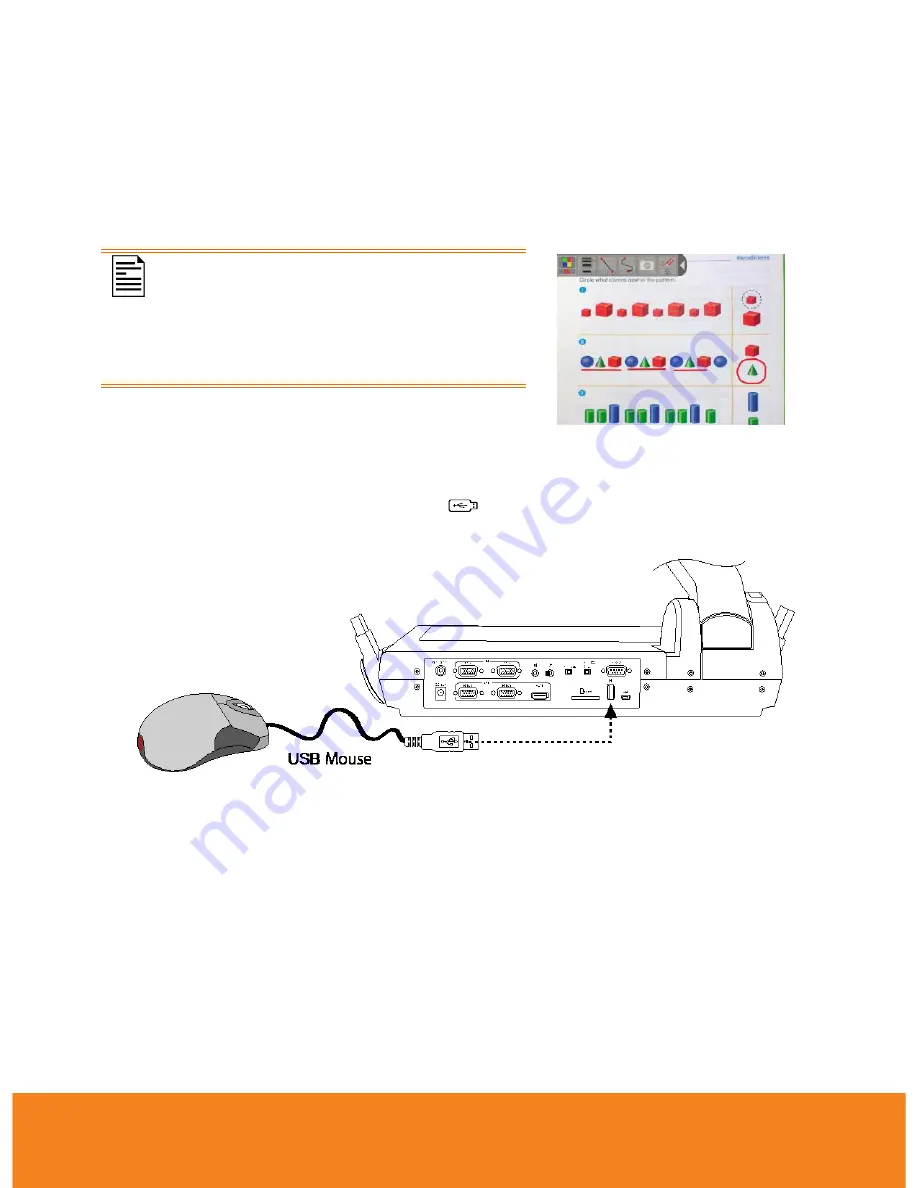
In single image playback mode or when the screen is frozen in camera mode, you can use 
the annotation feature to overlay straight line or freeform line on the captured image or still 
camera screen with the USB mouse connected to the USB port of AVerVision  PL50. It 
comes with the following selections: Color Palette, Line Thickness, Line, Freehand, 
Capture, Eraser, and Hide/Show icons.  


Annotation can only be supported in the 
following resolution setting : 

-  1024 x 768 
-  1280 x 720 

1280 x 1024


Connecting a USB mouse 

1.  Set the USB switch on the rear panel to 

2.  Connect the USB mouse cable to the USB slot of AVerVision PL50. 


Summary of Contents for AVerVision PL50

Page 1: ...AVerVision PL50 User Manual ...

Page 2: ...d in its sale but the follow ing w arning shall be included in the instructions for use Warning This is a class A product In a domestic environment this product may cause radio interference in w hich case the user may be required to take adequate measures COPYRIGHT 2015 AVer Information Inc All rights reserved All rights of this object belong to AVer Information Inc Reproduced or transmitted in an...

Page 3: ... they are not in use for long period of time Battery leakage and corrosion can damage the remote control dispose batteries safely Do not mix and use old and new batteries Do not mix and use different types of batteries alkaline standar d carbon zinc or rechargeable nickel cadmium Do not dispose batteries in a f ire Do not attempt to short circuit the battery terminals 警告使用者 這是甲類的資訊產品 在居住的環境中使用時 可能...

Page 4: ...nect to a Computer 10 Connect to a Computer via USB 11 Connect an External Microphone 11 Connect an Amplified Speaker 12 Connect to a Microscope 12 Setting Up AVerVision PL50 14 Camera Head 14 Mechanical Arm 14 Unfold the Side Lights 15 Infrared Sensor 15 Light Box 16 Handling the AVerVision PL50 16 Anti glare Sheet 17 External Memory Storage 17 I In ns s e er rt t a an n S SD D C Ca ar rd d 17 I ...

Page 5: ...rage 25 Format 25 USB to PC 26 Flicker 26 System 26 Language 26 Output Display 26 Backup 27 Save Setting 27 Recall Setting 27 Information 27 Default 27 Playback 28 Slide Show 28 Interval 28 Slide Show Effect 28 Current Storage 28 Delete All 28 Annotation 29 Connecting a USB mouse 29 Using the Annotation Control Panel 30 Transfer Captured Images Videos to a computer 31 Technical Specifications 31 I...

Page 6: ...nsion 32 External Storage 32 RS 232 Diagram Connection 32 RS 232 Cable Specifications 33 RS 232 Transmission Specifications 33 RS 232 Communication Format 33 RS 232 Send Command Table 33 RS 232 Get Command Table 39 Troubleshooting 40 Limited Warranty 42 ...

Page 7: ... vary depending on the standard pow er outlet of the country w here it is sold DUST COVER Dust Cover Remote Control batteries included O Op pt ti io on na al l A Ac cc ce es ss so or ri ie es s Microscope Adapter 28mm 34mm Rubber Coupler are included Anti glare Sheet Softw are Manual CD For User Manual and Softw are please visit the link below http averusa com classroom technology support ...

Page 8: ...e RS 232 for serialcommunication betw een computer and AVerVision PL50 USB standard for USB flash drive mouse connection Mini USB for computer data transfer or USB camera connection TV RGB display output sw itch USB Flash Drive PC sw itch 4 Side Lights Provide light w hen presenting in dimmed lighting condition 5 Light box Provide light for viewing x ray filmor transparency 6 Arm latch Extend and ...

Page 9: ...udio video recording directly to a USB flash drive and right w hen connecting AVerVision PL50 to a computer using a USB cable 7 RS 232 Connect to the computer serialport or to any controlpanel or for centralized controlif desire 8 DC12V port Connect the pow er adapter into this port 9 RGB 1 RGB 2 Connect the AVerVision PL50 to any display device w ith RGB cable 10 HDMI OUTPUT Connect the AVerVisio...

Page 10: ...he image magnification in camera and picture playbackmode 8 MENU Open and exit the OSD menu 9 Pan and zoom in image above digital zoom level in both live and playbackmode Select options in OSD menu Use to increase and decrease the video playbackvolume Use to play the video backw ard and forward Move the Spotlight frame and Visor screen cover 10 ENTER ZOOM 1X Make a selection in Playback mode and O...

Page 11: ...ode press this button again to stop 5 VISOR Call the Visor submenu Visor covers part of the presentation screen and allow presenter to revealthe material as desire In the Visor submenu the follow ing options are available ON OFF select to run cancelthe Visor Press to move to the next selection Shade set the opacity level of the covered area The shaded area w ill completely turns black w hen it is ...

Page 12: ...captured picture video fromthe memory in 16 thumbnail images 13 PC 1 2 PC mode displays the video signal from the RGB INPUT port of AVerVision PL50 14 FREEZE STOP Freeze live images Stop video playback 15 SPOTLIGHT Call the Spotlight submenu Spotlight overlays a box frame on the presentation screen You can adjust the box size and move it around In the Spotlight submenu the follow ing options are a...

Page 13: ...fromthe camera Graphics adjust the gradient of image View ing the subject from32 36 cm 16X zoom aw ay fromthe camera Motion increase frame rate Sufficient lighting is required w hen using this mode View ing the subject from32 36 cm 16X zoom aw ay fromthe camera Microscope automatically adjust optical zoom for microscopic viewing Macro set to view when object is only 10 32cm 5X zoom aw ay fromthe c...

Page 14: ...et tt ti in ng g The TV RGB switch determines the displayoutput selection Switch it to RGB right to output signal using RGB HDMI connection and TV left to outputsignal using RCA connection see fig 1 2 5 Switch AVerVision Port Display Device Port RGB RGB 1 2 OUTPUT To RGB INPUT HDMI OUTPUT HDMI INPUT TV VIDEO OUT VIDEO IN C Co on nn ne ec ct t t to o a a M Mo on ni it to or r o or r L LC CD D D DL ...

Page 15: ... ce e Locate the HDMI input port of the display device and connect it to HDMI OUTPUT port of AVerVision PL50 Make sure the TV RGB switch is setto RGB HDMI monitor HDMI cable C Co on nn ne ec ct t t to o a a T T V V Locate the VIDEO or SCART RGB if applicable inputportof the TV or Video equipment i e VCR to record your presentation and connectitto VIDEO OUT port ...

Page 16: ...u ut te er r Locate the RGB VGA output port of the computer or laptop and connect it to RGB INPUT port of AVerVision PL50 The video signal from the RGB INPUT port is streamed to RGB OUTPUT port To displaycomputer image press PC1 PC2 button on the control panel or remote control to switch AVerVision PL50 to computer mode For laptop to outputdisplayimage use the keyboard command FN F5 F8 to switch b...

Page 17: ...captured pictures videos from the memoryand to computer Also see Transfer File from AVerVision PL50 to PC Make sure the USB Flash Drive switch see fig 1 2 6 is setto the right C Co on nn ne ec ct t a an n E E x xt te er r n na al l M Mi ic cr ro op ph ho on ne e Plug a 3 5mm mono microphone to port The built in microphone on the control panel will be disabled when an external microphone is connect...

Page 18: ...stthe volume down on the remote to prevent hearing damage due to loudness C Co on nn ne ec ct t t to o a a M Mi ic cr ro os sc co op pe e Connectthe AVerVision PL50 to a microscope enables you to examine microscopic objects on a big screen 1 Change the image displaymode to Microscope Press MENU select IMAGE tab select MODE select microscope and press 2 Aim the camera head at the farthest pointand ...

Page 19: ...th the rubber coupler inserted Fasten the 3 bolts until the adapter secures the eyepiece For the eyepiece we suggestusing 15 5mm eye reliefor higher 7 Attach the microscope adapter to the AVerVision camera head Then connectit to the AVerVision and microscope For easy connection and adjustment unlock the base latch to adjustthe arm angle and arm latch to adjustthe arm length Microscope eyepiece Mic...

Page 20: ... can turn freely at 180 to the left and right and 235 up and down 90 145 180 If the camera head is in uprightposition you can also press ROTATE on the remote control twice to rotate the image in 180 M Me ec ch ha an ni ic ca al l A Ar r m m The mechanical arm design can extend for a full A4 paper viewing Press the arm latch to extend the arm length and the base latch to fold and unfold the arm Arm...

Page 21: ... Li ig gh ht ts s Simplyfollow the illustration below to unfold the side lights Press LAMP on the control panel to turn on the side lights I In nf fr ra ar re ed d S S e en ns so or r Aim the remote control at the infrared sensor to operate the unit ...

Page 22: ...use marker that could stain the lightbox surface DO NOT use any sharp objectsuch as cutter knife on top of the lightbox surface 8Kg H Ha an nd dl li in ng g t th he e A AV Ve er rV Vi is si io on n P P L L5 50 0 The AVerVision PL50 mustbe folded in storage position and use two hands to carry it from the base DO NOT carry the unit from the side lights or camera head arm This may not be able support...

Page 23: ...o video recordings AVerVision PL50 can detect when there is an external storage media and automaticallyswitch to the lastdetected storage If no external storage is connected all captured still images will be saved in the built in memory I In ns se er rt t a an n S SD D C Ca ar rd d Insertthe card with the contact facing down until it reaches the end To remove the card push to ejectand pull the car...

Page 24: ...TTING and SYSTEM In Playback mode you can access PLAYBACK OSD menu to enable the Slide Show feature and modify Slide Show interval and transition setting ifdesire For TV output the RESOLUTION will be disabled in SETTING menu list IMAGE PRESENTATION SETTING SYSTEM PLAYBACK ANNOTATION ...

Page 25: ...ess and to choose a selection in the menu list 4 Press to make a selection 5 Use and to adjustthe setting or make a selection 6 Press to enter submenu 7 Press MENU to close the OSD menu I Im ma ag ge e Menu Screen Function Brightness Adjust brightness level manuallybetween 0 and 63 Contrast Adjust the contrastlevel manuallybetween 0 and 255 under brightand dark environments ...

Page 26: ...n increase frame rate Sufficient lighting is required when using this mode Viewing the subjectfrom 32 36 cm 16X zoom away from the camera Microscope automaticallyadjustoptical zoom for microscopic viewing Macro set to view when object is only 10 32cm 5X zoom away from the camera Infinite set to view when subjectis from 36 cm to infinity Max 16X and further away from the camera Effect Convert the i...

Page 27: ... Select the exposure setting AUTO automaticallyadjustthe camera exposure and the amountof lightrequired MANUAL manuallyadjustthe exposure level The exposure can be adjusted up to 99 White Balance Select the White Balance setting for various light conditions or color temperature AUTO automaticallyadjustthe white balance MANUAL manuallyadjustthe red and blue color level The color level can be adjust...

Page 28: ...y level of the area outside the box The shaded area will completelyturns black when it is set to level 100 Press to move to the next selection Color selectthe Spotlightframe color Press to move to the next selection OK press for the setting to take effect If you selectON the frame will appear and blink use the buttons to adjustthe frame size and press to set the desired size and OFF will close the...

Page 29: ...exposed Use the buttons to reveal more of the covered area and OFF will close the submenu PIP Select the thumbnail playback screen location and show the thumbnail playback screen atthe corner of the screen to recall the captured image from the memoryin Camera mode SelectOFF to cancel PIP Lower Left Upper Left Upper Right Lower Right Split Screen Divide the screen into two parts Half of the screen ...

Page 30: ...ontinue S S e et tt ti in ng g Menu Screen Function Capture Select to setthe capture resolution quality type and interval settings Resolution Select the capture size In 5M setting the capture resolution size is 2560 X 1920 If the output displaysetting is in 1280 x 720 or 1920 x1080 the capture resolution size will be 2560 x 1440 and as for 1280 x 800 output displaythe capture size will be 2560 x 1...

Page 31: ... Interval Set the time interval for continuous capture The length can be set up to 600 sec 10 min Recording Select the video recording compression setting Storage Change the storage location Audio video recording can only be saved in SD memorycard or USB flash drive Format Formatto delete all the data in the selected memory ...

Page 32: ...till image Storage transfer the captured pictures videos from the memoryto computer hard disk Flicker Select between 50Hz or 60Hz Some displaydevices cannothandle high refresh rates The image will flicker a couple of times as the output is switched to another refresh rate S S y ys st te em m Menu Screen Function Language Change and selectdifferentlanguage Output Display Set the resolution to displ...

Page 33: ...elected profile number Only brightness contrast image mode effect auto image setting flicker recording quality capture resolution and capture quality can be saved Recall Setting Restore the setting back to the selected profile number Information Displaythe productinformation Default Restore all the settings into original factory default setting ...

Page 34: ...he next picture The length can be set up to 100 sec Slide Show Effect Select the slide show transition effect Slide image Wipe right Checker down Split Vertical Out Wipe down Split Horizontal Out Current Storage Select the source ofthe images Delete All Permanentlydelete all the data in selected memory source A Warning Message will appear SelectYES to continue and NO to stop formatting the storage...

Page 35: ...ra screen with the USB mouse connected to the USB port of AVerVision PL50 It comes with the following selections Color Palette Line Thickness Line Freehand Capture Eraser and Hide Show icons Annotation can only be supported in the following resolution setting 1024 x 768 1280 x 720 1280 x 1024 Connecting a USB mouse 1 Set the USB switch on the rear panel to 2 Connectthe USB mouse cable to the USB s...

Page 36: ...electthe features you want to use Name Function Color Palette Select the line color Line Thickness Select the thickness ofthe line Line Select to draw a straightline Freehand Select to draw freeform line Capture Capture the image with the annotation and save it as a new file Eraser Select to erase any part of the annotation that it comes in contact with or delete all annotation Hide Show Shrink or...

Page 37: ...s the new removable disk You can now transfer the captured image s from the AVerVision PL50 built in memory to the computer hard disk T Te ec ch hn ni ic ca al l S S p pe ec ci if fi ic ca at ti io on ns s Image Sensor 1 3 2 CMOS Pixel Count 5 megapixels Frame Rate 30 fps max White Balance Auto Manual Exposure Auto Manual Image mode Sharp Graphics Motion Microscope Macro Infinite Effect Color B W ...

Page 38: ...ow er Jack MIC Phone Jack Speaker Phone Jack Dimension Operating 630mm x 510mm x 505mm 2mm include rubber foot Folded 470mm x 510mm x 165mm 2mm include rubber foot Weight 6 5 kg about 14 3300 lbs External Storage Secure Digital SD Max 32GB FAT USB Flash Drive Max 64GB FAT R RS S 2 23 32 2 D Di ia ag gr ra am m C Co on nn ne ec ct ti io on n AVerVision PL50 can be controlled using a computer or any...

Page 39: ...the Command Table for reference Data Code 2 Byte See the Command Table for reference Data Code 3 Byte See the Command Table for reference Receive Device Code 1 Byte 0x53 CheckSum Code 1 Byte See the Command Table for reference Format Start Type DataLength Data CheckSum Example 0x52 0x0B 0x03 0x01 0x00 0x00 0x53 0x5A Command Power Off R RS S 2 23 32 2 S S e en nd d C Co om mm ma an nd d T Ta ab bl ...

Page 40: ... CAPTURE 0x07 0x01 0x00 0x5d TIMER START 0x08 0x00 0x00 0x53 TIMER P AUSE 0x08 0x01 0x00 0x52 TIMER STOP 0x08 0x02 0x00 0x51 TIMER SET TIME 0x08 0x03 VALUE 1 120 1 PREVIEW MODE SHARP 0x0A 0x00 0x00 0x51 PREVIEW MODE GRAPHICS 0x0A 0x01 0x00 0x50 PREVIEW MODE MOTION 0x0A 0x02 0x00 0x53 PREVIEW MODE MICROSCOPE 0x0A 0x03 0x00 0x52 PREVIEW MODE MACRO 0x0A 0x04 0x00 0x55 PREVIEW MODE INFINITE 0x0A 0x05 ...

Page 41: ...00 0x49 EXPOSURE MANUAL INCREASE 0x14 0x00 0x00 0x4f EXPOSURE MANUAL DECREASE 0x14 0x01 0x00 0x4e WHITE BALANCE AUTO 0x15 0x00 0x00 0x4e WHITE BALANCE MANUAL 0x15 0x01 0x00 0x4f WHITE BALANCE BLUE INCREASE 0x16 0x00 0x00 0x4d WHITE BALANCE BLUE DECREASE 0x16 0x01 0x00 0x4c WHITE BALANCE RED INCREASE 0x17 0x00 0x00 0x4c WHITE BALANCE RED DECREASE 0x17 0x01 0x00 0x4d FLICKER 50Hz 0x18 0x00 0x00 0x43...

Page 42: ...00 0x79 PIP POSITION BOTTOM RIGHT 0x20 0x03 0x00 0x78 SPLITSCREEN OFF 0x21 0x00 0x00 0x7a SPLITSCREEN ON 0x21 0x01 0x00 0x7b SPLITSCREEN DIR UPPER SCREEN 0x22 0x00 0x00 0x79 SPLITSCREEN DIR LOWER SCREEN 0x22 0x01 0x00 0x78 SPLITSCREEN DIR LEFT SCREEN 0x22 0x02 0x00 0x7b SPLITSCREEN DIR RIGHT SCREEN 0x22 0x03 0x00 0x7a RECORD OFF 0x23 0x00 0x00 0x78 RECORD ON 0x23 0x01 0x00 0x79 MOVIE FAST REWIND 0...

Page 43: ...CONNECT MASS STORAGE 0x30 0x01 0x00 0x6a BACKUP TO SD CARD 0x31 0x00 0x00 0x6a BACKUP TO THUMBDRIVE 0x31 0x01 0x00 0x6b PROFILE SAVE PROFILE 1 0x32 0x00 0x00 0x69 PROFILE SAVE PROFILE 2 0x32 0x01 0x00 0x68 PROFILE SAVE PROFILE 3 0x32 0x02 0x00 0x6b PROFILE RECALL PROFILE 1 0x33 0x00 0x00 0x68 PROFILE RECALL PROFILE 2 0x33 0x01 0x00 0x69 PROFILE RECALL PROFILE 3 0x33 0x02 0x00 0x6a SLIDESHOW OFF 0x...

Page 44: ...x41 0x00 0x00 0x1a ARROW DOWN 0x42 0x00 0x00 0x19 ARROW UP 0x42 0x01 0x00 0x18 ARROW LEFT 0x42 0x02 0x00 0x1b ARROW RIGHT 0x42 0x03 0x00 0x1a ENTER 0x43 0x00 0x00 0x18 FREEZE 0x44 0x00 0x00 0x1f DEFAULT 0x45 0x00 0x00 0x1e ZOOM 0x46 0x00 0x00 0x1d ZOOM 0x46 0x01 0x00 0x1c ZOOM RESET 0x47 0x00 0x00 0x1c NEAR 0x48 0x00 0x00 0x13 FAR 0x48 0x01 0x00 0x12 LAMP OFF 0x49 0x00 0x00 0x12 LAMP ON 0x49 0x01 ...

Page 45: ...de ReData 0 RED VALUE 0x02 0x5A VALUE 0 255 BLUE VALUE 0x03 0x5B VALUE 0 255 POWER STATUS 0x04 0x5C 0 OFF 1 ON LAMP STATUS 0x05 0x5D 0 OFF 1 ON DISPLAY STATUS 0x06 0x5E 0 CAMERA MODE 1 PLAYBACK MODE 2 PC 1 P ASS THROUGH 3 PC 2 P ASS THROUGH VIDEO OUTPUT STATUS 0x07 0x5F 0 VGA 1 TV FREEZE STATUS 0x08 0x50 0 OFF 1 ON BRIGHTNESS VALUE 0x0A 0x52 VALUE 0 63 CONTRAST VALUE 0x0B 0x53 VALUE 0 255 LIGHT BO...

Page 46: ...TV RGB dip sw itch to TV The picture on the presentation screenis distorted or the image is blurry 1 Reset all changed settings if any to the original manufacturer default setting Press DEFAULT on the remote or select Default in Basic tab OSD menu 2 Use the Brightness and Contrast menu functions to reduce the distortion if applicable 3 If you discover that the image is blurry or out of focus press...

Page 47: ...B flash drive sw itch is set to the left and checkif the USB flash drive is properly inserted The recordedvideo on MAC with the bundled software doesn t have sound Due to some limitation w e recommend recording the audio directly fromthe MAC MIC IN port for better audio quality ...

Page 48: ...riginal Warranty Period or b thirty 30 days from the date of delivery of the repaired or replaced product Limitations of Warranty AVer makes no w arranties to any third party You are responsible for all claims damages settlements expenses and attorneys fees with respect to claims made against You as a result of Your use or misuse of the Product This w arranty applies only if the Product is install...

Page 49: ...g Law and Your Rights This w arrantygives you specific legal rights You may also have other rights granted under state law These rights vary fromstate to state For warranty period please refer to the warranty card ...

Reviews: