background image


English-1 

Quick Guide


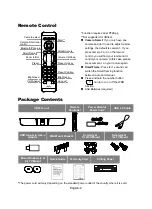
SmartFrame and Audio Tracking Functions via 
Remote Control? 


Manual frame:

 Press 

  button for 0.5sec and 

  will pop up on the top left corner of 

the image screen. It takes 3~5 sec to zoom to include all users to fit in the screen. 


Auto framing: 

Press and hold 

  button for1~2sec to switch to auto framing mode and 

  will pop up on the bottom of the image screen. The camera will automatically 

detect all faces present and keep stable until people touch the sides of the screen to trigger the 
face detection again.   


Audio Tracking:

 Press and hold 

  button for 1~2sec. Audio tracking mechanically moves 

camera and then zoom the single speaker face. You will see the movement around the room from 
the image screen.   


Audio Frame: 

Press and hold 

  button for1~2sec. Audio framing detects the speaker and 

zoom in his/her face. The camera will be fixed in the central position and uses ePTZ to track the 
speaker and zoom in without seeing the movement.   


Audio Preset


Tracking

: Press and hold 

  for 1~2sec. Camera will pan to speaker based on 

preset points. Please complete the preset points before entering any tracking mode. Ex: Set up 
presets in “Manual Frame” or “Tracking off” mode.   


OFF:

 Press and hold 

  or 1~2sec to Enable or Disable all tracking functions. Need to enable 

before selecting any ‘SmartFrame or Audio tracking mode’ 

[Note] 

Side facial profiles are not detectable.


Summary of Contents for 61U8D00000AF

Page 1: ...VB342 Conference Camera Quick Guide 簡易使用手冊 简易使用手册 Guía rápida Guide rapide Краткое руководство ...

Page 2: ......

Page 3: ...English 1 繁體中文 6 简体中文 13 Español 19 Français 26 Pусский 33 ...

Page 4: ......

Page 5: ...o tracking mechanically moves camera and then zoom the single speaker face You will see the movement around the room from the image screen Audio Frame Press and hold button for1 2sec Audio framing detects the speaker and zoom in his her face The camera will be fixed in the central position and uses ePTZ to track the speaker and zoom in without seeing the movement Audio Preset Tracking Press and ho...

Page 6: ...d your remote can t control your camera In this case please press camera 1 on your remote again SmartFrame Press for 1 second can switch the Smart framing function between auto and manual Press and hold the number button can turn on or off the WDR function AAA Batteries required Package Contents VB342 unit Remote Controller Power Adaptor Power Cord USB 3 0 Cable USB type A to type c adapter Wall M...

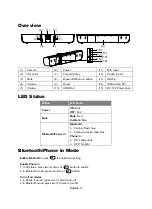
Page 7: ...LED Status Power ON Blue OFF Red Mute Mute Red Un Mute Blue Bluetooth Phone in Bluetooth Pairing Flash blue Pairing success solid blue Phone in ON solid purple OFF No light Bluetooth Phone in Mode Enable Bluetooth press to enable and pairing Enable Phone in 1 In off status press two 2 times of button to enable 2 In Bluetooth mode press one time of button Turn off all modes 1 In Phone in mode press...

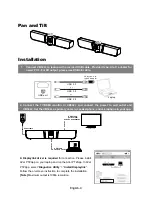
Page 8: ...MI monitor to VB342 and connect the power to wall outlet and VB342 Set the VB342 as primary camera speakerphone and microphone in your app USB cable TV Monitor HDMI cable not inculded Power cable A Displaylink driver is required for connection Please install AVer PTZApp on your laptop and run the AVer PTZApp In AVer PTZApp select Diagnotics Utility Install Displaylink Follow the on screen instruct...

Page 9: ...re is no guarantee that interference will not occur in a particular installation If this equipment does cause harmful interference to radio or television reception which can be determined by turning the equipment off and on the user is encouraged to try to correct the interference by one of the following measures Reorient or relocate the receiving antenna Increase the separation between the equipm...

Page 10: ......

Page 11: ...於螢幕上 攝影機會自動偵測所有與會者的臉部並保持穩定 直到與會者觸摸屏幕兩側以再次觸發 臉部檢測為止 追蹤發言者 按 鍵約 1 2 秒 攝影機鏡頭會跟著單一說話者轉動鏡頭來跟蹤 你可看到房間 內移動場景於螢幕上 自動對焦發言者 按 鍵約 1 2 秒 攝影機鏡頭不動 當偵測到說話者說話持續超過 3 秒鐘 則畫面會瞬間切到說話者畫面並拉近 預設點發言追蹤 按 鍵約 1 2 秒 攝影機偵測到說話者並轉動鏡頭到預設的預設點位置 建 議於多人發言者時使用 在啟動此功能請先設定預設點位置 請在 手動智能圖框 或 關閉 模 式下 進行預設點設定 關閉 按 鍵約 1 2 秒可啟動或關閉追蹤功能 在選擇任何智能圖框和追蹤發言功能前 需先 啟動 註 側臉無法被攝影機偵測到 ...

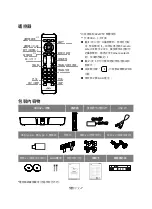
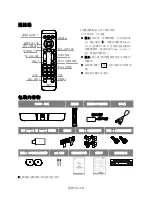
Page 12: ...ra select 1 鈕 恢復到預設的 1 註 2 按 1 秒可切換智慧對焦為手動或自 動模式 長按數字鍵 可啟動或關閉 WDR 功能 需安裝 2 顆 AAA 電池 包裝內容物 VB342 本機 遙控器 變壓器 和電源線 USB 線 USB type A 轉 type C 轉接器 壁掛架 螺絲 x 4 壁掛使用 螺絲 x 2 電視架使用 膠墊 x 2 電視支架使用 AAA 電池 簡易安裝手冊 保固卡 壁掛鑽孔紙 P N 303AU320 AGH 電源插頭會隨國家 地區規定而不同 攝影機選擇 攝影機方向鍵 藍牙 音源輸入 智慧對焦 縮小 放大 預設點 撥打 接聽 確認 靜音 非靜音 音量調整 預設點位置快捷鍵 掛斷 註1 預設點位置 亮度 亮度 註2 ...

Page 13: ... 藍牙 音源輸入切換鍵 13 RS232 埠 4 音量 鍵 9 重新開機鈕 14 USB 埠 連接電腦 5 音量 鍵 10 HDMI 輸出埠 15 DC 12V 電源孔 LED 燈號狀態 按鍵 LED 狀態 電源 開啟 藍色 關閉 紅色 靜音 靜音 紅色 非靜音 藍色 藍牙 音源輸入 藍牙 配對 藍燈閃爍 配對成功 藍燈恆亮 音源輸入 開啟 紫色恆亮 關閉 無燈號顯示 藍牙 音源輸入模式 啟動藍牙 按 鍵啟動並開始配對 關閉藍牙和音源輸入功能 啟動音源輸入功能 1 在藍牙模式關閉時 連按 2 次 鍵 2 在藍牙模式啟動時 按 1 次 鍵 1 在音源輸入模式時 連按 1 次 鍵 2 在藍牙模式時 連按 2 次 鍵 ...

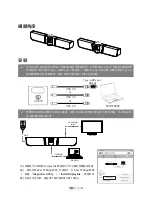
Page 14: ...接 Type A 端的線 將轉接器的 Type C 端與電腦 筆記型電腦連接 要有 4K 輸出請使用 USB 3 0 連接線 筆記型電腦 USB 2 0 USB 3 0 USB 3 0 Type A轉Type C 轉接器 或 USB埠 或 2 將電視或 HDMI 螢幕與 VB342 連接 並將 VB342 電源連接到牆上的電源插座 將 VB342 設 為主要視訊和音效設備 如上圖連接方式需安裝 Displaylink 驅動程式於你的筆記型電腦或是電 腦上 請先安裝 AVer PTZApp 軟體 然後執行 在 AVer PTZApp 軟體 上 點選 Diagnotics Utility Install Displaylink 請遵照螢 幕上的指示完成安裝 註 最大輸出解析度可達 1080p ...

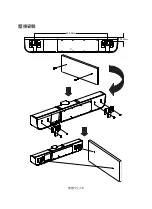
Page 15: ...繁體中文 10 壁掛安裝 500 0mm 28 5mm ...

Page 16: ...手冊 步驟 3 進行視訊會議撥打 建議安裝 AVer PTZApp 可獲得更佳的使用體驗 請造訪 http tw aver com 服務支援 下載中心 下載下載安裝 版 權 宣 告 2020 圓展科技 版權所有 遙 控 器 電 池 安 全 資 訊 請將電池存放在涼爽與乾燥的位置 不要將電量用盡的電池棄置在家庭廢棄物中 請將電池棄置在特定回收處 或送回原購買的商 店 如果長時間不使用電池 請將其取出 電池漏液與腐蟲可能會損壞遙控器 請以安全方式棄置 電池 不可混用新舊電池 不可混用不同類型的電池 鹼性 標準 碳鋅 或可充電 鎳鎘 電池 不可將電池棄置於火源中 請勿嘗試讓電池端子短路 資訊 常見問題 技術協助 軟體和使用手冊下載 請到網址 http tw aver com 連絡資訊 圓展科技 www aver com 新北市土城區大安路 157 號 8 樓 電話 02 2269 8535 ...

Page 17: ...eeds the reference percentage value of presence condition 備考 2 係指該項限用物質之百分比含量未超出百分比含量基準值 Note 2 indicates that the percentage content of the restricted substance does not exceed the percentage of reference value of presence 備考 3 係指該項限用物質為排除項目 Note 3 The indicates that the restricted substance corresponds to the exemption 低功率電波輻射性電機管理辦法 第十二條 經型式認證合格之低功率射頻電機 非經許可 公司 商號或使用者均不得擅自變更頻率 加 大功率或變更原設計之特性及功能...

Page 18: ......

Page 19: ... 于屏幕上 摄影机会自动侦测所有与会者的脸部并保持稳定 直到与会者触摸屏幕两侧以再次触发 脸部检测为止 追踪发言者 按 键约 1 2 秒 摄影机镜头会跟着单一说话者转动镜头来跟踪 你可看到房间 内移动场景于屏幕上 自动对焦发言者 按 键约 1 2 秒 摄影机镜头不动 当侦测到说话者说话持续超过 3 秒钟 则画面会瞬间切到说话者画面并拉近 预设点发言追踪 按 键约 1 2 秒 摄影机侦测到说话者并转动镜头到默认的默认点位置 建 议于多人发言者时使用 在启动此功能请先设定默认点位置 请在 手动智能图框 或 关闭 模 式下 进行默认点设定 关闭 按 键约 1 2 秒可启动或关闭追踪功能 在选择任何智能图框和追踪发言功能前 需先 启动 注 侧脸无法被摄影机侦测到 ...

Page 20: ...elect 1 钮 恢复到预设的 1 注 2 按 1 秒可切换智能对焦为手动或自 动模式 长按数字键 可启动或关闭 WDR 功 能 需安装 2 颗 AAA 电池 包裝內容物 VB342 本机 遥控器 变压器 和电源线 USB 线 USB type A 转 type C 转接器 壁挂架 螺丝 x 4 壁挂使用 螺丝 x 2 电视架使用 胶垫 x 2 电视支架使用 AAA 电池 简易安装手册 保固卡 壁挂钻孔纸 P N 303AU320 AGH 电源插头会随国家 地区规定而不同 摄像机选择键 摄橡机箭头键 蓝牙 音源输入 智慧對焦 缩小 放大键 预设点 拨打 接听 确认键 静音 非静音键 音量调整键 默认点位置快捷键 挂断键 注1 默认点位置键 亮度 亮度 注2 ...

Page 21: ... 蓝牙 音源输入切换键 13 RS232 埠 4 音量 键 9 重新启动钮 14 USB端口 连接计算机 5 音量 键 10 HDMI 输出埠 15 DC 12V 电源孔 LED 灯号状态 按键 LED 状态 电源 开启 蓝色 关闭 红色 静音 静音 红色 非静音 蓝色 蓝牙 音源输入 蓝牙 配对 蓝灯闪烁 配对成功 蓝灯恒亮 音源输入 开启 紫色恒亮 关闭 无灯号显示 蓝牙 音源输入模式 启动蓝牙 按 键启动并开始配对 关闭蓝牙和音源输入功能 1 在音源输入模式时 连按 1 次 键 2 在蓝牙模式时 连按 2 次 键 启动音源输入功能 1 在蓝牙模式关闭时 连按 2 次 键 2 在蓝牙模式启动时 按 1 次 键 ...

Page 22: ... 要有 4K 输出请使用 USB 3 0 连接线 笔记本电脑 USB 2 0 USB 3 0 USB 3 0 USB type A转 type C 转接器 或 USB端口 或 2 或 HDMI 屏幕与 VB342 连接 并将 VB342 电源连接到墙上的电源插座 将 VB342 设为主要视讯 和音效设备 如上图连接方式需安装 Displaylink 驱动程序于你的笔记本电脑或 是计算机上 请先安装 AVer PTZApp 软件 然后执行 在 AVer PTZApp 软件上 点选 Diagnotics Utility Install Displaylink 请遵照屏幕上的指示完成安装 注 最大输出分辨率可达 1080p USB连接线 电视 屏幕 HDMI连接线 选购 电源线 笔记本电脑 ...

Page 23: ...简体中文 17 壁挂安装 500 0mm 28 5mm ...

Page 24: ...p tw aver com 服务支持 下载中心 下 载下载安装 版 权 宣 告 2020 圆展科技 版权所有 连络信息 圆展科技 www aver com 新北市土城区大安路 157 号 8 楼 电话 886 02 2269 8535 遥 控 器 电 池 安 全 信 息 请将电池存放在凉爽与干燥的位置 不要将电量用尽的电池弃置在家庭废弃物中 请将电池弃置在特定回收处 或送回原购买的商 店 如果长时间不使用电池 请将其取出 电池漏液与腐虫可能会损坏遥控器 请以安全方式弃置 电池 不可混用新旧电池 不可混用不同类型的电池 碱性 标准 碳锌 或可充电 镍镉 电池 不可将电池弃置于火源中 请勿尝试让电池端子短路 若产品上标有打叉记号的滚轮垃圾桶 表示不得将产品与其他家用垃圾一同丢弃 请 将废弃的设备交由指定之废电机电子设备回收站处理 关于处理废弃设备之详细信息 请洽当地的家庭垃圾处理服务处或您购买...

Page 25: ...a mecánicamente y luego encuadrará la cara del ponente Verá el movimiento alrededor de la sala en la pantalla de la imagen Audio Frame Encuadre de audio mantenga pulsado el botón durante 1 2 segundos El encuadre de audio detectará al ponente y encuadrará su cara La cámara se fijará en la posición central y utilizará ePTZ para seguir al ponente y encuadrarlo sin que se vea el movimiento Audio Prese...

Page 26: ...ompatible con la unidad VB342 1 si solo dispone de una cámara y no necesita realizar ninguna configuración la cámara 1 es la cámara predeterminada Si pulsa los botones correspondientes a la cámara 2 o 3 en el mando a distancia el mando no podrá controlar la cámara En ese caso vuelva a pulsar el botón correspondiente a la cámara 1 en el mando 2 mantenga pulsado el botón durante un segundo para alte...

Page 27: ...la de perforación P N 303AU320 AGH El cable de alimentación variará en función de la toma de corriente estándar del país en el que se venda el producto Información general 1 2 2 3 4 7 5 8 6 9 10 11 12 13 14 15 1 Cámara 6 Alimentación 11 Entrada de micrófono 2 Sensor de infrarrojos 7 Botón de acceso rápido predefinido 12 Puerto de entrada de teléfono 3 Silenciar 8 Botón Bluetooth Entrada de teléfon...

Page 28: ...ono Activada púrpura fijo Desactivada ninguna luz Modo Bluetooth Entrada de teléfono Habilitar el Bluetooth pulse para habilitar y emparejar Habilitar la entrada de teléfono 1 En modo desactivado pulse dos 2 veces el botón para habilitarla 2 CEn el modo Bluetooth pulse una vez el botón Desactivar todos los modos 1 En el modo Entrada de teléfono pulse una 1 vez para desactivarlo 2 En el modo Blueto...

Page 29: ...la unidad VB342 y conecte la alimentación a la toma de pared y la unidad VB342 Establezca la unidad VB342 como la cámara el altavoz y el micrófono principales en su aplicación Cable USB TV Monitor Cable HDMI no incluido Cable de alimentación Portátil Se requiere un controlador Displaylink para la conexión Instale la aplicación AVer PTZApp en su portátil y ejecútela En AVer PTZApp seleccione Diagno...

Page 30: ...Español 24 Instalación del soporte mural 500 0mm 28 5mm ...

Page 31: ... en su aplicación consulte la guía de configuración de su aplicación para obtener más información Paso 3 ya puede realizar una videollamada Para configuraciones avanzadas y actualizaciones de firmware descargue AVer PTZApp en www aver com Información de contacto Global AVer Information Inc www aver com 8F No 157 Da An Rd Tucheng Dist New Taipei City Taiwan Sede europea AVer Information Europe B V ...

Page 32: ......

Page 33: ...a puis effectue un zoom sur le visage du parlant uniquement Vous verrez le mouvement dans la pièce depuis l écran d image Cadrage audio Appuyez sur le bouton et maintenez le enfoncé pendant 1 à 2 secondes Le cadrage audio détecte le parlant et fait un zoom sur son visage La caméra sera fixée en position centrale et utilise ePTZ pour suivre le parlant et zoomer sans voir le mouvement Suivi des prér...

Page 34: ...n prise en charge par la VB342 1 Si vous n avez qu une caméra et n avez rien à paramétrer la caméra par défaut est la caméra 1 Si vous appuyez sur caméra 2 ou 3 sur la télécommande celle ci ne commandera pas votre caméra Dans ce cas réappuyez sur caméra 1 sur la télécommande 2 En appuyant pendant 1 seconde vous faites basculer la fonction de cadrage intelligent entre les modes manuel et automatiqu...

Page 35: ...rantie Dessin de perçage P N 303AU320 AGH Le cordon d alimentation diffère entre les pays de vente selon le type de prises secteur qu ils utilisent Aperçu général 1 2 2 3 4 7 5 8 6 9 10 11 12 13 14 15 1 Caméra 6 Alimentation 11 Entrée MIC micro 2 Capteur IR 7 Touche de raccourci programmable 12 Port d entrée téléphone 3 Mise en silence mute 8 Bouton Bluetooth Entrée téléphone 13 RS232 4 Volume 9 B...

Page 36: ...téléphone Activée violet fixe Désactivée Éteinte Mode Bluetooth Entrée téléphone Activation Bluetooth appuyez sur pour activer et apparier Activation entrée téléphone 1 En état d arrêt appuyez deux 2 fois sur le bouton pour activer 2 En mode Bluetooth appuyez une fois sur le bouton Pour éteindre tous les modes 1 En mode d entrée téléphone appuyez une 1 fois pour éteindre 2 En mode Bluetooth appuye...

Page 37: ...moniteur ou la TV HDMI sur la VB342 et branchez l alimentation sur le secteur et sur la VB342 Dans l application définissez comme principaux la caméra VB342 son téléphone à haut parleur et son micro USB cable Câble USB Câble HDMI non fourni Câble d alimentation Ordinateur portable Cette connexion nécessite d un pilote Displaylink Installez l application AVer PTZApp sur votre ordinateur portable et...

Page 38: ...Français 31 Installation du support mural 500 0mm 28 5mm ...

Page 39: ...t son haut parleur consultez le guide de configuration de l application pour plus de détails Étape 3 Prêt à passer un appel vidéo Pour les paramètres avancés et la mise à jour du microprogramme allez à www aver com et téléchargez l application AVer PTZApp Coordonnées de contact Mondiales AVer Information Inc www aver com 8F No 157 Da An Rd Tucheng Dist New Taipei City Taïwan Siège européen AVer In...

Page 40: ......

Page 41: ...ние говорящего Вы увидите перемещение по комнате на экране изображения Аудиокадрирование Нажмите и удерживайте кнопку в течение 1 2 секунд Функция аудиокадрирования выполнит распознавание говорящего и увеличит изображение его лица Камера фиксируется в центральном положении и использует функцию ePTZ для отслеживания говорящего и увеличения его изображения без отображения движения камеры Отслеживани...

Page 42: ...ся только одна камера и вам не нужно выполнять какие либо настройки то по умолчанию используется камера 1 Если вы выберете камеру 2 или 3 на пульте ДУ то обнаружите что ваш пульт не может управлять вашей камерой В этом случае снова нажмите кнопку выбора камеры 1 на своем пульте ДУ 2 Нажмите и удерживайте кнопку в течение 1 секунды чтобы переключить функцию смарт кадрирования на автоматический или ...

Page 43: ...AAA Краткое руководство Гарантийн ый талон Схема расположения монтажных отверстий P N 303AU320 AGH Тип сетевого шнура зависит от стандарта розеток сети питания в стране продажи устройства Основные компоненты 1 2 2 3 4 7 5 8 6 9 10 11 12 13 14 15 1 Камера 6 Питание 11 Вход MIC 2 ИК датчик 7 Горячая клавиша настроек 12 Вход для наушников 3 Без звука 8 Кнопка Bluetooth Наушники 13 RS232 4 Громкость 9...

Page 44: ...ит фиолетовым Выкл Не горит Режим Bluetooth Наушники Включить Bluetooth нажмите кнопку чтобы включить и создать пару Включить Наушники В положении Выкл нажмите кнопку два раза чтобы включить наушники 2 В режиме Bluetooth нажмите кнопку один раз Выключить все режимы 1 Находясь в режиме подключения наушников нажмите кнопку один раз чтобы выключить все режимы 2 Находясь в режиме Bluetooth нажмите кно...

Page 45: ... 2 Подключите телевизор монитор с разъемом HDMI к камере VB342 после чего подключите камеру VB342 к сети питания Назначьте в своем приложении систему VB342 в качестве основной камеры микрофона и динамиков Кабель USB TV монитор Кабель с разъемом HDMI приобретается отдельно Кабель питания Ноутбук Для подключения к ПК требуется драйвер Displaylink Установите приложение AVer PTZApp на своем ноутбуке и...

Page 46: ...Pусский 38 Настенный монтаж 500 0mm 28 5mm ...

Page 47: ...качестве основных согласно описаниям в руководстве по настройке приложения Шаг 3 Все готово для выполнения видеовызова Для выполнения расширенных настроек и обновления прошивки загрузите приложение AVer PTZApp с сайта www aver com Контактная информация Весь мир AVer Informаtion Inc www aver com 8F No 157 Da An Rd Tucheng Dist New Taipei City Taiwan Европейская штаб квартира AVer Information Europe...

Page 48: ...P N 300AU320 ...
Reviews: