


www.avenview.com
Page 7
3.
PANEL DESCRIPTION
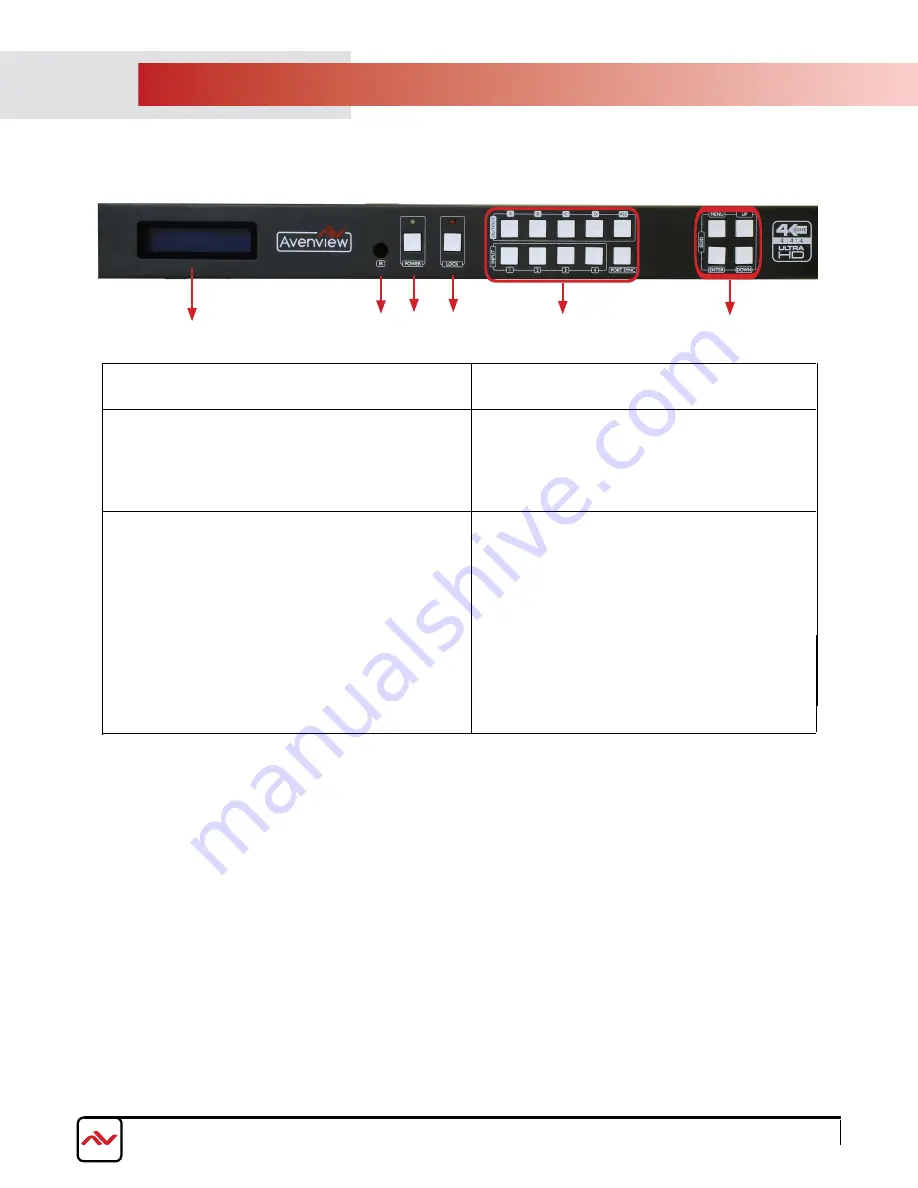
3.1 Front Panel
1.
IR Window:
Receives IR signals from the device
remote control (Included in package)
2.
Power Button:
Toggle ON/Off
first press power On , Second press Standby Mode.
Note : Quick Factory Reset
HOlD power button then connect power supply to
the unit.
3.
Lock
Button :
Shows the OSD Menu on the
screen
Menu with “-“ button :
switches the
output timing to 720@60Hz
Menu with “+“ button :
switches the output
timing to XGA (1024x768@60Hz)
4.
5.
Input IN 1- IN 4 /Output OUT1- OUT4:
Press
OUTPUT and INPUT buttons to select the output
corresponding input.
e.g: Press OUTPUT ALL > INPUT 1, The OUTPUT
A, B, C, D will be set to INPUT 1.
Press PTP button, The OUTPUT A, B, C, D will be
corresponding INPUT 1, 2, 3, 4
6.
EDID:
Smart EDID management, the LCM will display the
EDID operation.
Press the MENU button and enter the EDID
management window.
Press UP or DOWN button to select the needed
EDID setting.
Press ENTER button to download EDID into input
source, it can easily download any EDID setting to
any input port.
Check page
15
for more details
LCM:
Liquid Crystal Monitor displays
device status and selections
1
3
4
5
6
2
Summary of Contents for SW-HDM2-T4K-4X4
Page 9: ...www avenview com Page 6 2 3 APPLICATION DIAGRAM...
Page 19: ...www avenview com Notes...
Page 20: ...www avenview com Notes...


