background image


92

APPENDIX 2. – Default Text Insertion List 


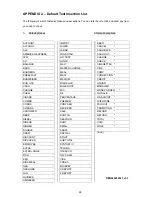
The following is a list of default phrases and exceptions. You can refer here to click and enter any item 

you need to check. 


A. 

Default phrases.                                                                                  B. Default exceptions 


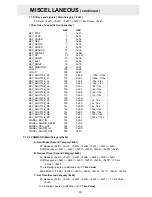
ACCOUNT 
ALCOHOL 
ALE 
AMERICAN EXPRESS 
ATM 
AX 
BALANCE 
BASS 
BOURBON 
BREAKFAST 
BUDWEISER 
BUD LITE 
CASH 
CHANGE 
CHEW 
CIGARS 
COMBO 
COORS 
CORONA 
CUSTOMER 
DEBIT 
DIESEL 
DINERS 
DINNER 
DOUBLE 
DRAFT 
DISCOUNT 
DISCOVER 
EMPLOYEE 
EXTRA 
EXTRA LARGE 
FISH 
KEG 
KIDS MEAL 
GAS 
GASOLINE 
GIN 
GUINESS 
HEINEKEN 

IMPORT 
LAGER 
LARGE 
LONE STAR 
LOTTERY 
LUNCH 
MALT 
MASTER CHARGE 
MEAL 
MEAT 
MEDIUM 
MICHELOB 
MILLER LITE 
M/C 
OIL 
PERCENTAGE 
PREMIUM 
PONY KEG 
RECEIVED 
SALE 
SCOTCH 
SEAFOOD 
SHOT 
SMALL 
SNUFF 
SPECIAL 
STOUT 
SUB TOTAL 
SYNTHETIC 
TEQUILA 
TOBACCO 
TOP SHELF 
VISA 
VODKA 
WHISKEY 
X REPORT 


Z REPORT 


BEER   * 
CANCEL  

CASH BACK 

CASH OUT 

CHARGE  

CHECK   * 
CIGARETTES * 
CIGS  * 
COMP   * 
CORRECTION * 
CREDIT  

LIQUOR  

MANAGER * 
MONEY ORDER 

NO SALE   

ON ACOUNT  * 
OVER RIDE 

PAID OUT  

PROMOTION * 
REFUND 

 *   

RETURN  

TOTAL                *   
VOID  * 
WINE                  * 
 
( End ) 


RMN040200323 v3.3

Summary of Contents for MVDR5000

Page 1: ...INSTALLATION OPERATION MANUAL Digital Video Recorder MV DR5000 AVE Before trying to connect or operate this product please read this manual completely ...

Page 2: ...own expense WARNING To reduce the risk of fire or electric shock do not expose this appliance to rain or moisture Do not block ventilation openings Do not place anything on top of the unit that might spill or fall into it Do not attempt to service this unit yourself as opening or removing covers may expose you to dangerous voltage or other hazards Please refer all servicing to qualified service pe...

Page 3: ... 22 3 5 Backup Operations 24 3 5 1 SD Card Backup Operations CD Rewritable unit Backup Operations 24 3 5 2 Backup the System settings 25 3 5 3 Updating System Software 25 3 6 Key Lock Operation 25 4 MENU SETUP 26 4 1 REC Setting 26 4 2 ALARM MOTION Setting 27 4 3 TIMER SEQ TITLE Setting 29 4 4 COMMUNICATION Setting 30 4 5 DISK Setting 32 4 6 SYSTEM Setting 33 5 NETWORK 36 5 1 Network Configuration...

Page 4: ...es at the same time z Stores video in hard disk drives instead of VCR tapes z Main recording media one fixed HDD plus a CD RW z Hard disk drive hot swapping capability z Pre alarm image recording z Time lapse and real time recording z Refresh rate up to 30 IPS 25 IPS for PAL z Image quality selectable at 4 different levels for recording z Event Timer Alarm recording mode z Quick search by time ala...

Page 5: ...utton while in the PAUSE MODE will advance the video by one frame The green PAUSE LED will be illuminated PLAY button Press the PLAY button to play recorded video from the hard disk The green LED under the PLAY button will be illuminated STOP button Press the STOP button to stop the playing of video during playback or stop recording during a manual record The green LED under the STOP button will b...

Page 6: ...eras following the programmed dwell time In SD card backup mode press to save the desired still image to SD card T rec Indicator This indicator LED will turn ON to signal that the schedule timer record setting is enabled A rec Indicator This indicator LED will turn ON to signal that the alarm record setting is enabled DISK Indicator The indicator shows the operation status of the unit s hard disk ...

Page 7: ...amera or other devices to the DVR 32 ETHERNET 10 100 Connector This is one standard RJ 45 connector for 10 100 Mbps Ethernet networks 33 RS 485 Port The RS 485 communication ports function as connectors when two or more units are serially connected to an external control device 34 ALARM I O This is a 9 PIN D SUB connector including SWITCH OUT GROUND ALARM OUT DISK FULL RECORD IN ALARM RESET and AL...

Page 8: ...7 ALARM1 IN ALARM4 IN ALARM2 IN ALARM3 IN ALARM OUT RECORD IN GROUND DISK FULL ALARM RESET 1 2 3 4 5 6 7 8 9 1 4 ALARM In Out ...

Page 9: ... 5V 0V Active 4 ALARM RESET INPUT This pin connects to an alarm clear device for clearing an alarm Use a Normally Open switch to GND 5V 0V Active 5 RECORD IN INPUT This pin connects to a record trigger device for starting a record Negative Trigger 5V 0V Active 6 ALARM4 IN INPUT This is an alarm input for CH 4 which can be programmed in the menu system to Normally Open or Normally Closed operation ...

Page 10: ...e disk drives are designed for easy installation It is not necessary to set any jumpers terminators or other settings on this drive for proper operation The compatible hard disk drives Table 2 2 which can be used with the unit are shown in the tables below 2 INSTALLATION Camera Monitor Camera Camera Camera RS 232 ALARM DC12V RS 485 hi z 75 AUDIO IN IN OUT OUT MONITOR ETHERNET I O RS 232 ALARM DC12...

Page 11: ...M 8M WD1200AABS 120G 7200 RPM 2M WD1200AAJS 120G 7200 RPM 8M WD1200AAKS 120G 7200 RPM 16M WD1600AABS 160G 7200 RPM 2M WD1600AAJS 160G 7200 RPM 8M WD1600AAKS 160G 7200 RPM 16M WD2500AABS 250G 7200 RPM 2M WD2500AAJS 250G 7200 RPM 8M WD2500AAKS 250G 7200 RPM 16M WD3200AABS 320G 7200 RPM 2M WD3200AAJS 320G 7200 RPM 8M WD3200AAKS 320G 7200 RPM 16M WD4000AAJS 400G 7200 RPM 8M WD4000AAKS 400G 7200 RPM 16...

Page 12: ...e Press the Display button 8 once the DVR will display the following sample message plus the default display Press the Display button 8 again the unit will not display any OSD message Press the button one more time to back to the default display FIGURE 2 3 A 1 2 59G Total capacity of installed hard disk 59 GB 12 4 HR Total 12 4 hour recording time available Timer record activated Alarm record acti...

Page 13: ...ly and then turn on the DVR 8 Keep holding down the buttons until the DVR sounds a tone and display the message XXXXXX BYTES READ Now the DVR is updating the system software which will take approximately 90 seconds to process 9 Restart the unit when the device sounds a tone twice and displays the message PLEASE RESTART The process is complete If you have already followed the procedure 1 9 the unit...

Page 14: ...k drive NOTE 1 Recording times on the tables below are estimated For the actual available recording time of a recording configuration please refer to the system information of the DVR Please refer to section 2 3 system information for more details 2 No audio function at the refresh rate in NTSC 1 2 fields sec 1 fields 16 sec No audio function at the refresh rate in PAL 1 4 fields sec 1 fields 16 s...

Page 15: ...717 5 2288 1 Refresh Rate Frame Sec 25 12 5 8 3 5 2 7 1 4 0 76 0 44 1 8 1 12 1 16 REC Time Mode 3 hr 6 hr 9 hr 12 hr 24 hr 48 hr 96 hr 168 hr 480 hr 720 hr 960 hr PAL Audio ON 11KHz Possible Recording Time HDD 20GB hour BEST 3 4 5 9 8 8 14 6 25 8 HIGH 3 5 7 1 10 6 17 4 30 6 STANDARD 4 4 8 8 13 2 21 6 37 8 Image Quality BASIC 5 6 11 1 16 5 27 1 46 9 Refresh Rate Frame Sec 25 12 5 8 3 5 2 7 1 4 0 76...

Page 16: ...2 Press the REC button 6 for 3 seconds to stop recording any time 3 To access just recorded video please refer to section 3 4 for more details 3 2 2 Timer Recording Timer recording provides 2 periods of time each day in a weekly table which programs the DVR to turn on and off at specified times This way the DVR will start stop recording according to the programmed schedule 1 Press the Setup button...

Page 17: ...ecording Note If you activate the recording function before the scheduled recording the unit will operate recording as shown in the diagram below and keep those Images in different files 03 00 06 00 08 00 12 00 14 00 START END START END Start Manual Recording Timer Manual Timer Manual 3 2 3 Alarm Motion Recording Take the following steps to activate the programmed alarm recording For ALM OPERATION...

Page 18: ...akes Place Timer Recording Actual Recording Speed Alarm Takes Place Normal Alarm Normal Normal Alarm Alarm Normal 3 2 4 Externally Triggered Recording By connecting the RECORD IN of ALARM I O on the rear panel of the DVR you can activate deactivate the recording function of a DVR The file will be kept with a prefixed R NOTE The status of recording operations when an alarm takes place is shown in t...

Page 19: ...ata DVR would show the ending message use SEARCH functions or rewind to replay the file if required 3 3 2 Fast Forward Backward There are 7 speeds available for playback 1x 2x 4x 8x 16x 30x and 100x While playing back recorded video at the recorded speed Forward Turn the Shuttle dial 21 to the right to view the recorded video in the forward direction at a speed faster than the recorded speed Each ...

Page 20: ...he JOG dial 20 can act in both a forward and a backward direction as well as picture by picture A By PAUSE button 3 Press the PAUSE button 3 to display one frame field of a picture at a time in the forward direction B By JOG dial 20 Turn the JOG dial 20 clockwise to display one frame field of a picture at a time in the forward direction Turn the JOG dial 20 counterclockwise to display one frame fi...

Page 21: ...d v 13 buttons to select a video press the 11 and 14 buttons to flip over a page NOTE T Timer recording R External trigger recording A Alarm recording NOTE The maximum number of index in the list for a respective HDD is 3000 3 4 2 ALARM LIST Search Take the following steps to proceed with the alarm list search function 1 Press the Search button 10 to enter the search mode 2 Select the ALARM LIST a...

Page 22: ...Enter button 15 to access the thumbnail page 3 Set the date you wish to search for the recorded video 4 Press the Enter button 15 to start searching for and displaying the concerned image You can set up by using the 11 14 12 and v 13 buttons to move focus You can also set up by using the Shuttle Ring and the Jog Dial to move eye focus is the equal of the button 11 is the equal of the button 14 is ...

Page 23: ...ton 15 to access the complete list of JPG files 4 Highlight the specific JPG file of your requirement and press the Enter button 15 to display the image 5 If you need another please return to the SD card JPG file list page and repeat steps 3 and 4 again for another search NOTE To delete JPG file in the SD card please return to SD CARD JPG FILE list page and highlight the specific JPG file and pres...

Page 24: ...arch NOTE If by accident one selects a CD item and forgets to insert it See the picture below for this status and please insert a CD or press the search button to exit the CD menu EMPTY SEARCH CD DVR0001 DVR0002 DVR0003 DVR0004 Search EXIT v SELECT PAGE UP PAGE DOWN SEARCH FULL LIST ALARM LIST TIME SEARCH THUMBNAIL SD CARD CD ...

Page 25: ... item Please follow the steps given below i Please insert the CD disc in its tray You ll hear a signaling beep to tell you the disc is ready ii Play the video back to find your desired item Press PAUSE when you find it iii Press the Seq Save button and select 3 CD JPEG and enter iv You ve entered the CD JPEG menu v Select item 1 ADD to add your image into the buffer vi Turn the jog dial or Play bu...

Page 26: ...ng an SD card If a user wants to set many DVR devices with the same settings the DVR could save the whole setting in the SD card then transfer it to another DVR Save the whole setting into the SD card 1 Insert an SD card into the SD card slot 2 Press the Setup button 9 to enter the setup mode 3 Highlight SYSTEM and press the Enter button 15 to enter the SYSTEM SETTING page 4 Set SD SETUP to SAVE T...

Page 27: ...o exit the setup mode 12 and v 13 buttons Press to select the desired item or entry for setting 11 and 14 buttons Press to highlight the desired option or to select the context for setting Enter 15 button Press to enter the selected item and to save the setting Jog Dial 20 Turn to select the desired item or entry for setting Shuttle Ring 21 Turn to highlight the desired option or to select the con...

Page 28: ...ce continues recording by displacing the old data STOP When the hard disk is full the device will stop recording AUDIO This option determines the way to record sound if necessary OFF Disables AUDIO recording 11KHZ Enables AUDIO recording and record at the 11KHz sampling rate 22KHZ Enables AUDIO recording and record at the 22KHz sampling rate NOTE Audio function can only be activated at the followi...

Page 29: ...ling rate 22KHZ Enables AUDIO recording and record at 22KHz sampling rate NOTE Audio function can only be activated at the following refresh rates in NTSC PAL 30 25 15 12 5 10 8 3 6 5 2 7 2 7 fields sec ALM TYPE This option allows users to set a type of alarm input corresponding to the sensor signal in use NO Normally Open This is to be used with the type of alarm sensor whose contact remains open...

Page 30: ...tection ON Enables the motion detection OFF Disables the motion detection SENSITIVITY 1 5 This option allows users to set the motion sensitivity 1 is the most sensitive setting 5 is the least sensitive setting 4 3 TIMER SEQ TITLE Setting The DVR provides a weekly table consisting of two periods of time each day for scheduled recording This option allows you to set the time each day when the DVR wi...

Page 31: ...splayed in a 24 hour clock format If there is a time overlapping showing between two continual time period settings the device will automatically combine the two time period settings into one SEQUENCER This entry allows users to set the DWELL time time interval for CH1 CH2 CH3 CH4 and quad view The valid values are 01 99 seconds if the dwell time is set to 00 it will disable the corresponding chan...

Page 32: ... communication port BAUD You have the option of using a Baud rate at 8 different levels 2400 4800 9600 19200 28800 38400 57600 or 115200 NET ENABLE This option selects either enable or disable for the Ethernet communication port OFF Disables it ON Enables it NET DHCP This option selects enable or disable for the DHCP communication function OFF Disables it ON Enables it NOTE If provided with a DHCP...

Page 33: ...lt with a qualified MIS professional to configure it FTP IP Every FTP server has to own an IP address to be identified on the network Enter the IP address of the FTP server USER Enter the FTP user name Login Name PASSWORD Type in the FTP password Password PATH Enter the upload path while connecting the FTP 4 5 DISK Setting HD REFORMAT This option allows you to clear out all the data in the hard di...

Page 34: ... a message reading SD CARD ERROR will appear Note If there is no hard disk in your DVR during the TEXT TO SD CARD function a message saying NO BACKUP SOURCE will show NOTE In the case of the CD RW model no backup HD can be used So you won t see that item mentioned in the menu HD FAT32 This function build FAT32 file system on the hard disk make the data on hard disk could be playback on the PC AUTO...

Page 35: ...1 is totally transparent level 3 is opaque and level 2 is between level 1 and 3 The background color is used in setup menu and search function BUZZER This option determines the embedded buzzer sounding a tone to signal the following situations A tone lasts about two seconds long ON Enables buzzer OFF Disables buzzer Situation Alarm occurs Video loss occurs Disk is full Load factory default Buzzer ...

Page 36: ...to set up many a number of the same devices with the same settings he can save the whole settings to an SD card then transfer to another DVR SAVE Saves the whole setting to the SD card LOAD Loads the whole setting from the SD card VERSION This item is in the setup menu reveal network MAC BIOS version and software version and last updated date MAC 00 0C 0C 00 00 10 BIOS 1 00 SW 1 11GBT DATE Feb 24 ...

Page 37: ...A Connect to a PC Use a crossover LAN cable to connect directly to a PC B Connect to a LAN Hub Intranet The RJ 45 PIN configuration for connecting with a LAN Hub is shown below C Connect to WAN Internet The RJ 45 PIN configuration for connecting to a WAN is the same as that for connecting to a LAN 5 NETWORK RJ 45 CROSSOVER CABLE SD Card RS 232 ALARM DC12V RS 485 hi z 75 AUDIO IN IN OUT OUT MONITOR...

Page 38: ...ght NET ENABLE select ON Then press the Enter button to proceed 5 1 2 2 Enable DHCP Function Use the 12 and v 13 buttons to highlight NET DHCP select ON NOTE This function can only work if the LAN to which the unit is connected to has a DHCP server If the DHCP server is working the DVR will obtain an IP address automatically from the DHCP server In that case please skip section 5 1 2 3 Set IP addr...

Page 39: ...rectly configure the MASK and GATEWAY settings according to your network architecture If you have any questions regarding those settings please contact a qualified MIS professional or your ISP 2 Connecting to a network each connected DVR must be assigned a unique IP which must be in the same class type as your network address IP addresses are written as four sets of numbers separated by periods fo...

Page 40: ... Point to the Local Area Connection and click the right bottom of the mouse Click the Properties to enter the Local Area Connection 3 Click the Configuration tag check if the TCP IC is included among the network component list If the TCP IP is included please process step 5 If it is not included please follow step 4 to install the TCP IP 4 TCP IP installation During the installation you will be re...

Page 41: ...provider If you are using a DHCP server please select Obtain an IP address automatically Any assigned IP address for the connected DVRs must be in the same class type as the server If there is no DHCP server please select specify an IP address and type in the IP address of your PC This IP address must be different from the DVR IP but in the same class type NOTE The IP address of a DVR in a network...

Page 42: ...his IP is the DVR IP address which is assigned for the connected DVR 3 If you receive a response as in the sample screen below the connection hasn t been successfully established Please re check all the hardware and software installations by repeating steps 1 to 5 If you still can t establish the connection after rechecking please contact your dealer 4 If you receive a response as in the sample sc...

Page 43: ...ecorded data for the event time you want 5 It supports your local PC simultaneously with the DVR backup data The programs can be operated by a selected PC equipped with the following requirements 1 Intel Pentium III 750MHz at least 2 256 MB RAM 3 Windows 98 NT ME 2000 and XP 4 A 4 MB Video card capable of 24 bit true color display 5 A 160 MB free hard disk space for software installation 6 A 10 ba...

Page 44: ...ose button to complete the installation process Step 6 After completing installation you can double click the file shown below Or click the Start Menu in the computer and select Programs to open the Program Selection page Then click the AVE Viewer Software tag to start the 4 channel DVR Viewer Software Program 5 2 2 Short introduction Now the Login page appears Enter the default User Name admin an...

Page 45: ...ll automatically search the whole local LAN 4 channel DVR device to see a list NOTE If you want to create a new DVR please press the button to add it Step 2 Double click your selected device to see a window as on the right Enter the Username and Password the default name and password are admin and 9999 Step 3 The default multi screen is the 4 channel mode you see now Step 4 The Viewer Software hel...

Page 46: ...o the previous mode use the mouse to click the right key and choose Close 6 Re arrange the divisions Click this button to see the following channels 7 Screen divisions Choose any of the buttons you want 8 Pop menu You can use the mouse to move to each channel Click the right key of the mouse to show a window You can select Close Full Screen or Capture Print Close Stops the channel s display Full S...

Page 47: ...vious page and Next page buttons to find the record you want from the record list Click the Time Search page to use the time and date search entries to help your search Click the Review Text page to use the text search The search conditions include Channel String Date Time Amount The user can input any combination of the above conditions for searching After a search the Viewer software will list t...

Page 48: ...Controller will be able to display the listed Models by turn 4 Select a Speed Dome device ID from the drop down list on the Speed Dome Controller The Controller will be able to display the listed IDs by turn 5 Each of the ten buttons under Set is connected with a specific position and angle of either panning or tilting of the camera Click each button to activate its particular position and angle P...

Page 49: ... on the right Click Edit Selected File to start editing Frame Rate Modification To see the total number of frames modify your frame rate File Preview Click the Start button to start your setting component You can also use the Start button to interrupt the code You can click the Save to new file button to save a new file after the edit code Backup to JPG Folder Path To set the backup file path clic...

Page 50: ...ion provides instructions for using the Viewer Software to view the Web Page NOTE This device also provides the IE Browser function Open the browser and view the images directly via the browser Please refer to section 5 3 for more details ...

Page 51: ...vers 30 to 1000 seconds 4 Users Management Click the Save User button to add the new user s name and password under Add New User Enter the User Name and Password and click Save User again Your new user and his password will appear on the User Name Password list to the left If you proceed to enter a new user and then click Cancel Edit no new name will be added to your list If you wish to delete any...

Page 52: ...e pan tilt zoom function camera live over a local area network or the Internet Recorded video list box This box allows you to access all recorded video which are stored in the HDD of the connected devices To review a recorded video simply select an entry from the list and click the button PgUp PgDn Enables you to scroll up and down the list Time Status Box This box indicates the device status This...

Page 53: ...nable the TIMER RECORD function 4 There are two time periods available for scheduling each day The Timer Record setting page allows users to program the time each day that the DVR will start and stop recording The time is displayed in a 24 hour clock format If there is a time overlap showing between two continual time period settings the device will automatically combine the two time period settin...

Page 54: ...rmation including the desired strings BY DATE TIME Lists some of the records with the text information within a desired period BY AMOUNT Lists some of the records with the text information whose cash amount meets the desired range BY COMBINATION Combines the above search interfaces on one and the same page 3 Various EXCEPTION ALERT monitoring functions including ALERT A Trigger Alert signal after ...

Page 55: ...COL The DVR supports the following two protocols please set the appropriate one in the Setup Menu 2 5 1 GENERIC All the text data is delimitated by CR Carriage Return 0x0d and LF Line Feed 0x0a 2 5 2 VSI ADD The text data includes CHANNEL information for application in the multi channel environment as follows 0x1b CH TEXT 0x0d 3 Operation 3 1 Settings 3 1 1 Text Insertion Protocol SETUP RECORD TEX...

Page 56: ...RED MAGENTA GRAY WHITE YELLOW and GREEN if the TEXT INSERTION option has been set as VSI ADD protocol and incoming texts come from different channels all the messages of the channels could be set in different colors are shown as below MAC 00 0C 0C 00 00 10 BIOS 1 00 SW 1 11GBT DATE Feb 24 2006 TEXT 0 229376 PRESS ENTER TO RETURN TEXT INSERTION TEXT INSERTION OFF TEXT COLOR SET TEXT DISPLAY BY CHAN...

Page 57: ... one by one when they input the string value in the search menu or search menu the phrase offers another shortcut to input the common strings Enter SETUP RECORD TEXT INSERTION PHRASE There are 11 options 1 10 11 20 99 100 FACTORY DEFAULT please select one and then enter the inner page for the string settings The last one FACTORY DEFAULT is used to go back to the default values TEXT INSERTION TEXT ...

Page 58: ...RESS 5 ATM 6 AX 7 BALANCE 8 BASS 9 BEER 10 BOURBON BY STRING CHANNEL ALL TEXT 03 20 2006 13 36 08 BY STRING CHANNEL ALL TEXT 03 20 2006 13 36 08 PHRASE PAGE 5 EXTRA EXTRA LARGE FISH GAS GASOLINE GIN GUINESS HEINKEN INPORT KEG EXCEPTION 1 10 1 ALE 00 2 CANCEL 00 3 CASH BACK 00 4 CASH OUT 00 5 CHARGE 00 6 CHECK 00 7 CIGARETTES 00 8 CIGS 00 9 COMP 00 10 CORRECTION 00 PHRASE PAGE 5 EXTRA EXTRA LARGE F...

Page 59: ...s used to go back to the default values In the right hand side of the Exception Setting page is the exception count If a number has been specified the DVR will alert the remote Viewer Software when the number of the exceptions exceeds the number set here TEXT INSERTION TEXT INSERTION TEXT COLOR TEXT DISPLAY TEXT STAMP REVIEW CONSTRAINT PHRASE EXCEPTION 1 10 11 20 21 25 FACTORY DEFAULT MAIN PAGE 1 ...

Page 60: ... as a warning when an exception has been detected The duration depends on the DWELL setting 3 1 8 7 Note The buzzer setting in SYSTEM BUZZER must also be set as ON or the function will not take effect 3 1 8 4 FLG Flag If the FLG has been set as ON the DVR will show a mark on the screen and keep flashing for a duration depending on the setting in DWELL 3 1 8 7 3 1 8 5 NFY Notify Remote If the NFY s...

Page 61: ... DVR over a specified time the DVR will generate an alert to notify the remote viewer start the FTP function etc To activate this function please set the start and end time for the POS DATA LOSS monitoring int the TIMER page in setup menu EXCEPTION 1 10 CNT RST BUZ FLG NFY FTP DWE 1 05 01 ON ON ON OFF 03 2 05 01 ON ON ON OFF 03 3 05 01 ON ON ON OFF 03 4 05 01 ON ON ON OFF 03 5 05 01 ON ON ON OFF 0...

Page 62: ...ltiple Devices Connection By using AVE REGCOM and HYDRA a multiple cash register can be linked together through an RS 485 and can finally connect to the DVR through the RS 232 The following is an example of 4 cash registers connected to a DVR For proper setting please refer to 3 1 1 3 section in this chapter DVR RS 232 to RS 485 Converter OR Cash Register Cash Register Cash Register VSI PRO Conver...

Page 63: ... Regcom or Networker or Vnetworker Regcom or Networker or Vnetworker RS 232 RS 232 RS 232 RS 232 Cash Register Cash Register Cash Register Cash Register Regcom or Networker or Vnetworker RS 232 RS 232 RegCom 1 Cash Register Cash Register Cash Register Cash Register Hydra RS 485 RegCom 4 RegCom 3 RegCom 2 DVR RS 232 RS 232 RS 232 RS 232 RS 232 RS 232 RS 232 ...

Page 64: ...TM ATM Regcom or Networker Regcom or Networker Regcom or Networker RS 232 RS 232 SNA SNA SNA RS 232 ATM ATM TCPIP 232 VSSI PRO DVR DVR RS 232 RS 232 TCP IP SNA Cash Register DVR RS 485 RS 232 or RS 485 VSI PRO MAX VSI PRO MAX VSI PRO MAX VSI PRO MAX Cash Register Cash Register Cash Register RS 232 or RS 485 RS 232 or RS 485 RS 232 SNA RS 232 RS 232 or RS 485 ...

Page 65: ...er any one of the following modes the contents of the received text data will be shown on the screen 3 2 3 1 Simple Text Display Mode An example On the left lower corner the OSD message SM TOMATOS 48 is the newest incoming TEXT data Hydra DVR RS 485 RS 232 ATM ATM ATM ATM TCPIP 232 TCPIP 232 TCPIP 232 TCPIP 232 TCP IP TCP IP TCP IP TCP IP CH1 CH2 CH3 CH4 SM TOMATOS 48 01 05 2006 14 26 25 ...

Page 66: ...small red ball periodically flashing in the right upper corner of the screen Please press the DISPLAY button to switch to a desired mode to observe the incoming TEXT data To stop recording please press the REC button and hold for more than3 seconds before releasing 3 2 6 PLAYBACK Press the SEARCH button to enter the Search Menu highlight a desired item in the list and then press the ENTER button t...

Page 67: ...wing channel selection screen will be shown first as the input of the desired channel The selectable options are ALL CH1 CH2 CH3 and CH4 FULL LIST CHANNEL ALL 01 05 2006 14 26 25 HD1 1013 01 05 06 14 13 22 SANDY 0004 1014 01 05 06 14 13 22 PLUM RED 1015 01 05 06 14 13 22 ALEX 0005 1016 01 05 06 14 13 22 PLUM RED 1017 01 05 06 14 13 22 10 01 97 1 1018 01 05 06 14 13 22 NECTARINES 1019 01 05 06 14 1...

Page 68: ...s exist If you enter COKE you ll see both COKE and CLASSIC COKE listed for instance You can highlight the one you want and start to playback If the TEXT INSERTION is set as GENERIC the BY STRING screen will have only a TEXT string as input Up to 16 characters can be input for searching If the TEXT INSERTION is set as VSI ADD there is a channel item which will show on the screen too HD1 CH 1 2 3 4 ...

Page 69: ... TEXT INSERTION is set as VSI ADD there is a channel item which will be shown on the screen too 3 2 7 4 BY AMOUNT This function offers an interface to search above and under a particular amount across the transactions recorded in the different channels If the TEXT INSERTION is set as GENERIC the BY AMOUNT screen will have only 2 sets of entries each under OPERATION and AMOUNT as inputs BY STRING C...

Page 70: ...To search Amount 1 00 the following items appear on the screen 00001 00 00000 00 D To search 1 00 Amount 10 00 the following items will show on the screen 00001 00 00010 00 or 00010 00 00001 00 E To search Amount 1 00 OR Amount 10 00 the following items will be shown on the screen 00010 00 00001 00 or 00001 00 00010 00 Note If two operations are set and those two are exclusive of each other the sy...

Page 71: ...e operations in the lower level pages please refer to section 3 2 6 2 3 2 6 3 and 3 2 6 4 in this chapter When you are in those lower level pages press the ENTER button to go back to BY COMBINATION After all the conditions have been set properly please press the SEARCH button to start searching In the TEXT LIST page please press the ENTER button to start playback and press the SEARCH button to ret...

Page 72: ...will be stamped as continuously input feedback over the AVI pictures The text data will either be stamped on different corners for different channels or there will be a mixed display combining all the channels together depending on the TEXT DISPLAY setting in the Setup menu RECORD TEXT INSERTION page TEXT INSERTION TEXT INSERTION TEXT COLOR TEXT DISPLAY TEXT STAMP REVIEW CONSTRAINT OFF PHRASE 1 MO...

Page 73: ...to an SD card as a text only file Enter the Setup menu DISK HD BACKUP TXT TO SD CARD DISK SETTING HD REFORMAT HD HD BACKUP TEXT TO SD CARD HD FAT32 BUILD SD FILE JPEG AUTO ERASE SET SD REFORMAT START CD ERASE START MAIN PAGE TEXT INSERTION TEXT INSERTION TEXT COLOR TEXT DISPLAY TEXT STAMP OFF REVIEW CONSTRAINT ON PHRASE EXCEPTION MAIN PAGE ON ...

Page 74: ...enu TIMER SEQ TITLE CLOCK page move the highlight to SYNC TO VSI START press the ENTER button and a new date time will replace the old one The DVR will automatically start the time synchronization after POWER ON and every midnight the exact time is 23 59 31 DATE TIME 12 28 2007 13 43 01 GMT 8 SYNC TO VSI START MOVE v CHANGE ...

Page 75: ...O MAX VSI PRO MAX VSI PRO MAX Cash Register Cash Register Cash Register RS 232 or RS 485 RS 232 or RS 485 VSI PRO MAX or Hydra RS 232 RS 232 or RS 485 VSI PRO MAX VSI PRO VSI PRO VSI PRO VSI PRO Hydra DVR RS 485 RS 232 RS 232 RS 232 Cash Register Cash Register Cash Register Cash Register RS 232 RS 232 RS 232 or RS 485 RS 232 or RS 485 RS 232 or RS 485 RS 232 or RS 485 Vnetworker Vnetworker Vnetwor...

Page 76: ...e multiple channel text input 2 Set BAUD at 9600 in the SETUP Menu Communication page 3 Connect at least one video source to the DVR for the recording 4 2 Connect PC and DVR Please connect your PC and DVR with the RS232 Null Modem Cable 4 3 Install the simulation software 1 RegOnPC is a cash register simulation software Please double click Setup exe to install it and then just follow the instructi...

Page 77: ... the BAUD Rate at 9600 the same as the setting in the DVR 4 3 2 Protocol setting There are two protocols for selection Here we suggest you set your software to VSI ADD for multi channel testing A GENERIC If the GENERIC has been chosen the output text will be delimitated by CR 0x0d and LF 0x0a Under the GENERIC option only CH1 output will be enabled To test the GENERIC 2CH on DVR please use this op...

Page 78: ...arately 4 3 3 START STOP Transmission Click the START button to start transmission and click END to stop transmission 4 3 4 Speed Adjustment Please adjust the transmission with the SPEED Slide Bar 4 4 Test Procedure The Simulation software RegOnPC acts as the Hydra 4 RegCom and 4 cash registers Please follow the steps below to test the DVR DVR PC RegOnPC Monitor CH1 CH2 CH3 CH4 RS 232 ...

Page 79: ...e CHANNEL item and press the ENTER button again to enter the FULL LIST page All the recorded texts will be shown in list and display in different colors If CH1 has been set in the CHANNEL item the FULL LIST page will only show all the data coming from CH1 Step 7 In Step 5 select BY STRING and input the string for example COKE and press ENTER all the search results will be shown in a list Step 8 In...

Page 80: ... No Parity 8 Data Bits 1 Stop Bit 7 1 2 Communication Protocol 7 1 2 0 General Command Format Lead Code 0x41 Dest ID Src ID Main category Second category Number of parameters Parameter 1 Parameter 2 End Code 0x4f Lead Code 0x41 Dest ID 0x01 Src ID 0x20 Main Category 0x01 Keys and Signals 0x02 Command Second Category 0x01 Handshake 0x02 Request Time Set Time 0x06 Request System State 0x0b Time Sear...

Page 81: ...B 2x 1 2x KEY_SHUTTLE_R2 140 0x 8C 4x 1 2x KEY_SHUTTLE_R3 141 0x 8D 8x 1 4x KEY_SHUTTLE_R4 142 0x 8E 16x 1 4x KEY_SHUTTLE_R5 143 0x 8F 30x 1 8x KEY_SHUTTLE_R6 144 0x 90 100x 1 8x KEY_SHUTTLE_R7 145 0x 91 100x 1 16x SIGNAL_REC_IN 163 0x A3 SIGNAL_ALARM_RESET 165 0x A5 SIGNAL_REC_OUT 169 0x A9 SIGNAL_ALARM_IN 189 0x BD SIGNAL_ALARM_OUT 209 0x D1 7 1 2 2 COMMAND Main Category 0x02 A Handshake Second ...

Page 82: ...0x02 0x10 0x00 0x4f DVR Response 0x41 0x20 0x01 0x02 0x10 0x32 0x00 0x00 48 Bytes Data 0x4f 48 Bytes Data 4 HDD Status Primary Master Slave Secondary Master Slave Every HDD uses 12 Bytes 0 HDD Exists if 1 1 Active HDD if 1 2 Current HDD for REC if 1 3 Current HDD for PLAY if 1 4 7 Capacity 8 11 REC PLAY Position G Request REC Position Second Category 0x11 PC message 0x41 0x01 0x20 0x02 0x11 0x00 0...

Page 83: ... 1 Built in hard disk 1 Unscrew all the 4 mounting screws on the mobile rack of the unit and detach it 2 3 Carefully lift the mobile Unscrew the secured rack to a vertical screws to detach the position hard disk rack 4 5 Carefully insert a SATA Place the hard disk in hard disk the rack 6 Secure the driver in the rack using 4 mounting screws in the side mounting holes Please don t tighten the screw...

Page 84: ... Push the carrier body back in the mobile rack further into the mobile rack until fully inserted 3 Slide the top cover backward and remove 5 Place the HDD inside the mobile rack Use four of the provided by screws to fix the HDD place 4 Place the hard disk in the rack 6 Place the top cover back to the carrier body sliding forward to insecure 9 Push the active handle Lock the Key inward 10 ...

Page 85: ...OFF SET SET SET REC SETTING AUTO START REC OFF REC RATE 15 F S REC QUALITY BEST DISK FULL REWRITE AUDIO OFF TEXT INSERTION MAIN PAGE 7 3 System Default COMM SETTING COMM ID 01 RS232 ON RS485 ON BAUD 2400 NET ENABLE OFF NET DHCP OFF NET IP SET NET ACCOUNT SET FTP SETTING MAIN PAGE DISK SETTING HD REFORMAT HD HD FAT32 BUILD AUTO ERASE SET SD REFORMAT START CD REFORMAT START MAIN PAGE SYSTEM OPERATIO...

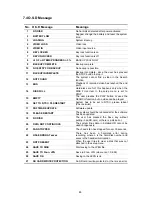
Page 86: ...he user presses the PLAY button or uses the SEARCH function but no video can be played 16 SET TO NTSC PLS RESTART System has to be set to NTSC please reboot PAL is similar 17 SOFTWARE UPDATE Software update 18 PLEASE RESTART The system should be rebooted after the software has been updated 19 NO DISK The user has pressed the Save key without putting in an SD card or there is a disk error 20 DATA N...

Page 87: ...h a case an index for the recent recorded data will be generated and the index of the next oldest data will be erased so that the list does remain 3000 in total And the next oldest data will be kept in the index of the corresponding oldest data For any newly recorded data this approach will be applied until the disk becomes full In the rewrite recording mode when the archived hard disk drive is fu...

Page 88: ...e Event list Filter thumbnail SD card OSD Language English Chinese T Set up Menu Multi layer Network setting Log list 2000 records Alarm In Out 4 Alarm Inputs 1 Alarm Output Built in Buzzer Yes Motion Detection Yes Communication Port RS 232 RS 485 and Ethernet Port Network Interface Ethernet RJ 45 10 100 base Tx x 1 Network Protocol TCP IP DHCP HTTP UDP FTP PPP Software Upgrade Upgrade via Memory ...

Page 89: ...ts to display the desired changes instantly 4 Do you want to execute an automatic search for free IP If and when you want to auto search the free IP select Yes or No If clicked Yes the software will provide the Free IP Address boxes to the right of the window If you click No these address boxes will not show 5 Manual insertion of Free IP Address If you have clicked No please manually type in inser...

Page 90: ...ess box on the right to enter it into an IP Address on the left 2 To change any IP address type in the new address in the Free IP Address box on the right as well as the device Login Name and Password in their respective blanks at bottom left then click UPDATE and the new address will automatically be sent to the device 9 Click Exit at bottom right to shut the device ...

Page 91: ...tly at the middle of its front and push gently to insert Ejecting The Disc 1 Press the eject button 2 Carefully lift out the disc 3 Press the eject button or lightly touch the center of the tray and the tray will automatically reenter its position within the CD RW recorder Caution After the tray has been ejected and the disc has been retrieved from the caddy or put in the caddy insert the tray in ...

Page 92: ...of installation As suggested in your specifications please do not install in an unstable position or in one that causes vibrations 2 Do not install in high humidity direct sunlight or damp conditions 3 Do not use near magnetic fields or place near a television or a radio signal as the performance of the device may be affected 4 Do not open to try to repair as the laser may be harmful ...

Page 93: ...FT DISCOUNT DISCOVER EMPLOYEE EXTRA EXTRA LARGE FISH KEG KIDS MEAL GAS GASOLINE GIN GUINESS HEINEKEN IMPORT LAGER LARGE LONE STAR LOTTERY LUNCH MALT MASTER CHARGE MEAL MEAT MEDIUM MICHELOB MILLER LITE M C OIL PERCENTAGE PREMIUM PONY KEG RECEIVED SALE SCOTCH SEAFOOD SHOT SMALL SNUFF SPECIAL STOUT SUB TOTAL SYNTHETIC TEQUILA TOBACCO TOP SHELF VISA VODKA WHISKEY X REPORT Z REPORT BEER CANCEL CASH BAC...

Page 94: ...93 ...

Reviews: