Talk Indicator Light
Mute Indicator Light
Headset Jack
Mute/Pause Button
Channel Button
Listen Volume Control
Headset Cable Retainer
Memory/Redial Button
Antenna
Ringer ON/OFF Switch
Talk Button
Battery Pack
Headset Holder/Antenna
Power Indicator Light
Talk Indicator Light
Charge Indicator Light
Talk Volume Control
Page Button
Base Unit (front)
Talk Button
Remote Unit Charging Well
Handset/Ring Detector
Configuration Switch
Manual Channel Settings
AC Adapter Jack
Optional Connection to Online Indicator
or Handset Lifter
Ring Detector or Handset Jack
Telephone Jack
Headset Jack
Ring Detector
AC Adapter
Short Cord
Handset Jack
Remote Unit / Télé-Élement
Base Underside
1
2
3
4
5
6
7
8
9
10
11
12
29
30
31
19
20
24
25
26
27
28
22
23
Base Unit (rear)
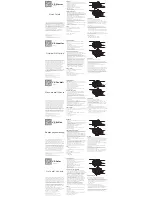
K E Y T O D I A G R A M
12
3
4 5 6 7
8
90
A B
12
3
4 5 6 7
8
90
FIGURE 1: For LUCENT/AVAYA Series 64XX with a separate headset
FIGURE 2: For other LUCENT/AVAYA phones
D I A G R A M
A
Power
In Use
Charge
x
x
TALK
0
8
5
2
#
7
6
3
*
7
4
1
M
em
/R
ed
ial
Ch
an
ne
l
Vo
lu
m
e
M
ute
/P
au
se
TA
LK
D
0
8
5
2
#
7
6
3
*
7
4
1
Mem/Redial
Channel
Volume
Mute/Pause
TALK
B
Power
In Use
Charge
TALK
0
8
5
2
#
7
6
3
*
7
4
1
Mem/Redial
Channel
Volume
Mute/Pause
TALK
E
0
8
5
2
#
7
6
3
*
7
4
1
Mem/R
edial
Channel
Volume
Mute/Pa
use
TALK
C
0
8
5
2
#
7
6
3
*
7
4
1
Mem/Redial
Channel
Volume
Mute/Pause
TALK
F
G
User Guide
Cordless Telephone Headset Amplifier
Model
LKA10
I N S T A L L A T I O N
S P E C I A L B U T T O N S
A U D I O V I S U A L P R O M P T S
F C C R E G I S T R A T I O N I N F O R M A T I O N
F C C R E Q U I R E M E N T S
—
PA R T
1 5
NOTE: This device complies with Part 15 of the FCC Rules. Operation is subject to the following two conditions:
1. This device may not cause harmful interference, and
2. This device must accept any interference received, including interference that may cause undesired operation.
This equipment has been tested and found to comply with the limits for a Class B digital device, pursuant to Part
15 of the FCC Rules. These limits are designed to provide reasonable protection against harmful interference in a
residential installation. This equipment generates, uses, and can radiate radio frequency energy and, if not installed
and used in accordance with the instructions, may cause harmful interference to radio communications.
However, there is no guarantee that interference will not occur in a particular installation. If this equipment does
cause harmful interference to radio or television reception, which can be determined by turning the radio or television
off and on, the user is encouraged to try to correct interference by one or more of the following measures:
1.
Reorient or relocate the receiving antenna.
2.
Increase the separation between the equipment and receiver.
3.
Connect the equipment into an outlet on another circuit.
4.
Consult the dealer or an experienced radio/TV technician for help.
F C C R E Q U I R E M E N T S
—
PA R T
6 8
This equipment complies with Part 68 of the FCC rules. On the baseline underside is a label that contains, among
other information, the FCC registration number and ringer equivalence number (REN) for this equipment. If requested,
this information must be provided to the telephone company.
The telephone company may make changes in its facilities, equipment, operation or procedures that could affect the
operation of the equipment. If this happens, the telephone company should provide you advance notice in order for
you to make the necessary modifications to maintain uninterrupted services.
If you experience problems with your headset, please refer to the warranty section for information on warranty and
repair service. If the problem is causing harm to the telephone network, the telephone company may request that
you remove the equipment until the problem is resolved. In extreme cases, the telephone company may be forced
to disconnect your service before notifying you of the problem.
49389-01 (3•01)
F
O R
L
U C E N T
/ A
V A Y A
6 4
X X
S
E R I E S
T
E L E P H O N E S
W
I T H
A S
E P A R A T E
H
E A D S E T
J
A C K
S E T U P
(
R E F E R T O F I G U R E
1
)
1. Connect the LKA10 Amplifier to your telephone using Figure 1.
2. Using the Short Cord
provided, plug one end into the LKA10 Telephone Jack
and the other end
into your telephone’s Headset Jack
.
3. Plug the Ring Detector
into the LKA10 “Ring Detector or Handset” Jack
.
4. Now connect the AC Adapter
to the LKA10 AC Adapter Jack
and into a wall outlet. The Power
Indicator will
light.
5. Peel the backing from one end of the Ring Detector
and stick it to the center of the telephone’s
ringer or speaker.
6. Make sure that the Handset/Ring Detector Configuration Switch
is in position B (the ring detector position).
7. Make sure you remove the shipping battery insulator pull tab located between the Remote Unit and the
Battery Pack
.
8. Gently slide the Remote Unit and Battery Pack into the Remote Unit Charging Well
until the Charge
Indicator lights.
9. Connect your Headset to the Remote Unit Headset Jack
. Press the Headset Cable into the Headset
Cable Retainer
. If you are using a Headset whose cable terminates in a Quick Disconnect
™
(QD)
module, you will need the QD to 2.5mm Headset Adapter Cable.
Note:
Remote Unit must remain in the Base for 5 seconds to establish a communications link before the
system can function.
Prior to first use, the Battery must charge for 8 hours before the Remote will operate away from the Base.
You may, however, use the Remote while it is in the Charging Well. (
Note:
May increase charging time.) The
Charge LED will turn off after the Battery is fully charged. You are now ready to make or receive calls.
P L A C I N G
A
C A L L
1. With your headset in position, press the Talk Button on either the Remote
or the Base Unit
. The
Talk Indicator Lights on the Remote
and Base Unit
will light and you will hear a dial tone.
2. If you do not hear a dial tone, see Troubleshooting section.
3. Dial a co-worker. When your party answers, speak normally.
4. If you do not sound loud enough, or if you sound too loud, adjust the transmit level with the Talk Volume
Control
on the Base Unit.
5. Adjust the volume of your co-worker's voice by using the Listen Volume Control
on the Remote Unit.
6. Upon completion of the call, press the Talk Button on either the Remote
or the Base Unit
. The
Talk Indicator Lights on the Remote
and Base Unit
will go out.
Note:
Be sure to end the call by pressing the Talk Button on either the Remote
or Base Unit
. If you
hang up by pressing the “Headset” key on your telephone, the Remote will remain on, discharging the battery.
R E C E I V I N G
A
C A L L
1. With your headset in position, when you have an incoming call, press the Talk Button on either the Remote
or the Base Unit
. The Talk Indicator Lights on the Remote
and Base Unit
will light. Begin speaking.
2. Upon completion of the call, press the Talk Button on either the Remote
or the Base Unit
. The Talk
Indicator Lights on the Remote
and Base Unit
will go out.
Note:
Be sure to end the call by pressing the Talk Button on either the Remote
or Base Unit
. If you
hang up by pressing the “Headset” key on your telephone, the Remote will remain on, discharging the battery.
F
O R
O
T H E R
L
U C E N T
/ A
V A Y A
T
E L E P H O N E S
S E T U P
(
R E F E R T O F I G U R E
2
)
1. (Optional) Install Lifter:
We recommend using a Lifter (see Supplies And Accessories section) with your LKA10 to allow you to place and
answer calls while away from your phone. If you have a Lifter, install it first, following the instructions packed
with the unit.
2. Connect the LKA10 Amplifier to your telephone using Figure 2.
3. Unplug the telephone handset from the jack on your telephone base and insert into the “Ring Detector or
Handset” Jack .
4. Using the Short Cord
provided, plug one end into the LKA10 Telephone Jack
and the other end into
your telephone’s Handset Jack
.
5. Now connect the AC Adapter
to the LKA10 AC Adapter Jack
and into a wall outlet. The Power
Indicator will
light.
6. Make sure that the Handset/Ring Detector Configuration Switch
is in position A (the handset position).
7. Make sure to remove the battery insulator pull tab located between the Remote Unit and the Battery Pack
.
8. Gently slide the Remote Unit and Battery Pack into the Remote Unit Charging Well
until the Charge
Indicator lights.
9. Connect your Headset to the Remote Unit Headset Jack
. Press the Headset Cable into the Headset Cable
Retainer
. If you are using a Headset whose cable terminates in a Quick Disconnect
™
(QD) module, you will
need the QD to 2.5mm Headset Adapter Cable.
Note:
Remote Unit must remain in the Base for 5 seconds to establish a communications link before the system
can function.
Prior to first use, the Battery must charge for 8 hours before the Remote will operate away from the Base. You may,
however, use the Remote while it is in the Charging Well. (
Note:
May increase charging time.) The Charge LED will
turn off after the Battery is fully charged. You are now ready to make or receive calls.
P L A C I N G
A
C A L L
1. With your headset in position, place the handset off-hook.
2. Press the Talk Button on either the Remote
or the Base Unit
. The Talk Indicator Lights on the
Remote
and Base Unit
will light and you will hear a dial tone.
3. If you do not hear a dial tone, see Troubleshooting section.
4. Dial a co-worker. When your party answers, speak normally.
5. If you do not sound loud enough, or if you sound too loud, adjust the transmit level with the Talk Volume
Control
on the Base Unit.
6. Adjust the volume of your co-worker’s voice by using the Listen Volume Control
on the Remote Unit.
7. Upon completion of the call, replace the handset and press the Talk Button on either the Remote
or
the Base Unit
. The Talk Indicator Lights on the Remote
and Base Unit
will go out.
Note:
Be sure to end the call by pressing the Talk Button on either the Remote
or Base Unit
. If you
hang up by replacing the handset on your telephone, the Remote will remain on, discharging the battery.
R E C E I V I N G
A
C A L L
1. With your headset in position, when you have an incoming call, place the handset off-hook.
2. Press the Talk Button on either the Remote
or the Base Unit
. The Talk Indicator Lights on the Remote
and Base Unit
will light. Begin speaking.
3. Upon completion of the call, replace the handset and press the Talk Button on either the Remote
or the
Base Unit
. The Talk Indicator Lights on the Remote
and Base Unit
will go out.
Note:
Be sure to end the call by pressing the Talk Button on either the Remote
or Base Unit
. If you hang
up by replacing the handset on your telephone, the Remote will remain on, discharging the battery.
R E C E I V E
V O L U M E
C O N T R O L
O N
T H E
R E M O T E
U N I T
The volume control keys allow you to adjust the sound level that you hear through the headset. This feature
is especially useful for people who have trouble hearing, or are in a noisy area like a workshop.
To increase volume, push the “
s
” Key on the Remote Unit. Press again until the volume is comfortable.
To decrease volume, push the “
t
” Key on the Remote Unit. Press again until the volume is comfortable.
M U T E
/
P A U S E
O N
T H E
R E M O T E
U N I T
The Mute/Pause Button
stops voice transmission to the receiving party. When mute is activated, the
Mute Indicator
is on. Press the Mute/Pause Button
again to deactivate the mute function.
C H A N N E L
O N
T H E
R E M O T E
U N I T
The LKA10 has an auto scan feature that automatically selects a clear channel when you press the Talk
Button
when the Manual Channel Settings
are "0/0". If you experience interference during a call,
press the Channel Button
to switch to another channel until you have good reception.
M E M O R Y
/
R E D I A L
O N
T H E
R E M O T E
U N I T
The speed dial memory can store up to 10 phone numbers, containing a maximum of 16 digits.
TO STORE NUMBERS
The Talk Indicator light
should be off. If it is not off, press the Talk Button
once to turn it off.
Press the Memory/Redial Button
followed by the number you want to store.
Press the Memory/Redial Button
followed by the one digit number (0-9) on the Remote Unit keypad that
you wish to assign to that number.
Press the Mute/Pause Button
to store one or more pauses between digits in memory. When a stored
number is dialed from memory, for each pause stored the unit will pause about half a second before dialing
the next number. Each pause occupies the same memory space as a single stored digit. You can repeat the
process for storing numbers until you have stored 10 numbers.
TO CHANGE STORED NUMBERS
To change a number stored in memory, simply store a new number in that memory location.
TO DIAL STORED NUMBERS
Press the Talk Button
. The Talk Indicator
will light up.
When you hear the dial tone, press the Memory/Redial Button
then press the single digit (0-9) memory
location button.
The stored number you have selected will be automatically dialed.
TO DIAL A STORED NUMBER DURING A CALL
The memory recall function also works when additional numbers are required during a call, such as a
numeric password. At the appropriate time during the call press the Memory/Redial Button
and the
assigned key to rapidly transmit the stored number.
THE REDIAL FUNCTION
Press the Talk Button
to get a dial tone.
To redial the last number dialed, press the Memory/Redial Button
, then press the Memory/Redial Button
again.
P A G E
B U T T O N
O N
T H E
B A S E
U N I T
If someone at the Base Unit needs to summon you, pressing the Page Button
on the Base Unit
momentarily causes the Remote Unit to emit two sets of beeps.
If you have misplaced the Remote, press the Page Button
on the Base Unit for 3 seconds and the Remote
will beep continuously. Press the Talk Button
on the Remote once you have located it to stop the beeps.
V I S U A L
REMOTE
Talk Indicator – Green LED
. Only on when the Talk Button on either the Remote
or the Base
is
activated. Flashes when the telephone rings.
Mute Indicator – Red LED
. On only when transmit audio is muted.
BASE
Power Indicator – Red LED
. On whenever power is applied to the base via the AC Power Adapter
.
Talk Indicator – Green LED
. Only on when the Talk Button on either the Remote
or the Base
is
activated. Flashes when the telephone rings.
Charge Indicator – Yellow LED
. Flashes for a short time while verifying contact when the Remote Unit is placed
in the Remote Unit Charging Well
. Remains steady while charging. Is off when the battery is fully charged.
A U D I O
REMOTE
Alert – Tone emitted by the Remote Unit when the telephone rings. Can be disabled by using the Ringer
ON/OFF Switch
on the Remote. (Note: Disabling the audible ringer does not disable the Page function or
the ringing heard through the headset.)
Low Battery – Two sets of beeps generated whenever the power is low. Heard only through the headset in
Talk mode.
Out-of-Range – Three sets of beeps generated whenever the Remote Unit is taken out-of-range of the Base
Unit. Heard only through the headset in Talk mode.
Linked – One beep heard through the headset whenever the Talk Button on either the Remote
or
Base is
activated.
I
C A N N O T
H E A R
A
D I A L
T O N E
1. Make sure that the Remote Battery Pack
is securely seated in the Remote Unit Charging Well
and/or fully charged. The Battery Pack must charge for about 8 hours.
2. Check that all cords are correctly connected and firmly in place. Pay special attention to ensure that the
telephone handset cord and the Short Cord
are properly connected.
3. Adjust the Listen Volume Control
.
4. Make sure that the Remote Unit is within range of the Base Unit.
5. Make sure that the telephone is connected properly to the Base Unit. See Figures 1 and 2.
6. If you are using a telephone with a separate headset port, make sure that the Handset/Ring Detector
Configuration Switch
is in position B (the ring detector position).
7. If you are using a telephone without a separate headset port, make sure that the Handset/Ring Detector
Configuration Switch
is in position A (the handset position).
8. Separate and reconnect the Battery Pack
and the Remote Unit.
9. Return the Remote Unit to the Remote Unit Charging Well
for 5 seconds to re-establish a
communication link.
R E M O T E
S T O P P E D
W O R K I N G
1. Separate and reconnect the Battery Pack
and the Remote Unit.
2. Remove and replace the AC power cord from the AC Adapter Jack
of the Base Unit.
3. Return the Remote Unit to the Remote Unit Charging Well
for 5 seconds to re-establish a
communication link.
C A L L E R
C A N N O T
H E A R
M Y
V O I C E
1. Make sure that the Mute/Pause Button
is off.
2. Make sure that your telephone is connected properly to the Base Unit. See Figures 1 and 2.
3. If you are using a telephone with a separate headset port, make sure that the Handset/Ring Detector
Configuration Switch
is in position B (the ring detector position).
4. If you are using a telephone without a separate headset port, make sure that the Handset/Ring Detector
Configuration Switch
is in position A (the handset position).
5. Adjust the Talk Volume Control
.
6. Adjust the headset so the voice boom is closer to your mouth.
M Y
R E M O T E
K E E P S
R I N G I N G
W H E N
I
A M
O N
T H E
S P E A K E R
P H O N E
1. Turn off the Ringer ON/OFF Switch
.
2. After completion of the call, remember to turn on the Ringer ON/OFF Switch
.
I
H E A R
A
B U Z Z
O R
H U M
1. Try locating your Base Unit in different positions and make sure no objects obstruct the Remote or
Base Unit.
2. Locate the Remote and Base Units away from electronic equipment or other radio-frequency devices.
I
C A N
H E A R
O T H E R
C O R D L E S S
D E V I C E
U S E R S
1. Press the Channel Button
until you get a clear signal.
2. Ensure Manual Channel Settings
are “0/0”.
3. If others are using a LKA10 or a LCA10 Amplifier in your immediate vicinity, call 1-800-544-4660
Monday through Friday, 8:00 a.m. to 5:00 p.m. Pacific Standard Time for instructions on adjusting the
channel control settings.
I
N E E D
M O R E
T A L K
T I M E
A second Battery Pack may be held in the Charging Well while the Remote Unit is in use. This provides an
immediate source of additional talk time. Extra packs are listed under Supplies and Accessories.
H E L P
D E S K
Dial 1-800-544-4660 Monday through Friday, 8:00 a.m. to 5:00 p.m. Pacific Standard Time.
Battery Pack
Extend talk time by having a second Battery charged and ready.
Lifter
Rings the Remote Unit for incoming calls and automatically places handset off-hook when you
press “TALK”. For use with phones which provide dial tone when Handset is lifted.
Neck Strap
Allows Remote to be worn around your neck.
Right Angle On Line Indicator [OLI]
Alerts co-workers that you are on the phone. Plugs into the Accessory/Lifter jack.
INFORMATION ON SUPPLIES AND ACCESSORIES: Call 1-800-544-4660 .
S U P P L I E S A N D A C C E S S O R I E S
T R O U B L E S H O O T I N G
13
14
15
16
17
18
21