background image

6

Before Using Your Gas Range

Remove the exterior and interior packing.

Remove the protective film on steel and aluminium parts

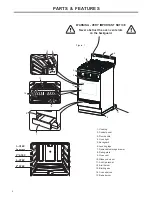
Check to be sure you have all of the parts listed below:


 !  

 "  #

Clean the interior surface with lukewarm water using a soft cloth. 

Have the installer show you the location of the ranges gas shut-off valve and how to shut 
it off if necessary.

Have your range installed and properly grounded by a qualified installer in accordance 
with the Installation Instructions.

Do not attempt to repair or replace any part of your range unless it is specifically 
recommended in this manual.

Be sure your range is correctly adjusted by a qualified service technician or installer for 
the type of gas (natural or LP) that is being used.

Do not remove permanently affixed labels, warnings, or plates from the product. This may 
void the warranty. 

The installer should leave these instructions with the consumer who should retain for local 
inspector’s use and for future reference. 

Please observe all local and national codes and ordinances.

BEFORE USING YOUR GAS RANGE 

  WARNING!!

HAVE THIS RANGE INSTALLED BY A QUALIFIED INSTALLER.

Improper installation, adjustment, alteration, services, or maintenance can cause injury 
or property damage.  Consult a qualified installer, service agency, or the gas supplier.

Important:

This appliance is designed and manufactured solely for the cooking of domestic (house-
hold) food and is not suitable for any non domestic application and therefore should not 
be used in a commercial environment.
The appliance guarantee will be void if the appliance is used within a non domestic envi-
ronment i.e. a semi commercial, commercial or communal environment.

It is advised to follow these instructions: 

Clean the interior of the oven with cloth soaked in water and detergent (neutral, 
then dry carefully.

Furnish the interior of the oven by assembling the wire racks and by insert shelves 
and tray (see chapter OVEN ACCESSORIES INSTALLATION AND REMOVAL on 
page 16).

Turn the oven on to the maximum temperature to eliminate possible traces of grease 
from the oven burner. The same operation should be followed for broil burner.

Read the instructions carefully before installing and using the appliance.

CAUTION: this appliance must only be installed in a permanently ventilated room in 
compliance with the applicable regulations.

Summary of Contents for DG 202 BS

Page 1: ...READ AND FOLLOW ALL SAFETY RULES AND OPERATING INSTRUCTIONS Avanti has a policy of continuous improvement on its products and reserves the right to change materials and specifications without notice...

Page 2: ...VER use this appliance as a space heater to heat or warm the room Doing so may result in carbon monoxide poisoning and overheating of the appliance WHAT TO DO IF YOU SMELL GAS Do not try to light any...

Page 3: ...ENTS Parts Features 4 5 Before Using Your Gas Range 6 Precautions And Recommendations 7 8 How To Use Top Burners 9 10 How To Use The Gas Oven 11 14 Care And Maintenance 15 17 Trouble Shooting Guide 18...

Page 4: ...ktop 2 Control panel 3 Door handle 4 Oven light 5 Backguard 6 Leveling legs 7 Removable storage drawer 8 Rating plate 9 Oven vent 10 Glass oven door 11 Anti tip bracket 12 Broil burner 13 Broiling pan...

Page 5: ...Auxiliary burner AUX 3500 BTU hr 2 Left semi rapid burner SR 6000 BTU hr 3 Right semi rapid burner SR 6000 BTU hr 4 Rapid burner R 10000 BTU hr Note The electric gas lighting device is incorporated i...

Page 6: ...WARNING HAVE THIS RANGE INSTALLED BY A QUALIFIED INSTALLER Improper installation adjustment alteration services or maintenance can cause injury or property damage Consult a qualified installer service...

Page 7: ...use ensure that the knobs are in OFF position Do not allow children or other unqualified people to use the appliance without your supervision During and after use of the range certain parts will beco...

Page 8: ...he range for service a rolling lift jack should be used Do not push against any of the edges of the range in an attempt to slide it into or out of the installation Pushing or pulling a range rather th...

Page 9: ...GAS BURNERS Gas flow to the burners is adjusted by turning the knobs which control the valves Turning the knob so that the indicator line points to the symbols printed on the panel achieves the follo...

Page 10: ...about a waste of gas fuel A small diameter pot or pan placed on a large burner does not necessarily mean that boiling conditions are reached quicker DIAMETERS OF PANS WHICH MAY BE USED ON THE TOP BURN...

Page 11: ...assured by a thermostatic probe positioned inside the oven The probe must be always kept in its housing in a clean condition as an incorrect position or encrustment may cause an alteration in the cont...

Page 12: ...e burner according to the power required If the flame extinguishes for any reason the safety valve will automatically shut off the gas supply to the burner To re light the burner first turn the oven c...

Page 13: ...atically shut off the gas supply to the burner To re light the burner first turn the oven control knob to position wait for at least 1 minute and then repeat the lighting procedure VERY IMPORTANT NOTE...

Page 14: ...lace the food to be cooked above the broiling pan Introduce the broiling pan in the oven fig 13 The broiling pan should be placed above the shelf and it should be centered with the broil burner fig 12...

Page 15: ...y will etch it making it opaque STAINLESS STEEL ELEMENTS Stainless steel parts must be rinsed with water and dried with a soft and clean cloth or with a chamois leather For difficult dirt use a specif...

Page 16: ...es with electric ignition check that the electrode S fig 18 is always clean to ensure trouble free sparking The ignition plug must be very carefully cleaned OVEN ACCESSORIES INSTALLATION AND REMOVAL A...

Page 17: ...oven cleaning it is possible to remove the door Please follow the instructions carefully Open the door completely Push down the lever L and keeping it in this position slowly close the door in order t...

Page 18: ...e oven light bulb Oven or broiler does not heat Range is not set for appropriate gas input See range conversion section of installation manual Temperature control not set properly Make sure temperatur...

Page 19: ...you Just call us toll free AVANTI PRODUCTS CUSTOMER SERVICES SERVICE Product Information 800 323 5029 Whatever your questions are about our products help is available Part Orders 800 220 5570 You may...

Page 20: ...ALL PARTS EXCEPT GLASS PARTS IN RENTAL OR COMMERCIAL USE THE WARRANTY PERIOD IS 90 DAYS REPLACEMENT PARTS AND REPAIR LABOR TO CORRECT DEFECTS IN MATERIALS OR WORKMANSHIP SERVICE MUST BE PROVIDED BY AN...

Reviews: