background image

Summary of Contents for A428062

Page 1: ...Snow blower 1150 1500 2019 2 Operator s Manual for Attachment Snow blower 1150 1500 Product number Snow Blower 1150 A434731 Snow Blower 1500 A428062 English A432274 2019 2 EN 2019 www avanttecno com ...

Page 2: ...Snow blower 1150 1500 2019 2 ...

Page 3: ...f the attachment to the loader 15 6 OPERATING THE ATTACHMENT 17 6 1 Checks before use 18 6 2 Use 19 6 3 Using the electric functions of the Snow Blower 20 6 3 1 Discharge chute rotation 21 6 3 2 Electric throwing height adjustment Optional extra 21 6 4 Scraper plate and skids 22 6 5 Removing a blockage 23 6 6 Transport position 24 6 7 Storing the attachment 24 7 MAINTENANCE AND SERVICE 26 7 1 Insp...

Page 4: ...quipment for other purposes or use in any other way than described in this manual is prohibited Keep this manual at hand throughout the service life of the equipment If you sell or transfer the equipment be sure to hand over this manual to the new owner If the manual is lost or damaged you can request a new one from your Avant dealer or from the manufacturer In addition to the safety instructions ...

Page 5: ...ention to instructions involving your personal safety or the safety of others When you see this symbol be alert your safety is involved carefully read the message that follows and inform other operators DANGER This signal word indicates a hazardous situation which if not avoided will cause death or serious injury WARNING This signal word indicates a potentially hazardous situation which if not avo...

Page 6: ...can perform regular maintenance tasks All repair work can t be performed by the operator and demanding repair and maintenance operations are to be left for professional maintenance All maintenance work must be done using proper safety equipment Spare parts must be identical with original specifications which can be ensured by using only original spare parts A separate spare parts catalogue may be ...

Page 7: ...k of impact from sudden stop Do not drive at high speed unless you can be sure that there are no obstacles at the working area The loader may stop suddenly if the snow blower hits an obstacle Remember that there may be hidden obstructions or fragile surfaces under the snow Always use seat belt and drive with caution Risk of thrown objects Keep a safety distance of at least 2 metres between a snow ...

Page 8: ... Do not modify the attachment in any way that could affect its safety Shut down the loader and place the attachment to a safe position as shown in Safe stopping procedure before any cleaning maintenance or adjustments Use the attachment only for its intended purpose Other use may create unnecessary safety risks and the equipment may get damaged Make sure that the loader is equipped with necessary ...

Page 9: ... attachment firmly on the ground before leaving the driver s seat Remember to wear proper personal protective equipment The noise level at the driver s seat may exceed 85 dB A depending on loader model and operating cycle Extended exposure to loud noise can cause hearing impairment Wear hearing protection while working with the loader Wear protective gloves Wear safety boots whenever working with ...

Page 10: ...ted below are the labels and markings on the attachment They must be visible and readable on the equipment Replace any unclear or missing label New labels are available via your retailer or contact information provided on the cover WARNING Make sure all warning decals are readable The warning labels contain important safety information and they help to identify and remember the hazards related to ...

Page 11: ...nt hazard keep clear of moving components Stop the machine before going near it 5 A434313 A426665 Attachment identification plate Table 4 Snow blower 1150 1500 Main components 1 Quick coupling plate with Avant quick coupling brackets 2 Discharge rotor 3 Feed auger 4 Standing supports Side skid 5 Gear rim for chute rotation 6 Throwing height adjustment manual version visible 7 Snow wall cutters 8 H...

Page 12: ...nt that has not been locked Avant quick coupling system Step 1 Lift the quick attach plate locking pins up and turn them backwards into the slot so that they are locked in the upper position If your loader is equipped with a hydraulic attachment locking system see additional instructions about the use of the locking system from the relevant manuals Ensure that the hydraulic hoses and the electric ...

Page 13: ...ol systems must be ensured in addition to mechanical compatibility of the attachment If you use the attachment with a loader that is not fit to be used with the attachment model you have risks include tipping over damage to attachment due to overload and risks related to uncontrolled motion of attachment and its parts If your loader is not listed in Table 1 on page ask your Avant dealer before usi...

Page 14: ...n the lever to disconnect the connector 3 After ending operation put the multiconnector on its holder on the attachment Disconnecting hydraulic hoses Before disconnecting the fittings lower the attachment to safe position on solid and level surface Turn the control lever of the auxiliary hydraulics to its neutral position When uncoupling the attachment always disconnect the hydraulic couplings bef...

Page 15: ...ttachment control switch pack There are three ways to connect the electric connector depending on the installed options of the loader 1 If your loader is not equipped with the attachment control switch pack Use the separate cable kit with a switch that is supplied with the attachment Connect this cable to the 12 V electric socket near the operator s seat of the loader and to the electric plug of t...

Page 16: ... control switch pack and the loader is manufactured in 2015 or before There is an electric socket near the multiconnector of the loader Connect the electric plug of the attachment to the socket of the loader The separate cable harness A34804 is not needed when the loader is equipped with the Attachment control switch pack Attachment control switch pack loader manufactured in 2015 or before Make su...

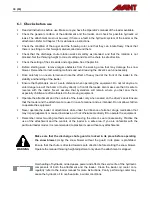
Page 17: ...lower may throw ice sand stones pieces of wood or other material up to even 30 metres away Stop the attachment immediately if other persons are closer than 2 metres from the snow blower at any direction Keep the chute directed to safe direction away from people and fragile surfaces WARNING Beware of entanglement and crushing hazards especially when removing blockages If a blockage is cleared witho...

Page 18: ...to reverse with the loader Never assume that bystanders will remain where you last saw them especially children are often attracted to the moving equipment Operate the attachment and the controls of the loader only when seated on the driver s seat Ensure that the loader and the attachment are used in a safe manner and as intended Do not allow children to operate the equipment Never operate the loa...

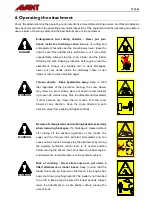
Page 19: ...ver s seat when using low engine rpm on the loader During operation use high engine rpm and slow drive speed adjusted according to operating conditions The snow blower requires high output of hydraulic oil Depending on the loader model typically the 2 pump setting of auxiliary hydraulics and high engine rpm should be used for most effective discharge of snow 3 Do not press the snow blower too hard...

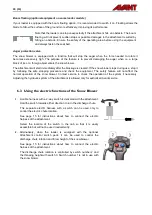
Page 20: ...ocedure and check the equipment The safety feature will not affect the normal operation of the snow blower Contact service to check the operation of the system if necessary Adjusting the hydraulic system of the attachment is allowed only for authorized Avant service 6 3 Using the electric functions of the Snow Blower 1 A cable harness with a 2 way switch is delivered with the attachment Hold the s...

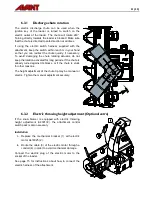
Page 21: ...ctivated for long periods if the chute is already turned against its blocks or if the chute is stuck for other reasons The height adjustment of the chute tip may be manual or electric Tighten the manual adjustment securely 6 3 2 Electric throwing height adjustment Optional extra If the snow blower is equipped with electric throwing height adjustment A430172 the attachment control switch pack is al...

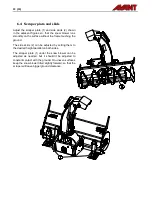
Page 22: ...e frame touching the ground The side skids 2 can be adjusted by setting them to the desired height parallel on both sides The scraper plate 1 under the snow blower can be adjusted as needed but it shouldn t be adjusted to constant contact with the ground On uneven surfaces keep the snow blower tilted slightly forward so that the scraper will leave bigger ground clearance ...

Page 23: ...glement and cutting hazards Never put your hands inside the discharge chute Beware of cutting and entanglement hazards near the snow blower never leave the driver s seat if the attachment is switched on or if it can start unexpectedly Always stop the snow blower and the loader following the safe stopping procedure before going near the attachment Always use suitable tool to clear blockages never p...

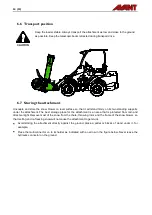
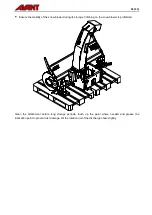
Page 24: ...er the attachment The best storage place for the attachment is an area that is protected from rain and direct sunlight Remove most of the snow from the chute throwing rotor and the frame of the snow blower so that melting and re freezing snow will not cause the attachment to get stuck Avoid storing the attachment directly against the ground place a pallet or blocks of wood under it for example Pla...

Page 25: ...uring its storage Climbing on the snow blower is prohibited Clean the attachment before long storage periods touch up the paint where needed and grease the lubrication point to prevent rust damage Oil the rotation rim of the discharge chute slightly ...

Page 26: ...id is also harmful to the environment and any leak to the environment must be prevented Repair all leaks immediately after detecting them a small leak can quickly grow into a big one Operate the attachment only with type of hydraulic oil that is accepted for use in Avant loaders DANGER Risk of high pressure fluid injection through skin Release residual pressure before maintenance Never handle hydr...

Page 27: ...ust be inspected regularly Check visually for damages and inspect the quick attach brackets and their surrounding area carefully The attachment must not be used if it is deformed cracked or torn Welding repairs are only allowed to be carried out by professional welders When welding only methods and additives suited for steel used in attachment must be used For more information about repairs contac...

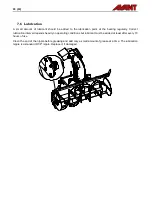
Page 28: ... regularly Correct lubrication interval depends heavily on operating conditions but lubricant must be added at least after every 10 hours of use Clean the end of the nipple before greasing and add only a small amount of grease at a time The lubrication nipple is a standard R1 8 nipple Replace it if damaged ...

Page 29: ...y reimburse the price of components purchased by the customer in special cases that have been agreed in advance The warranty does not cover Normal maintenance work or parts and consumables required for it Damages caused by unusual operating conditions or ways of use negligence structural changes made without the consent of Avant Tecno Oy use of non original parts or lack of maintenance Consequence...

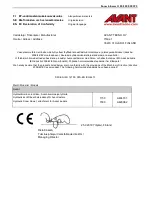
Page 30: ...att nedan beskrivna produkter överensstämmer med hälso och säkerhetskrav i EG maskindirektiv EG direktiv 2006 42 EG som ändrat Följande harmoniserade standarder har tillämpats We hereby declare that the products listed below are in conformity with the provisions of the Machinery Directive directive 2006 42 EC as amended The following harmonized standards have been applied SFS EN ISO 12100 SFS EN I...

Page 31: ......

Page 32: ......

Reviews: