Avalue Technology EPC-BYT2 Quick Installation Manual Download Page 9

Quick  Installation  Guide 

Facial  Recognition  Quick  Installation  Guide    9 


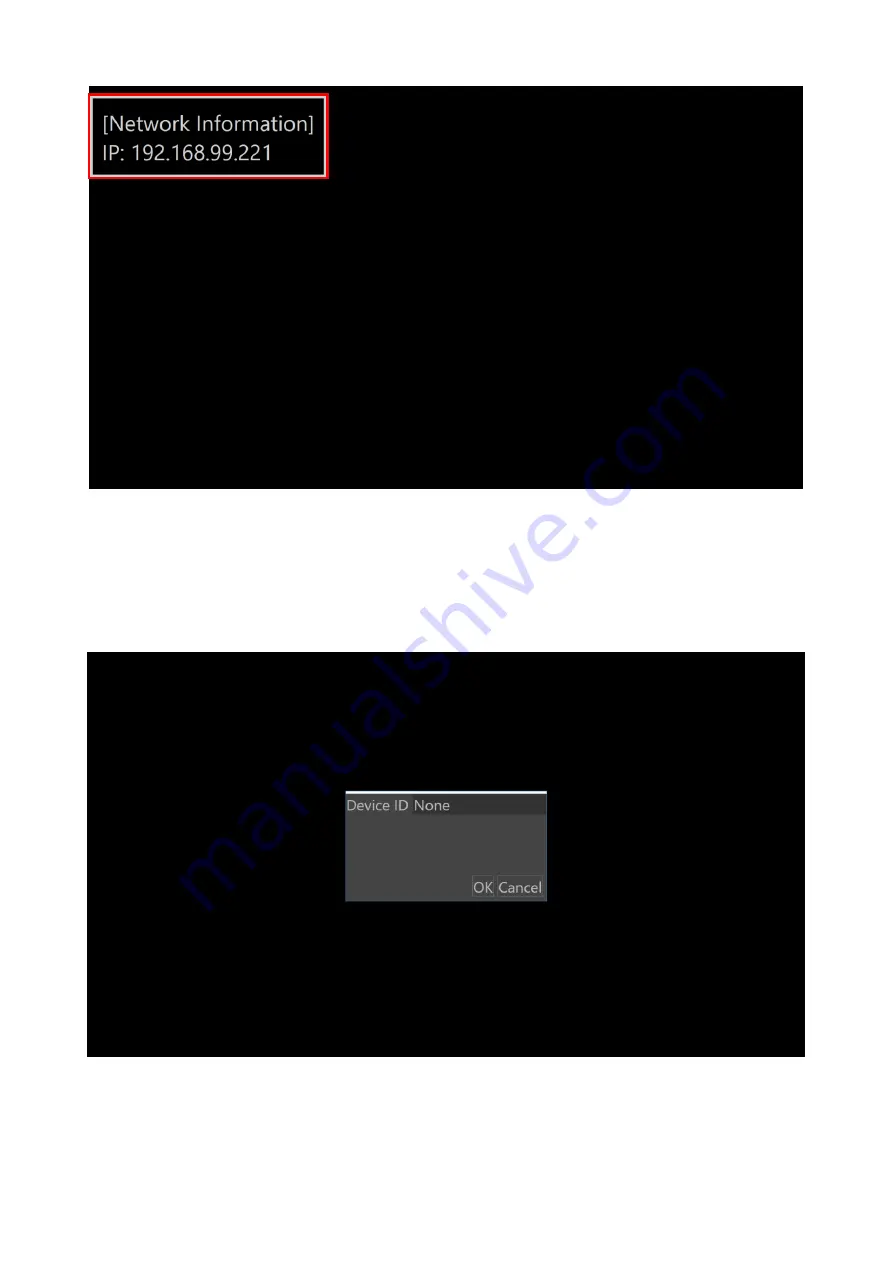
Step2. Please configure the Device ID   

As follow description is only suitable for distributors. Otherwise, if end customers change 

their Device ID and ask us where their data is

, we can’t help them. 

So before shipping, distributors should help customers to set their Device ID on the target 

device. 

When distributors turn the target device on, it will display screen as follow. 


No matter target device has played content whether not, distributors can press F2 key to 

set Device ID as follow. 

CAUTION

. Device ID should be the same with Renity SRS Device ID, then end customers 

can see all of their data in the Business Intelligence and data is related. 

Summary of Contents for EPC-BYT2

Page 1: ...Facial Recognition Quick Installation Guide 1st Ed 30 July 2018 Copyright Notice Copyright 2018 Avalue Technology Inc ALL RIGHTS RESERVED...

Page 2: ...RECT THE INTERFERENCE AT HIS OWN EXPENSE A Message to the Customer Avalue Customer Services Each and every Avalue s product is built to the most exacting specifications to ensure reliable performance...

Page 3: ...cking List 4 1 3 EPC BYT2 System Overview 5 1 3 1 Front View 5 1 3 2 Rear View 5 1 4 EPC BYT2 System Dimensions 6 1 4 1 Front Top View 6 2 Renity Signs Setting 7 2 1 Prerequisites Setting 8 2 2 Renity...

Page 4: ...urges Only experienced electronics personnel should open the PC chassis Caution Always ground yourself to remove any static charge before touching the CPU card Modern electronic devices are very sensi...

Page 5: ...tton 1 3 2 Rear View Connectors Label Function Note COM1 Serial port 1 connector D sub 9 pin male HDD HDD indicator LAN1 2 RJ 45 Ethernet 1 2 with L LED for ACT LINK and R LED for speed PWR System pow...

Page 6: ...Facial Recognition 6 Facial Recognition Quick Installation Guide 1 4 EPC BYT2 System Dimensions 1 4 1 Front Top View Unit mm...

Page 7: ...Quick Installation Guide Facial Recognition Quick Installation Guide 7 2 Renity Signs Setting...

Page 8: ...Facial Recognition 8 Facial Recognition Quick Installation Guide 2 1 Prerequisites Setting Step1 Connect the power HDMI recommended or VGA and LAN cables of the signage box...

Page 9: ...help them So before shipping distributors should help customers to set their Device ID on the target device When distributors turn the target device on it will display screen as follow No matter targe...

Page 10: ...n Quick Installation Guide When distributors have entered Device ID they can click OK button to finish setting Step3 Please note the IP address of the device When you turn device on IP address will be...

Page 11: ...Quick Installation Guide Facial Recognition Quick Installation Guide 11 Step4 Now we can continue to configure playlist for Facial Recognition...

Page 12: ...in the same networking Use a browser to connect to CMS The URL should be https Device IP Address When you connect to the device via browser it will show a warning message Because it is a protected SSL...

Page 13: ...uick Installation Guide Facial Recognition Quick Installation Guide 13 Step2 Log into CMS Type in Default Username Password as below and click on Login Username admin Password P ssw0rd Default Passwor...

Page 14: ...Facial Recognition 14 Facial Recognition Quick Installation Guide Step3 Create the Playlists for different gender Click on Playlists on the sidebar Step4 Click on Add Playlist button to add content...

Page 15: ...oad button to upload your playlist to CMS All palyable contents have to be edited by Renity Content Editor and saved as rspkg file For further information please refer to Renity Signs User s Manual Yo...

Page 16: ...Quick Installation Guide Step7 Set display conditions for different gender Click on Display Conditions of sidebar Step8 Click on Add Condition button Step9 Input all necessary information then click S...

Page 17: ...k Installation Guide 17 Step10 Repeat above steps to create all conditions Step11 Create player schedule for different gender Click on Player Scheduler of sidebar Step12 Click on Add Event button to c...

Page 18: ...Step13 Click on Add Event to create another event Input all necessary information then click on Save button to create an event Step14 Repeat above steps to create all events you would like to show St...

Page 19: ...fferent content playlist By the way in our case the default content is Renity Signs Intro you can replace it to create your default content The end when no one closes to the digital signboard it will...

Page 20: ...allation Guide 2 3 Renity Signs SRS Account Setting To look into the BI report of Smart Shelf you need to setup user account End customer for this solution Please follow the below stpes Step1 Login SR...

Page 21: ...Quick Installation Guide Facial Recognition Quick Installation Guide 21 Step2 Add Customer Company...

Page 22: ...Facial Recognition 22 Facial Recognition Quick Installation Guide Step3 Add Customer Company Service...

Page 23: ...Quick Installation Guide Facial Recognition Quick Installation Guide 23 Step4 Add Customer Store...

Page 24: ...Facial Recognition 24 Facial Recognition Quick Installation Guide Step5 Add Contract...

Page 25: ...Quick Installation Guide Facial Recognition Quick Installation Guide 25 Step6 Add Customer Device...

Page 26: ...Facial Recognition 26 Facial Recognition Quick Installation Guide Step7 Add Customer User...

Page 27: ...Quick Installation Guide Facial Recognition Quick Installation Guide 27 Step8 Add Customer User Role...

Page 28: ...Facial Recognition 28 Facial Recognition Quick Installation Guide Step9 Step8 Add Customer User Store...

Page 29: ...Quick Installation Guide Facial Recognition Quick Installation Guide 29 2 4 Renity Signs People Counting Report Step1 Login...

Page 30: ...Facial Recognition 30 Facial Recognition Quick Installation Guide Step2 People Counting Report...

Reviews: